Figured I'd drop my story here, too. After 3 years and about 95 hrs on the clock mowing less than 1/2 acre, the original batteries needed to be replaced. All this year it was taking 2 charges to finish the lawn. Then a couple weeks ago I couldn't even get it to run 10 minutes. Drive motor would drop out after only a few minutes of running on a full charge. "5 beeps". I went through diagnostics with a Ryobi tech to make sure there wasn't some other problem (motor drive circuit, etc) and based on the significant voltage drop when running he recommended battery replacement.
While I was waiting on replacements, I added a push button for the original volt meter to allow monitoring the voltage more closely. It tracked pretty well with my fluke on the charge port. Why was this not standard?
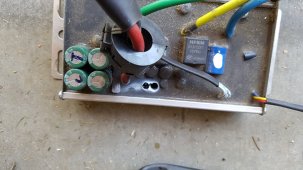
I wanted to go with a 48V DIY LiFePO4 pack, but needed to get it back up and running so I went with 4 drop in 12V 75ah LiFePO4 that I bought off ebay. I was a little nervous to "reduce" to 50ah but then found
these 75ah that are rated for series installation for close to what the OEM replacements were going to run and I received all four in a week. I charged them individually to the same voltage (within 0.005v) with my Noco charger and dropped them into the battery tray just like the originals. I wired them up with the original wiring and also included individual leads to allow independent charging (the manufacturer recommends every 4th cycle). After a full double mow due to the excessive height from the missed week, the voltage is still above nominal.
Next step is to install Qwork current monitor to keep a better eye on the depth of discharge and to watch during the initial charges until I am comfortable with it.
Need to do a little more research to decide how to approach charging since I plan to charge only before use instead of always charging as with the original batteries.
I was considering hacking these open over the off season and dropping on a 48v BMS onto the 16 cells just to make it even easier to manage, but that will likely be pretty far down the list. The performance seems so much better than that I probably won't get around to it for a few years.
If there are any questions, let me know.
I appreciate all of the great content here. It was the best research I could find as I was contemplating the best approach to solving Ryobi's engineering failure.


") Where did you get your 200 ohm 50W resistor (amazon)? I know what a single pole switch is thankfully
Where did you get your 200 ohm 50W resistor (amazon)? I know what a single pole switch is thankfully