diy solar

diy solar

Sixtysix 280ah Cells from Deligreen

I don't know yet. I will know when I reassemble my cells. Keep in mind I had no threads left. So I wouldn't expect it to be as strong as using Loctite in a cell with non stripped threads.

3nm and I stopped. When I reassemble my cells I will try for 4nm and stop there. Your chances for success are better since you have a few threads left.

What I meant by that statement is it is a personal decision whether or not to use it on non stripped screws and I should have made that clear.

For partially or fully stripped studs I do recommend it. There may be better products for this but I was in a hurry and did not research everything that's out there. Like you, I watched the YouTube videos comparing different products and decided if the standard JB Weld doesn't work, then it's likely nothing else will.


Yes but don't overdo it either. In my case some did continue to ooze up over a short period of time...maybe 15 minutes at most. I lightly cleaned the cell's terminal with acetone to make sure there wasn't any residual left and I waited a bit to allow the JB Weld to start curing. I didn't want any acetone going down into the hole and I didn't want to disturb the stud for the remainder of the cure.

I broke off the head of a Q-tip and used the stick to apply the JB Weld to the inner part of the cell's hole where the threads were. Naturally some flowed to the bottom of the hole. I saved the mixed batch and occasionally checked it to take notice of the curing process. It did take a good long while before the JB Weld was fully cured in my mixed batch, at least the full 24 hours.

Ultimately the best thing to do is to tap the hole. But by the time one buys everything needed to properly tap the terminal, one is approaching the price of a new cell. And since I only have one stripped cell, I thought I would try this first.

I am fully aware this subject is debatable and it is an excellent debate. I am sharing my recommendations based on my own experience and the posts of others. I always look forward to other's experiences concerning the topics I am interested in, and this is one of those topics. That's my disclaimer...lol.
Truly appreciate all of this insight and advice. We are starting to pollute ArthurEld’s thread so it would be fantastic if you could post some of this detail on the thread I started entitled JB Weld vs Loctite for Grubscrews: https://diysolarforum.com/threads/jb-weld-versus-loctite-for-grubscrews.17440/

There is a member who just posted on that thread his plan to literally drill a vent hole through the entire length of his studs because he believes that is the only way he will be able to thread his studs down to the bottom (he does not believe JB Weld will ooze through non-stripped threads).

Would love to understand your opinion on that (in the other thread).

For me, I’ve decided I should heed my own advice and use JB Weld to secure an M6 bolt into an aluminum M6 tapped hold before I try JB Weld on my damaged cell.

Was your terminal so stripped that it was like a drilled hole (smooth sidewalls)? And it was stripped all the way to the bottom (literally no thread left)?
 
I'm sure that stuff is great but electrical tape works good too.
I took my time and got my tools insulated with electrical tape.

There was one time when I accidently whacked another terminal with my ratchet and it went through the tape and made a spark.
But it was nothing like the welding experience I had with no tape.
 
Here it is on Amazon but available in many big box stores:


Haven’t dropped by this thread in a while.

Looking good @ArthurEld !

Gets thin covering corners.

As a kid I tried to make diode light dimmers, using this stuff to cover discs of copper-clad PCB punched out as a circle with Rotex punch, and dipped to insulate the edge. (no patterning of PCB). Dropped into a light socket, it shorted through and burned back a little. I switched to heatshrink which was sufficiently robust.
 
I am trying to figure out how to cover the dials on my torque wrench. I put scotch tape on them but I can't see well.
I do so much torqueing that I will should buy something better than my HF $9.99 special.

Buy the way, I torqued all of terminal nuts to 45 in lbs on studs I recently put loctite on.
 
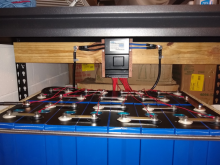
I've been trying to clean things up. I got rid of the unnecessary busbar and shunt that I had attached to the BMS.
Eventually I will use terminal studs that are screwed down instead of bolts and nuts to hold the large BMS wires.
Then I won't need the cable tiedowns.

It's still a work in progress. The height of wood the BMS is attached to is adjustable.
So I could move the BMS down behind the battery and out of sight.
1612872932795.png
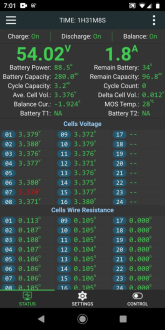
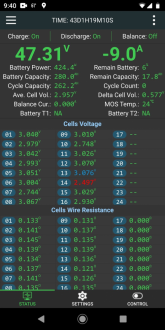
My wire resistance values have improved. Either I am getting better at crimping or all of my busbar connections are better.
I will have to dive into that issue with my other BMS
Cell 5 is the high cell and the voltage display happened to blink off when I made the screenshot.
1612873175686.png
 
Cell 5 is the high cell
Is that the new location of the cell that was in position 14 earlier (and misbehaving)?

If you did rearrange your cells, did any of the individual cell characteristics change?
I would have no reason to expect them to change significantly but it was an experiment afterall.
 
Is that the new location of the cell that was in position 14 earlier (and misbehaving)?

If you did rearrange your cells, did any of the individual cell characteristics change?
I would have no reason to expect them to change significantly but it was an experiment afterall.
This is a different set of cells. I'll get back to that other one.
 
I've been trying to clean things up. I got rid of the unnecessary busbar and shunt that I had attached to the BMS.
Eventually I will use terminal studs that are screwed down instead of bolts and nuts to hold the large BMS wires.
Then I won't need the cable tiedowns.

It's still a work in progress. The height of wood the BMS is attached to is adjustable.
So I could move the BMS down behind the battery and out of sight.
View attachment 36494
My wire resistance values have improved. Either I am getting better at crimping or all of my busbar connections are better.
I will have to dive into that issue with my other BMS
Cell 5 is the high cell and the voltage display happened to blink off when I made the screenshot.
View attachment 36495
Any way you can quantify how much your wire resistance improved by? Do you have a before and after?
 
Any way you can quantify how much your wire resistance improved by? Do you have a before and after?
It is two different batteries. I need to work on the one that appears worse and see if I can figure out what is going on.

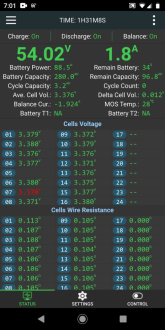
This is the latest one that has a new wire harness, new BMS and newly sanded terminals and busbars.
I haven't tried to improve this one yet.
1612921918618.png

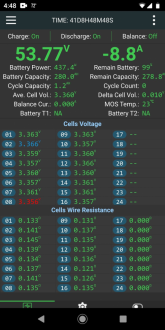
Here's the other battery. I will start trying things to see if it improves. Lake cleaning the terminals and busbars.
Replace the wire harness. That should narrow it down.
Cell 14 is the lowest capacity cell in this battery and it also happens to have the lowest wire resistance value.
1612922262686.png
 

Attachments

  • 1612921855784.png
    1612921855784.png
    638.6 KB · Views: 3
Last edited:
It is two different batteries. I need to work on the one that appears worse and see if I can figure out what is going on.

This is the latest one that has a new wire harness, new BMS and newly sanded terminals and busbars.
I haven't tried to improve this one yet.
View attachment 36609

Here's the other battery. I will start trying things to see if it improves. Lake cleaning the terminals and busbars.
Replace the wire harness. That should narrow it down.
Cell 14 is the lowest capacity cell in this battery and it also happens to have the lowest wire resistance value.
View attachment 36610
It’ll be interesting to see your before and after once you have had a chance to improve the older battery.

Do you know what technique your BMS used to measure ‘cell wire resistance’?
 
I am trying to figure out how to cover the dials on my torque wrench. I put scotch tape on them but I can't see well.
I do so much torqueing that I will should buy something better than my HF $9.99 special.

Buy the way, I torqued all of terminal nuts to 45 in lbs on studs I recently put loctite on.

When you torqued to 45 inch-lbs, did you bother using an Allen-Head wrench to secure the grubscrew or did you just ‘go naked’ and count on the Loctite to keep the grubscrew from turning any further?

Your results prove the soft aluminum threads in these terminals can withstand at least 45 inch-lbs of shear if no turning of SS threads against the soft aluminum threads.

I’m gearing up to test my first JB Welded stud and since JB Weld should be at least as strong as Loctite, I’m tempted to go for it and try 45 inch-lbs as well...

I haven’t yet JB Welded a grubscrew into my one partially-stripped thread but am gaining enough confidence to tackle that soon. I’ll probably only stress that one thread to 35 inch-lbs since that will be my weakest grubscrew and it’s not sounding like there is much benefit to pushing beyond 35 inch-lbs...
 
seems funny there are no pictures from those chiming in. I am going with a thread locker from Permatex. Threadlocker RED High Strength. says heavy duty/vibration safe. stationary build so no vibration but the real issue will be the cells expanding and contracting on charge discharging. I really like your input and reporting. mine are Lishen 272Ah cells in 2P8S 24volt configuration, but essentially identical potential issues as the eve cells. (64 272ah Lishen cells).
I am using 20mm long studs with the 3mm hex key centers they are 6mm diameter as that is the puny size the Lishen and Eve prismatic aluminum cased cells arrive with.
still think they will be the best battery cell for the money at this time.
keep up the good work. ?
 
When you torqued to 45 inch-lbs, did you bother using an Allen-Head wrench to secure the grubscrew or did you just ‘go naked’ and count on the Loctite to keep the grubscrew from turning any further?
No allen wrench. I assume I would feel it if the nut was trying to turn the stud.
Your results prove the soft aluminum threads in these terminals can withstand at least 45 inch-lbs of shear if no turning of SS threads against the soft aluminum threads.
With thread locker they withstand 45 in lbs. I tore the treads out of one terminal using only 40 in lbs before I started using loctite.
I’m gearing up to test my first JB Welded stud and since JB Weld should be at least as strong as Loctite, I’m tempted to go for it and try 45 inch-lbs as well...

I haven’t yet JB Welded a grubscrew into my one partially-stripped thread but am gaining enough confidence to tackle that soon. I’ll probably only stress that one thread to 35 inch-lbs since that will be my weakest grubscrew and it’s not sounding like there is much benefit to pushing beyond 35 inch-lbs...
I think your stud will hold. Especially since you have some thread.
 
No allen wrench. I assume I would feel it if the nut was trying to turn the stud.

Cool - so Loctite Red (and also hopefully JB Weld secured the grubscrew well-enough you don’t need to worry about it turning further and piercing the terminal bottim
With thread locker they withstand 45 in lbs. I tore the treads out of one terminal using only 40 in lbs before I started using loctite.
Yeah, and I partially-stripped the engaged top-three threads out of one of mine at a little over 30-inch-lbs. I think the rotation of (relatively) hard stainless threads against soft aluminum threads has a lot to go with what causes those aluminum threads to sheet-off/tear out...
I think your stud will hold. Especially since you have some thread.
I’m sure hoping so...
 
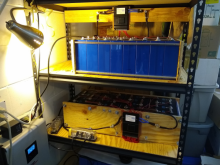
I finally got two batteries up and running parallel.
They are connected to a MRBF fuses until I finish setting up 100A class T fuses for each pack.

I moved one BMS to the front but got the balance leads out of the way pretty good.

My solar panels and Solark are supposed to arrive today so I will be concentrating on those for a while.

But I'll have little tests going with the batteries all the time. Each test takes so long.
But it is kind of amusing having some test going at all times.
I get to learn about batteries operating parallel. And I'll be keeping my active balancers busy.

1613408805208.png
 
I decided to reconfigure my cells into one row of 16 cells. I think that configuration is safer and it will be easier for me to make a cover that is hinged so I can just swing it open.
That means I have to buy longer shelves. The ones I have now are crap anyway.
I plan to buy super heavy duty shelves probably with three 60" X 24" selves. And I'll put 2 batteries on each of the top 2 shelves.
That should be easier to work on than using 4 shelves.

I'm also leaving town for a couple months so I am removing all of my busbars until I come back.
This has been a slow process but also an enjoyable way to pass the time. I'll be anxious to get back on it.
 
Last edited:
Back
Top