diy solar

diy solar

SOK won’t fit, now what??

carguy4471

New Member
Joined
Jul 3, 2021
Messages
32
Well, I was all set on a 100ah SOK but home to find out they don’t fit in a standard battery box on an RV.

So, sticking in the budget realm, what brands would everyone here recommend? Amperetime seems ok, sans low temp protection, I think I’m ok with that. Are they other brands I should look at that will fit in my battery box?

Thanks all!!
 
Why bother with the battery box? It already in its own metal box. I removed the box and put down a sheet of aluminum over the hole that it left and secured that to the bottom of the compartment using rivets (you could use screws). I then used two battery straps and secured those to the aluminum. You can use L brackets or even garage door sway bracing to prevent the battery from shifting. A box will do nothing for you and actually will expose the battery to colder elements since it hangs below the floor of the storage compartment.
I love the added Ah of the SOK and wouldn’t compromise getting a smaller capacity battery just because it conveniently fits in a standard battery box.
Next, I would highly recommend the Victron smart shunt so you can monitor your battery even while driving using Bluetooth. On a trip from Wisconsin to Washington I was able to tell that my propane was out by checking to see if my refrigerator was still running. Saved me from some spoiled food since it was 99° out.
 
My batter is exposed on the tongue of my pop up camper. It sits in a plastic battery box. They are standard sizes, one size for group 24 and one for 27-32, if memory serves. They are too small from front to back to fit an SOK.
Any other solution aside from replacing that box with something off the shelf will be a good deal of work.
 
  • Like
Reactions: Mia
Any other solution aside from replacing that box with something off the shelf will be a good deal of work.
What size is your battery? There are a lot of different tool boxes, pelican cases and the likes which are available at Harbor Freight, Lowes and Home Depot.
 
Re-wire your RV’s battery and put it in a storage compartment or under a bed/couch and get it out of the elements. The ONLY reason to have a battery on the tongue in the first place was because of the gassing that occurs with Lead Acid.
Re-wiring will be a simple project and is the only solution I would consider. Ok, maybe a lockable strong box would work but I still don’t like the idea of the battery sitting directly in the sun.
 
Last edited:
Re-wire your RV’s battery and put it in a storage compartment or under a bed/couch and get it out of the elements. The ONLY reason to have a battery on the tongue in the first place was because of the gassing that occurs with Lead Acid.
Re-wiring will be a simple project and is the only solution I would consider. Ok, maybe a lockable strong box would work but I still don’t like the idea of the battery sitting directly in the sun.

This isn't a bad idea at all!! I don't know why this didn't occur to me. IF there were only the two battery wires running up front it would be pretty easy. There are power and ground distribution points under the frame that I'd have to sort out. I don't have room behind the fuse panel as the water tank and shore power cord are in there, but under the other dinette is wide open. I may be just be able to grab the leads of that distribution point and get them up into the dinette.

That would also simplify doing a battery monitor. I think I'd just need to order new anderson connectors so I don't have to drill a hold to fit an sb50 through it, lol.

This may be going down! I really appreciate the input.
 
Re-wire your RV’s battery and put it in a storage compartment or under a bed/couch and get it out of the elements. The ONLY reason to have a battery on the tongue in the first place was because of the gassing that occurs with Lead Acid.
Re-wiring will be a simple project and is the only solution I would consider. Ok, maybe a lockable strong box would work but I still don’t like the idea of the battery sitting directly in the sun.

Only downside I can think of and it's kind of a bummer, no easy way to disconnect battery. At present I just have an sb50 connecter at the battery box I unplug. If the battery is under the dinette I don't have a quick easy way to disconnect. I could maybe do a battery switch on the frame on the wire running to the battery but meh....

Aside from that I'm in love with the idea. If you have some thoughts on battery disconnect that'd be great!!
 
Wound up ordering a battery disconnect switch that'll get installed on the side of the dinette. It'll be easy enough to reach in the side door and shut it off.

I got a Tess Electric battery yesterday and relocated the wiring to underneath the dinette. Worked like a peach and now I have an easy place to wire up a battery monitor.

The monitor and disconnect switch should be here tomorrow so if all goes well it'll be dialed in.
Awesome!, well worth your time and effort and you will be much happier knowing what’s going on with your battery. Too much of an investment to just assume that things will be OK with it the that it was. Not exactly “plug and play” but more like play and plug.
 
Why not share some photos of the adventure.

The summary:
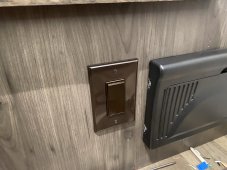
-Added switch next to breaker panel (to turn off outlet that runs new lithium charger)
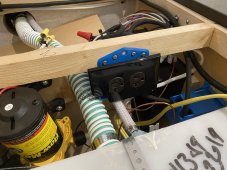
-Added said outlet under dinette side #1
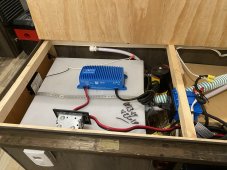
-Added victron ip67 under dinette side #1 plugged into outlet and then tied the output into the converter/charger battery output lines
-Routed battery cable from the tongue of trailer to dinette side #2
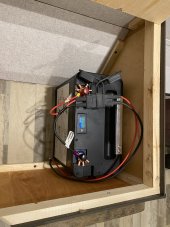
-Installed 100ah lifepo4 battery

Remaining (parts arriving tomorrow):
-install battery monitor in dinette side #2
-Install battery shut off switch in dinette side #2

Photos:

IMG_1518.jpegIMG_1519.jpegIMG_1522.jpegIMG_1521.jpeg
 
Why not share some photos of the adventure.

The summary:
-Added switch next to breaker panel (to turn off outlet that runs new lithium charger)
-Added said outlet under dinette side #1
-Added victron ip67 under dinette side #1 plugged into outlet and then tied the output into the converter/charger battery output lines
-Routed battery cable from the tongue of trailer to dinette side #2
-Installed 100ah lifepo4 battery

Remaining (parts arriving tomorrow):l
-install battery monitor in dinette side #2
-Install battery shut off switch in dinette side #2

Photos:

View attachment 56669View attachment 56670View attachment 56672View attachment 56671
@carguy4471,
Have you used the Tess electric batteries In your camper yet? How do you like them? Why did you choose Tess Electric over say HQST or some other similar price range LFP batteries?
 
Last edited:
I see five possible connectors on the battery. Five connections on a terminal post is not good practice.

If you need that many connections it’s time for a busbar, one example here :

 
Last edited:
Back
Top