diy solar

diy solar

(SOLVED) Solving the climate control crises

It's 24.4 SEER. I messaged that guy when he first put out that video and he couldn't or wouldn't give me any specifics regard power usage. Nor does he in the video.


Mitsubishi makes a 6000 BTU 33.1 SEER.
Model: MSZ-FS06NA MUZ-FS06NA


Never seen anyone with a Frankencooler that worked well. Seems like a waste of time.


Swamp (evaporative) coolers can work but only where there is low humidity.


The way they work is actually pretty simplistic and you could build one yourself. The only thing I'm not sure about is how much water they require to run. Obviously, the smaller your rig is, the smaller the unit needs to be and the less water would be required.

I would most likely do something along the lines of the below but use a fan-tastic vent endless breeze 12v fan instead of computer fans.


Here is a video of someone that built one similar.


Here is a video that is interesting. They built a cooler using the fan I mentioned that fits in their van window.


I have a Frigidaire FFRE0533S1 5000 BTU window unit. It has the lowest power consumption of any I could find. It has since been discontinued but there is a replacement (Model: FFRE053WAE) that has the exact same specs.
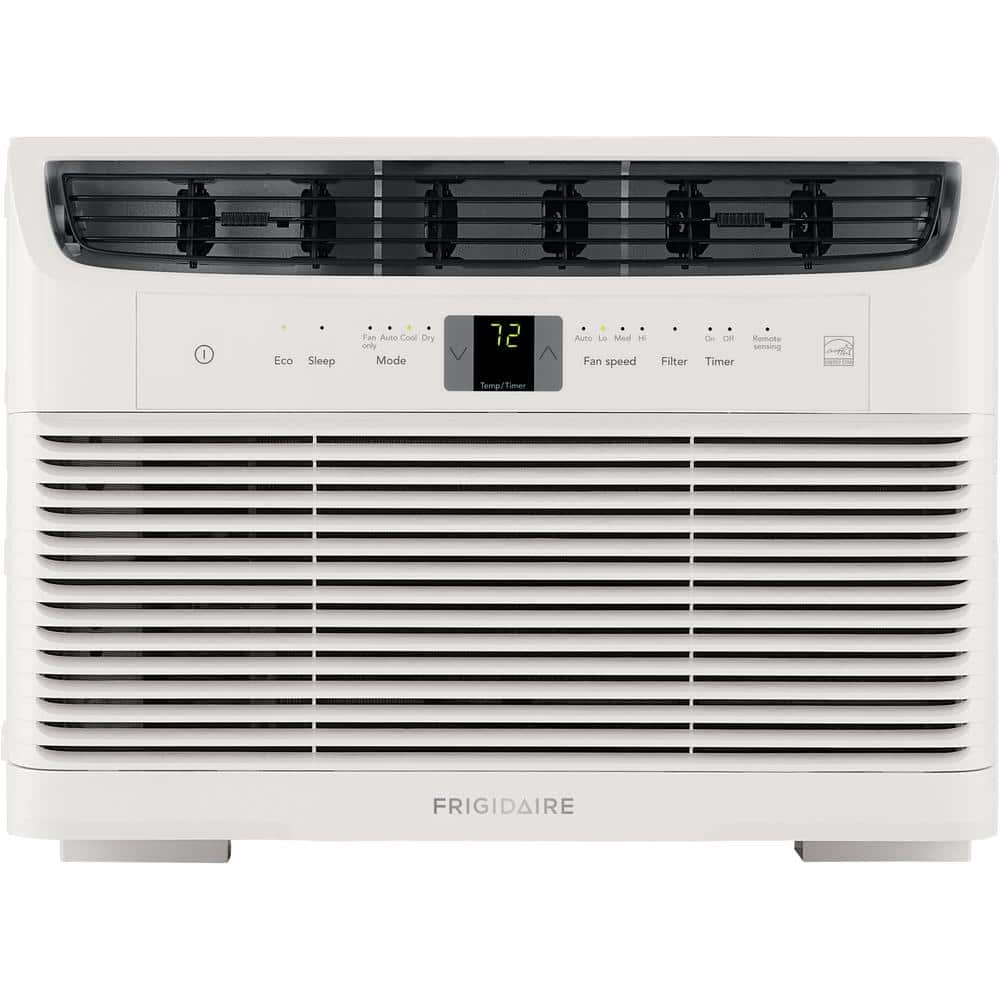


When I first got it (3 years ago), I never saw it go above 410 watts. Maybe I didn't test it enough. I started testing it again since it's getting hot and I've noticed it's 410 watts @ 90F. As I write this it's only 83F and it's pulling 386 watts. At 94F it pulled 416 watts.

When in cool mode and the compressor isn't running the fan runs and uses about 65 watts. In eco mode, it doesn't run the fan except for 20 seconds every 10 minutes.

How well your rig is insulated is really going to matter and is key. So that it holds the cold air well / the times when the compressor doesn't run are longer. You want to insulate the floor. Hot air rises and cold air falls. I would also create some form of a partition to separate the cab from the rest of your rig. If you have windows in the rear, I would make insulated covers.

It has a low voltage start-up and you can easily run it with a 1000 watt peak / 800 watt continuous generator. However, I would get a generator that could power the AC with the generator in ECO mode (1600w continuous or so). It should give you a longer runtime (use less fuel) and likely last longer.

I've always run it off of a generator but building out a solar system for it now.

I will say that it's certainly possible that a mini-split AC could be more efficient. But I think it may depend on the size of your rig. I just don't know enough about them and can't find any info that I need to know in order to make a decision. Also, a good one with a high SEER / EER rating is upwards of $1500. Which I really don't want to spend to test how it will perform against my window unit.


When it's under 80F a decent fan(s) could work.

My favorite fans are the 02cool smart power and fan-tastic vent endless breeze. I have two of each.

The endless breeze can move more air but uses more power to do it and it's louder. It's basically a portable roof vent fan as it moves 900 CFM of air at the highest speed setting. The roof fans move 900-950 depending on the model.

High on the 02cool moves about the same amount of air or close to it, as the endless breeze on low.

Here is a YT video that compares them.


Another fan that might be a replacement for the Endless Breeze is the Boundless Breeze. It's only $40, where the cheapest I see the Endless Breeze for these days is $95 plus tax/shipping. I will likely buy one to test it out and see how it compares to the endless breeze.

The guy in the video uses one that is 24 SEER the one I would get for a van rig is the Blueridge however, 38 SEER.


I've convinced my Dad to order this one for his car shed I will make a video talking about it one day soon!

Love all the input guys I can't wait to try out my build! Also last night i had an epiphany of sorts but after some consideration I think I would run into a few snags.

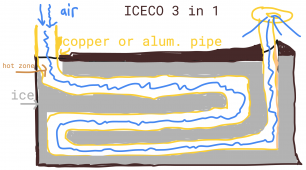
Basically the idea is to run a 12v efficient fridge but remove the top lid and add the same type of Frankencooler build to it. A fridge that allows water, ad a solid block of ice to the exact center and let the fridge do it's thing. I would think the bilge pump would circulate the water well enough to keep liquid water in the bottom but the fridge and the ice itself would extend the life of the ice and simultaniously cool the water.

I know this has been tried before on youtube with no success, but those builds

1. Do not use a bilge pump or radiator such as the Frankencooler
2. Do not use proper insulation such as the Frankencooler

I'm considering how much of a hassle it will be to move the ice back and forth from the frankencooler and the iceco over and over again, swapping the water back and forth into possily a silicone mold that would allow for me to contain the water in the iceco and then drop the block of ice into the frankencooler. Also consider how I would have to dump the water from the frankencooler back into the Iceco to me made back into ice. Seems like quite the process but if I did it once ever 12 hours or so it would seem doable. But if there was a solution to run a Frankencooler style setup on an Iceco or a BougeRV fridge and just remove the lid and replace the lid with a Frankencooler buildout maybe it would work?

I'm willing to try!
 
Also had another idea...two Frankencooler/12v Freezer Hybrids! Let one run for 12 hours until all the ice melts, and then when all the water has melted just close the lid and turn off the fans, use the bilge pump to fill the bottom of the other one with water, then take out the bilge pump and put it in the new fresh frozen Frankencooler/12v Freezer hyrbrid and turn on the fans and bildge pump.

This way the water never needs to be transferred and a person could even put food at the op of each one like the iceco 3 in 1.
Just a thought...lol...
 
Nobody ever mentions anything about that guy cramming his mini split outdoor unit against his RV. Don't all mini split instructions say the outdoor unit should be mounted at least 12" from a wall. Cramming it against the RV has to kill the efficiency.
Nope...
Most units come with a bracket to mount inches from the wall.
Efficiency isn't affected.
 
Vacuum Insulated Panel

12 x 12 x 1 inch

R20

that’s a building block I plan on using to reduce thermal conduction between spaces

https://www.digikey.com/en/products/detail/panasonic-industrial-devices-fbd/TZB7880E/9558505

bought a few of these ^ panels to play with. they are made by wrapping a hollow fiberglass core with a sheet of mylar and pumping much of the air out and then sealing it. the lack of Air Inside The Panel reduces internal radiative transfer.

direct conduction still occurs near the edges.

they need padding to protect against mylar puncture which would introduce air back into the panel and reduce the insulation value from R60 at center, R20 average down to R5.

R20 in one inch is fricking good in my humble opinion.
 
Curious Carbon I'm going to hereby name you the insulation and heating math expert, I will buy any insulation you recommend for my custom built frankencooler.

Question for everyone: Do you think it's possible to convert an ICO 3 in 1 into a Frankencooler hybrid? What I mean is, could we take the same bilge pump, insulation, fan system and simply keep an ICO 3 in 1 which allows water and just simply keep the ice/water at a low enough temperature to allow water circulation while maintaining enough ice where the ice won't even melt, making a true portable air conditioner/fridge/freezer all in one?

I've been contemplating the logistics in my head on how it would work, assuming i could just remove the lid and go to town attempting to create it, that way I wouldn't have to transfer ice over, i would just apply the bilge pump, insualtion, and fans to the ICECO...

I think we might have a breakthrough here if it's possible boys (and girls)
 
I think ampacity relates to the maximum the unit will draw so that is the minimum circuit. You can put it on 20 but not 8.
 
This guy in this youtube video says he's getting the ice to last for THREE DAYS GUYS. WE MIGHT HAVE ANOTHER BREAKTHROUGH!


I know there should at last now be a combination of an ICECO Freezer and possibly a build like this that could solve our problem! High hopes for this one!
 
Here we go boys.


So now I pose the question, is there any reason why I can't run this tube through an ICECO filled with ice set on freezer mode?
Will the ice..not melt? Ever?
I could remove the lid and run the aluminum pipe throughout the ICECO...two holes in the new insulated lid on the ICECO?

Post any modifications or ideas or potential pitfalls with this if you can think of any! Thanks!
 

WIll this work on a modified ICECO guys? Really looking for the answer here because this could actually solve the portable climate control crises. IF the ice doesnt melt. I imagine a person could add salt so the ice stays solid and simply find out the optimal temperature for the freezer to keep the ice frozen and just run air through the aluminum or copper duct. Possibly a slightly smaller duct that would weave throughout most of the cooler so it could have equal heat distribution throughout the ICECO filled with salted ice.

Any thoughts will be greatly appreciated!
 
Yeah I saw in several ice cooler AC builds that if you add salt to the water it can last even longer. I guess the salt makes the ice colder somehow

"One sure-fire way to make the ice in your ice chest last longer is to add a simple household item...salt. ... Much like salt helps freeze ice cream as it churns, it can help the ice in your cooler last longer because salt lowers the freezing point."

After some further research I found that salt lowers the freezing temperature of the water so I dont know if it will have application here since i'm attempting to build an ice-sustaining unit with an ICECO. However, I wonder if I freeze the salt water until its frozen solid, and then lower the temperature in the ICECO to a regular freezing temp for water...will the ice stay frozen? I know that water has some very interesting properties when it comes to freezing, I've even seen a crazy A/C build with like 30 long PVC tubes from some crazy scientist in my youtube travels lol...i'll try to find it.

Hopefully we can get some water nerds in here to clear up the science behind salt water and freezing it lol..here is that cray YT video too

 
Good luck freezing salt water in a residential freezer... it will need to get WELL below zero to do so...
 
Here is my crude drawing... lol...

I drew the copper piping so it could weave around the cooler in a uniform fashion so it would more evenly distribute the heat exchange. There will, however be a "hot zone" when the fresh air enters the pipe through the fan at the top. After drawing this I can understand how the video with copper piping with the bilge pump with an elongated tube blower would make the ice last longer since it's simply recirculating the cold water through the copper pipe instead of forcing the air through the pipe instead. Hard to explain but I might have to make my own youtube video about it. For my purposes I want the fan to turn on and off as it will be attached to a thermostat, and if the water isn't circulating constantly through the copper pipe I'd imagine water would eventually freeze. I want this Freezer/AC hybrid to be very "set and forget" and think the air circulating through the copper pipe instead of bilge pumping water through it might be easier for what I want it to do.

I want to try both builds honestly...

I think the air should enter towards the top of the ICECO and maybe even go about in a circle around the edges of the iceco, since the iceco has it's coils around the top of the fridge I could take advantage of the cold coils at the top of the fridge, and IF the water melts around the top the water has to rest on the ice below it as it melts and I bet there is a way to make sure the ice doesn't melt all the way if I can do this correctly.
 

Attachments

  • Screen Shot 2021-06-11 at 2.25.12 PM.png
    Screen Shot 2021-06-11 at 2.25.12 PM.png
    495 KB · Views: 3
Any suggestions guys? Or potential pitfalls I could run into as I try this first build? I'm going to order all of this stuff on the 17th to begin the lab testing. I have a Honda Odyssey that I'm going to be running tests inside to recreate the conditions of vanlife. I'm going to order that good insulation that was suggested as well to build out a custom lid so I don't destroy the factory lid.

Also I'm wondering what size these copper pipes should be to move the air through properly, weaved around the frozen ice inside the ICECO. HMM INDEED.

here is a system i could use to test aluminum vs copper and sizes I suppose.
 

Attachments

  • download (6).jpeg
    download (6).jpeg
    10.3 KB · Views: 1
Last edited:
Back
Top