Why my modules are going in an outside cement bunker, especially with the firmware issues we chatted about with the Jack in the Box recently... https://diysolarforum.com/threads/she-went-bang-real-good-whew.49857/
You are using an out of date browser. It may not display this or other websites correctly.
You should upgrade or use an alternative browser.
You should upgrade or use an alternative browser.
Solar house generator I started DIY back in 2000 - My path from Trace to Xantrex (on FLA battery) to XW Pro inverters on Tesla Model S batteries
- Thread starter dougbert
- Start date
dougbert
Solar Addict
Why my modules are going in an outside cement bunker, especially with the firmware issues we chatted about with the Jack in the Box recently... https://diysolarforum.com/threads/she-went-bang-real-good-whew.49857/
now, remember I was using firmware NOT yet vetted nor approved for general use. I was a beta test user and forgot that myself when encountered the issue.
But I concur, that an outside "Power House" would be the best configuration away from one's main house. I wish I could build one, but alas, I don't have land space for that here. And I am running out of "life span" in my growing old years
thanks for the link, going to share with my brother who will **** a brick
yea yea yea..... lol... my freak out was about the lack of response/support, not the number written down in the change log. ? You're very welcome, regardless what caused it, it's an eye opener for sure.... don't see many blow the roof off like that one did.now, remember I was using firmware NOT yet vetted nor approved for general use. I was a beta test user and forgot that myself when encountered the issue.
But I concur, that an outside "Power House" would be the best configuration away from one's main house. I wish I could build one, but alas, I don't have land space for that here. And I am running out of "life span" in my growing old years
thanks for the link, going to share with my brother who will **** a brick
PS, Alpha tester, with the issue you found, it was no where close to being Beta.
Last edited:
My LiFEP04 cells are all inside 1/2" walls of cement board.Why my modules are going in an outside cement bunker, especially with the firmware issues we chatted about with the Jack in the Box recently... https://diysolarforum.com/threads/she-went-bang-real-good-whew.49857/
I'm going to put my modules in a little cinder block/concrete bunker like a pump house and just put in lots of parallel 4/0 to the power house, it's a lot easier to buy lots of 4/0 or some copper bars between the two than a new house. Something that even if it blew like that video, everything else will be safe.My LiFEP04 cells are all inside 1/2" walls of cement board.
dougbert
Solar Addict
dougbert
Solar Addict
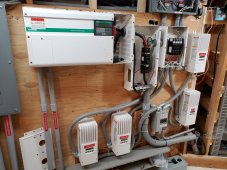
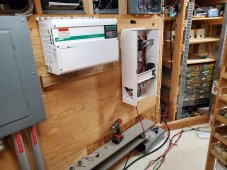
and after 5 hours of somewhat careful removal of wire, nuts, conduit and lock rings, this is how it looks now
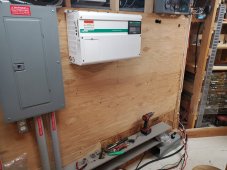
I cannot take down the inverter by myself, need to schedule some time with my 40 year old son (who is far more buff than I) to assist in removing the Xantrex.
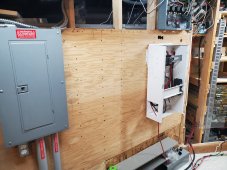
Then some wood cutting to align things right and I will install the sheet of plywood that I have painted with fire retardant paint to provide a full 1 inch of plywood to screw/bolt the hangers to. The studs are not 16" on center because of the angle of the wall and I directly placed the 2x4s under the ceiling rafters. Thus causing the studs to be offset of normal.
After that some placement attempts to see where I want the XW Pro and the big PDP (Power Distribution Panel).
The PDP will be on the right with 2 spaces to the left of the PDP to allow for 2 XW Pros total, but only one now. With 2 XW Pros, that will allow for 14.4 kw of supply.
Directly mounted on the right side of the PDP will be the MPPT 60, Array controllers #1 and #2. To their right the controllers for #3 and #4 will be mounted to the plywood with flex conduit running from the PDP to each of them.
Awaiting Signature Solar to ship it. Got it on their November sale, with FREE Shipping - that is $380 off.
$3495 was the total cost
Last edited:
Hedges
I See Electromagnetic Fields!
- Joined
- Mar 28, 2020
- Messages
- 20,436
I cannot take down the inverter by myself, need to schedule some time with my 40 year old son (who is far more buff than I) to assist in removing the Xantrex.
Got an engine hoist?

How does a 140 pound weakling hang a 140 pound inverter?
When I hung my original 2.5 kW SWR-2500U inverters 17 years ago, I was probably stronger and they were only 75 lbs. I was able to carry them up a stepladder and hang them head high. Taking them down to upgrade was doable, but difficult When I hung 75 lb transformerless 10000TLUS under the deck...
dougbert
Solar Addict
Got an engine hoist?

How does a 140 pound weakling hang a 140 pound inverter?
When I hung my original 2.5 kW SWR-2500U inverters 17 years ago, I was probably stronger and they were only 75 lbs. I was able to carry them up a stepladder and hang them head high. Taking them down to upgrade was doable, but difficult When I hung 75 lb transformerless 10000TLUS under the deck...diysolarforum.com
that is great
What I did on putting it up there, was to build a scaffording/shelf that we could lift the unit up on, then screw the lag bolts in, and remove the shelf. Will rebuild that to lower it down
the XW Pro will easier as it has a mounting bracket to mount first, then hang the unit on that. Still will need two of us.
Last edited:
dougbert
Solar Addict
dougbert
Solar Addict
Bare stripped 1st plywood, 1/2"
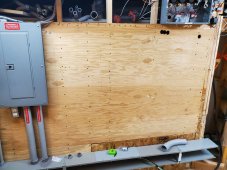
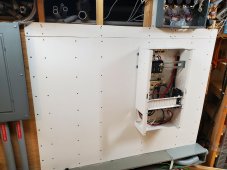
New 2nd layer of Fire Retardant paint plywood, 1/2", total of 1", both (well almost) screwed to studs
Also installed the 18" extension of the raceway, and new 2" receivers for the 4/0 wire to enter
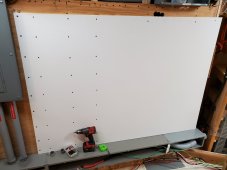
Refactored NEG and POS bus bars, closer for better access and found the fuse holder and it wasn't as bad as I thought.
Mounted on a cheap cutting board
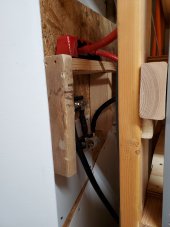

New 2nd layer of Fire Retardant paint plywood, 1/2", total of 1", both (well almost) screwed to studs
Also installed the 18" extension of the raceway, and new 2" receivers for the 4/0 wire to enter

Refactored NEG and POS bus bars, closer for better access and found the fuse holder and it wasn't as bad as I thought.
Mounted on a cheap cutting board

Last edited:
Got an engine hoist?
I know @dougbert is all set now but I tore my rotator cuff trying to get an EG4 battery in place. My son lives over 1000 miles away and I’m too cheap to buy an engine hoist.
My solution was a 1 ton chain hoist from Amazon for $50. It hangs anywhere in the basement from the open rafters and has definitely earned its keep.
Just one more way to skin that cat ?.
dougbert
Solar Addict
I know @dougbert is all set now but I tore my rotator cuff trying to get an EG4 battery in place. My son lives over 1000 miles away and I’m too cheap to buy an engine hoist.
My solution was a 1 ton chain hoist from Amazon for $50. It hangs anywhere in the basement from the open rafters and has definitely earned its keep.
Just one more way to skin that cat ?.
I actually have a 1 ton chain hoist that used to lift a 350 ci engine up and down a couple of times
sorry about the cuff, breaking ones self hurts
sorry about the cuff, breaking ones self hurts
Thanks. Getting old sucks!
The only thing it beats is dying young ?.
dougbert
Solar Addict
Hedges
I See Electromagnetic Fields!
- Joined
- Mar 28, 2020
- Messages
- 20,436
My solution was a 1 ton chain hoist from Amazon for $50. It hangs anywhere in the basement from the open rafters and has definitely earned its keep.
Just one more way to skin that cat ?.
I bought my first engine hoist to pull a steering clutch out of a D6. Have done a few engines and transmissions since.
Equipment at work has a hoist & trolley built in, to position modules during assembly and maintenance.
Thanks. Getting old sucks!
The only thing it beats is dying young ?.
My mom made it to 102.
Having been a competitive tennis player, and continuing to play until 98, contributed to her heart outlasting her mind.
She quit skiing at 85, not because she couldn't ski anymore, but because the snowboarders were becoming too much of a hazard.
I used to be more active, now more of a lab rat. I plan to die of electrocution before old age sets in.
400bird
Solar Wizard
A man after my own heart!I plan to die of electrocution before old age sets in.
dougbert
Solar Addict
An hour here and an hour here, doing the various little things that need to be done
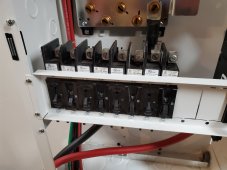
Installed the 4 60 amp breakers (between PV array and charge controller) and the 4 80 amp breakers (between the charge controller and the battery), prepping for the full wire up. Array 1 will have the left most postion and its 60/80 pair, then to the right #2, then 3 and finally 4.
Two slots in the panel for 2 more 250amp breaker between battery and inverter (one installed). Might use just one more if I get a 2nd inverter. That would provide 14,400 watts of power - continous.
and below positioning the 2 charge controllers, which will be mounted on the wall itself
also planning and getting parts for the Xanbus cable runs between devices. Will still need a couple of 1" flex conduit runs, one for each of the outer controllers, while 2 controllers will be mounted ON the PDP itself with the wires run internally
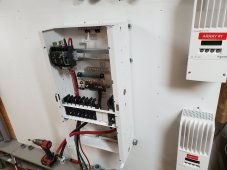
also painted touch up on the screws to lessen their darker impact on the white board

Installed the 4 60 amp breakers (between PV array and charge controller) and the 4 80 amp breakers (between the charge controller and the battery), prepping for the full wire up. Array 1 will have the left most postion and its 60/80 pair, then to the right #2, then 3 and finally 4.
Two slots in the panel for 2 more 250amp breaker between battery and inverter (one installed). Might use just one more if I get a 2nd inverter. That would provide 14,400 watts of power - continous.
and below positioning the 2 charge controllers, which will be mounted on the wall itself
also planning and getting parts for the Xanbus cable runs between devices. Will still need a couple of 1" flex conduit runs, one for each of the outer controllers, while 2 controllers will be mounted ON the PDP itself with the wires run internally

also painted touch up on the screws to lessen their darker impact on the white board
400bird
Solar Wizard
Nice progress, looks good.
Are there any wireways inside the charge controllers? Could you mount one directly off the next just like you can with the larger Context 100 600? This would keep all the wiring internal and not require more conduit runs.
Are there any wireways inside the charge controllers? Could you mount one directly off the next just like you can with the larger Context 100 600? This would keep all the wiring internal and not require more conduit runs.
dougbert
Solar Addict
Nice progress, looks good.
Are there any wireways inside the charge controllers? Could you mount one directly off the next just like you can with the larger Context 100 600? This would keep all the wiring internal and not require more conduit runs.
No, not possible, these CCs were their first "new" design ones from about 8-10 years ago, and they hadn't come up with the thru and thru. The PDP can handle 4 CCs (internal breakers), but only 2 can be mounted on one side of the PDP. The other side is for the XW Pro. Other CCs are mounted "away from its side".
The 80 and 100 are the newer design and pretty neat, but my arrays are 48v with combiners. The design I started 22 years ago with 24v
from pics I have found, they run the conduit into the back wall and hide the CAT 5 there, but I can't do that
here is the picture of the CCs lower wire chamber
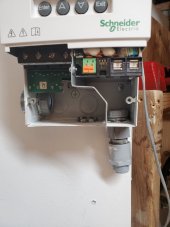
here the wire entrance is on the left, while the on the right is the Xanbus and AUX relay contact chamber. Two Xanbus ports on the upper right, to their left is the temp sensor port, and the AUX port (orange on green) further left
Not meant for thru and thru - which is a great design, just not created when they designed these first CCs. These are great CCs for low voltage arrays, like mine
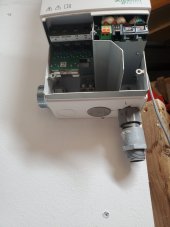
and above you can see where the IN and OUT wires are attached on the left, with ground on the back wall.
A box (4-7/8" x 3-1/4" x 2-1/4") will be attached on the wall to the downward conduit for the Xanbus cable IN and OUT
Link to the box
below the 2 CCs are attached to the side of the PDP, a chase nipple ties them to the PDP for the wire entrance. Edges of the outer 2 CCs are visible on the right
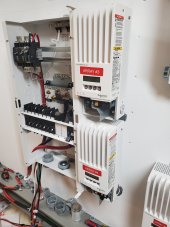
below is a side pic of the 2 mounted to the PDP with a space behind them. See the flex conduit 90s I put on the back. These will go down to the box near the raceway, then cross over to the lower right, and then up.
I have been pondering a simple solution but this looks like the best. At least will look better than my prior implementation
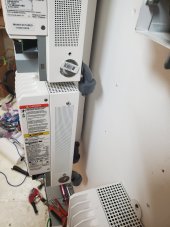
futher back pic of overall layout
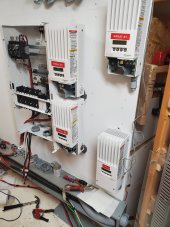
I don't think it will be too bad. Combination of flex and rigid PVC conduit with some small boxes to route the CAT 5 cable in and around.
with the breakers inside the PDP, much of the wires crossing this way and that way, will be covered inside.
Last edited:
Similar threads
- Replies
- 4
- Views
- 323
- Replies
- 95
- Views
- 2K
- Replies
- 2
- Views
- 281
- Replies
- 24
- Views
- 1K


