diy solar

diy solar

T fuse Size & wire gauge for split phase X2 LV6548

Gurusi

New Member
Joined
Aug 10, 2022
Messages
159
Hey, could someone please give any advice on the correct T Fuse size and wire gauge for a split phase setup (LV6548). I will have 16 cells hooked up (still looking at reliable Aliexpress sources, so 16 * 3.2V * 280Ah = 14.3kWh. I will likely add another 2-3 16 cell sets batteries over time. So would like to future proof for 4x sets.

This is my first setup and I am currently buying to build right now. So if I am lacking any details let me know.


From other similar posts I am guessing 0AWG wiring and two 250amp fuses (battery bank -> bus bar -> fuse -> inverter).

Thanks
 
I use a pair of 200A T fuses in mine.
I follow the install manual recommended #2/0 copper feeding each unit.
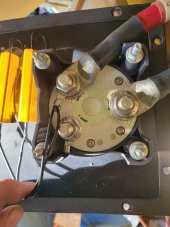
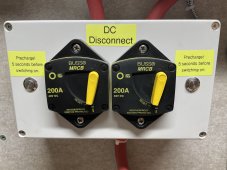
I have a pair of high capacity 165A DC breakers in front for a disconnect, and a bluesea 2 position switch to resistor bleed the capacitors slowly.
 
Thanks for the info, I will consider a DC disconnect. Do you have a similar battery setup as I’m considering?

What capacitors are bled with the switch disconnect?
 
Thanks for the info, I will consider a DC disconnect. Do you have a similar battery setup as I’m considering?

What capacitors are bled with the switch disconnect?
I dont know what battery setup you have.

ALL inverters have huge capacitors in them that draw crazy stupid amps from the battery when connected.
Unless you have batteries with built in bleed resistors, you need a way to slow charge up the capacitors when you hook up the batteries.
 
I’m looking at getting 4 sets of 16 cell 3.2v 280ah batteries.

That sounds like another aspect to research that I was unaware of. Is your switch store bought or adapted to drain?
 
I’m looking at getting 4 sets of 16 cell 3.2v 280ah batteries.

That sounds like another aspect to research that I was unaware of. Is your switch store bought or adapted to drain?
 
Thanks

What ohm resistor did you use in your setup? And do you have it setup as a pre charge for your system as well?

Disconnect and discharge seems convenient, but couldn’t see an easy way to pre charge the inverter with the switch/resistor setup.
 
I used a pair of resistors from autozone for LED blinkers.

I just tied them between position 1 and battery input.
 
Found info on a momentary switch hooked up to a resistor via the DC breaker as a pre charge method
 
Found info on a momentary switch hooked up to a resistor via the DC breaker as a pre charge method
That works as well.
My method is part of the battery disconnect, so anytime it is turned on it always goes through precharge.
 
Lol ok something clicked and I got it now. Looked at filterguys helpful download.

How does your setup discharge/bleed the caps? I figured the resistor would have to bridge from + to - (with battery disconnected and inverter off)
 
Lol ok something clicked and I got it now. Looked at filterguys helpful download.

How does your setup discharge/bleed the caps? I figured the resistor would have to bridge from + to - (with battery disconnected and inverter off)
The resistor is for charging the caps, not bleeding them.
I use the battery selector switch to choose between resistor path to battery, and main battery path.
20221007_172401.jpg
 
In the above picture, the top cable goes to battery positive, the resistor is between battery positive and position 1, the bottom cable is output from selected source.
 
thanks for the photos. For some reason I thought you had a pre charge and discharge (when disconnected) combo.

This will be going on my build definitely
 
Pre charging saves your bms and inverters from surge but also the breaker/disconnect contacts, perhaps even a T class fuse ?
Feeds two LV6548’s;
 

Attachments

  • DA8AF9F4-D04E-4831-8DCA-BA9B9198E6BE.jpeg
    DA8AF9F4-D04E-4831-8DCA-BA9B9198E6BE.jpeg
    207.8 KB · Views: 17
Pre charging saves your bms and inverters from surge but also the breaker/disconnect contacts, perhaps even a T class fuse ?
Feeds two LV6548’s;
Very nice setup. Yep came for advice on T class fuses and found more things to buy and build!
 
Back
Top