diy solar

diy solar

Testing or Replacing BMS

All of the cells are fairly close except those 2 rogue ones. If it were me I would use a load like a head light from a car to bleed those two during charge. Will probably take several charges to correct.
The next question is what do they look like at the bottom?
What is happening is the highest cell is disconnecting the BMS when it reaches the maximum cell voltage. While the other still need considerable change. The result is the total capacity from the artificial top to the bottom is a lot smaller than the advertised capacity.
OK, this makes sense to me now. That is what Sunshine_eggo meant by "3.500 and 3.557 cells are essentially full, while the others are not."
I didn't understand balancing or how the BMS controls the charge in that manner ("highest cell is disconnecting the BMS when it reaches the maximum cell voltage."). I guess that I was just under the impression that the cells will either hold a certain amount of charge or they wont.

As a newbie, I am a little nervous about trying to bleed those two while charging. By "Will probably take several charges to correct", do you mean several charges while bleeding those two or several charges by just discharging the pack and not bleeding those two? or will not bleeding those 2 ultimately result in a failed pack that never balances?


UPDATED:
I think I misunderstood your last post about how to bleed those cells down using headlights.

Do you mean to charge the battery while on the cart, but leave the headlights on so that those 2 cells will not reach full charge thus allowing the others to get to the desired charge level without the BMS tripping?

Instead of doing this on a bench by fully discharging, then recharge with lights individually hooked to those 2 rogue cells?
 
Last edited:
Concur.

If you can regulate your charge current, you can expedite the process by charging at a rate slightly lower than the load, that way you're catching the lower cells up as you bleed down the high ones (which actually stay near full since you're charging at nearly the same rate the load is pulling down.

If this were a DIY pack, you'd break it down and charge 'em in parallel.

Once you've top balanced the pack, you should be able to fully charge it without issue. Then you would want to know how it performs as you discharge it per @acdoctor .
I wish it were designed different and something I could break down! When I bought this I was certainly not expecting it to be put together the way it is. Thanks to you & acdoctor for the awesome advice!
 
No you have it the first time. Charge at a low amperage towards the top if possible while using off of the higher cells to prevent them from tripping the BMS so the other have a chance to get full as well.
This “balancing “ should have been done by the company that built it. If they did you may have reoccurring issues with them getting out. If so you could get a balancer like a heltech that connects to the cells like the sensor wires for the BMS do. It would continually try to keep them balanced.
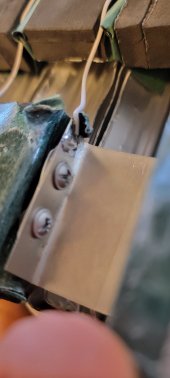
If you can post a picture of where the cell leads make connections.
 
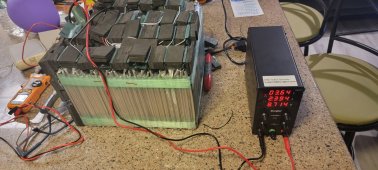
I tried using a couple lights to reduce the rogue cells and then on them while charging, but the others never got close, and the charger would outrun the light current to kick off the BMS. The cell voltage all leveled off since yesterday and was down to 3.33 on all cells. That quickly changed on at least one of the 2 higher cells when I hooked the charger, but not much on the lower cells. Today my new power supply arrived (pictured) so I am individually charging each cell to 3.65 as described in the Overkill manual for that BMS. This looks like it may take a while...lol I will keep you posted. Thanks again for all the help! 20220510_213406.jpg20220508_154526.jpg
Thanks again for all the help
 
A lot of the factory produced leads like in the picture on the power supply either have pour connections or to small of wire or both. This can make the amps very low and slow. Most power supply’s the insulation nut on the banana plug unscrews and a ring terminal can be installed behind the nut for a good low resistance connection. A 12 gauge wire and ring terminal on the battery ends is best as well. You can go from 2 amps to 10 in some cases and get finished quickly.
 
A lot of the factory produced leads like in the picture on the power supply either have pour connections or to small of wire or both. This can make the amps very low and slow. Most power supply’s the insulation nut on the banana plug unscrews and a ring terminal can be installed behind the nut for a good low resistance connection. A 12 gauge wire and ring terminal on the battery ends is best as well. You can go from 2 amps to 10 in some cases and get finished quickly.
Thanks for the tip. It still took forever, with an average charging time ranging from 1-4 hours per cell pack. After reading your suggestions I kinda did a sloppy hybrid to allow greater current to try to reduce charging time a little. Since I didn't want to mess with the tiny bolts on the "busbars", I just added an extra wire with clip to both + & - sides. I know the way I did it is not good practice, but I do believe it sped up the process.

Last night when I was finished and the battery was still settling, it was about 55.4V, then down to 55.0V.
Test one: This morning it started at 55.0 and after a round trip a little more than 1/2 mile to take my daughter to her swim class and back, it is down to 52.9. On the way back I did notice that when I hit full throttle to take off, the total voltage would drop to a little under 47V under that load.
I also bought and until I am comfortable with this battery will carry an Ecoflow River portable AC power supply, so that if I do trip the BMS I can use the charger to reset it and get going again. Even if I have to limp it home, that is much better than pushing!

I did notice that when I test my power supply with my multi-tester, 3.65 on the supply appears on one of my meters as 3.67 and the other meter at 3.679. This is testing with no load, is this normal or should I be returning this power supply for a different one?
 
Mine has calibration screws on the front if you think your meter is more accurate.
Let us know if recharge goes better than before.
 
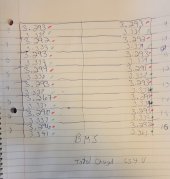
After completion of my balancing by fully charging 14 of the 16 cells, I was able to take the golf cart for about 13 miles before the BMS tripped on me. It tripped after about 1-2 seconds of hard acceleration from a full stop. Fortunately I had the Portable AC supply to reset it. After resetting, it seemed fine again and did not trip on my next hard acceleration. I could certainly have ran it for a much longer time, but at this point, upon getting home I pulled the pack from the case and tested voltage on all cells (see green dots in pic).


The per cell range at the lower state of charge was between 3.267-3.296V. (red dots)
Total of all cells was 52.5V
Remaining Charge 58.65Ah, which is 58.7% charge remaining. This was reset to 100Ah when I re-installed the battery after top-balancing.

I then put the pack on its new charger that should produce 15-18ah for charging. I came back a couple hours later to the charge state showing full. I was away when the charger turned off as full.
The voltage range at the full state of charge is now between 3.337-3.341V. (Green Dots)

Does this sound right? Are there any additional steps that you would suggest?


20220515_191032.jpg
 
Last edited:
Can’t really tell much from setteled voltage but they look fairly close. If you miss it stopping. Restart and monitor it will come up really fast. I am not familiar with pouch cells. Are the numbers arranged the same as post #16?
 
Can’t really tell much from setteled voltage but they look fairly close. If you miss it stopping. Restart and monitor it will come up really fast. I am not familiar with pouch cells. Are the numbers arranged the same as post #16?
Yes, the numbering I put on the sheet is the same as the order from that post. Cell# 12 & 14 were the rogue ones from that post, and both seem to be very much in line with the rest of the cells now. Those are also the only 2 that I did not put the power supply on at all when I top balanced the rest.

I guess at this point what I am trying to figure out if 53.4V is likely a full charge? especially since it was up to 55.4 then settled at 55V after top balancing. Of course that charge was done on individual cells, bypassing the BMS.

It charged faster than I anticipated with the new charger I bought, so I missed it getting to completion by a little bit (prolly less than 1 hour). Even when I unplug then re-attach the charger, it still doesn't charge more, even though none of the cells are at max voltage cutoff. That is why I am wondering if the BMS may be programmed with a max total pack voltage cut off of 53.4V? I have no way to access its settings to see, and so far the manufacturer GTK has ignored my requests for the build sheet & any testing or other specifications.

Unless you guys have other suggestions to better optimize it, it seems that the word is "send it". If it begins to fail again, maybe I will just end up buying an inverter & using this battery as emergency back-up power for the house and build a new battery for the golf cart myself. Again, I do appreciate all of your help!
 
Yes it could be bms pack voltage. So long as it meets your expectations I believe you are fine. If it becomes unbalanced again quickly you may look into a active cell balancer.
 
Yes, the numbering I put on the sheet is the same as the order from that post. Cell# 12 & 14 were the rogue ones from that post, and both seem to be very much in line with the rest of the cells now. Those are also the only 2 that I did not put the power supply on at all when I top balanced the rest.

I guess at this point what I am trying to figure out if 53.4V is likely a full charge? especially since it was up to 55.4 then settled at 55V after top balancing. Of course that charge was done on individual cells, bypassing the BMS.

It charged faster than I anticipated with the new charger I bought, so I missed it getting to completion by a little bit (prolly less than 1 hour). Even when I unplug then re-attach the charger, it still doesn't charge more, even though none of the cells are at max voltage cutoff. That is why I am wondering if the BMS may be programmed with a max total pack voltage cut off of 53.4V? I have no way to access its settings to see, and so far the manufacturer GTK has ignored my requests for the build sheet & any testing or other specifications.

Unless you guys have other suggestions to better optimize it, it seems that the word is "send it". If it begins to fail again, maybe I will just end up buying an inverter & using this battery as emergency back-up power for the house and build a new battery for the golf cart myself. Again, I do appreciate all of your help!

The specs you link earlier indicate a 58.4V charger was included, which is 3.65V/cell. Does not support the idea that the BMS would be limited to 53.4V.

What is the peak voltage of your new charger? Unfortunately, 48V LFP batteries aren't a set standard. 15S LFP has a nominal voltage of exactly 48V, but 16S is frequently used because it more closely mimics a 48V lead acid system. You may have purchased a 15S charger. 53.4V/15S = 3.56V/cell, which would get a 15S battery to very nearly fully charged.
The new charger is rated at 58.4V and 15A for 110vac or 30A if using 220vac according to the seller. I just put my meter to it and it is showing 58.9V with no load. The charger input wires to the BMS are only 14awg, so the seller of the charger recommended no more than 20A to be safe.
I am guessing that 53.4 may be the resting voltage after it settled??? I guess I will see or get a better idea as I start using the cart.

The old charger was supposed to be 10A, but based on how extremely slow it charged, I believe that it is the same scenario, 10A for 220, thus likely getting 5A output since using 110.

IMHO, you should reconnect the charger and see what the cells actually charge to, not where they settle. The fact that they're settling to 4mV difference is very encouraging, but I'd personally want to confirm they are charging to full.
 
Yes it could be bms pack voltage. So long as it meets your expectations I believe you are fine. If it becomes unbalanced again quickly you may look into a active cell balancer.
I will keep the active balancer in mind if the battery starts to have a similar fail again. I see many of them are 5A, is that what I would need? They say they go up to 300AH battery for 16s.

This is my first experience with a Lifepo4 battery, and at least I can say that all of the trouble this battery has given me has allowed me to get a much better understanding. I have a feeling that it won't be long before I am creating my own build for the golf cart and retiring this one to use as power backup at the house!
 
IMHO, you should reconnect the charger and see what the cells actually charge to, not where they settle. The fact that they're settling to 4mV difference is very encouraging, but I'd personally want to confirm they are charging to full.
Well, I think your Honest Opinion instincts are pretty on the money. I put it back on the charger over 3 hours ago thinking that it would charge for a few minutes and be done. Currently it is still charging.
 
Worth checking and documenting all 16 cells... :)
Yes that's what I was thinking too. As much as I hate pulling this thing all apart AGAIN and putting it back together, I am getting pretty good at it by now.
Of course if the initial resting balance after it stops is really close to 58.4, which would indicate to me that there is a pretty good balance, I may just call it a day. Will see when it stops...

If it actually attains very near 58.4V, you're probably good. I would just make a point of fully charging it regularly to ensure the BMS can maintain balance.
 
If it actually attains very near 58.4V, you're probably good. I would just make a point of fully charging it regularly to ensure the BMS can maintain balance.
Well, after the charger stayed active for over 7 hours on the cart, I finally disconnected the DC power from the cart (it is drawing approx 0.060 current for no reason, but I think that I need to change the solenoid as from my testing it is consuming about 0.04-0.05 of it, the gauge 0.010 and one other connection 0.010-0.020). I think that this minimal power draw was somehow keeping the charger active. During this charge, the meters were bouncing between 57 and 62, but mostly over 58.4 near the end.

Sometime within the past 1/2 hour the charger finally decided that it was full. I just walked back out and guess what the settled voltage said.......Drumroll please 53.4V, the same as it was before I started.
 
Back
Top