diy solar

diy solar

The BYDs from Batteryclearinghouse have arrived.

Maast

Compulsive Tinkerer
Joined
Oct 31, 2019
Messages
773
Location
Washington State
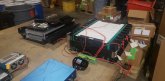
Took a bit but they're here. Bought it on the 12th and they arrived on the 30th. UPS tracking said the pallet actually arrived in the local area the 24th. Not too terribly bad coming from the far side of the country. Pretty good deal for $300 a pop and they gave me a 'bakers dozen' for the 12 I paid for, which I think was exceedingly cool.

Well packaged -arrived well banded and wrapped. The pallet evidently got whacked once during transport as one of the posts is bent over but since I'll be removing the posts anyway its not that big of a deal. Still annoying though.

Now I have to get these monsters down to the basement & stripped down, then testing, testing, and more testing. It begins!

P1030919.JPG
 
Hoping to hear back from Guy about getting these delivered into Canada via DHL or UPS or ? They have shipped them to the border with fellas having to cross over to pick them up but that's not an option for me. We shall see what pops up after the new year but likely I'll miss out on this deal too ! insert Fred Flintstone Ruckus, Stuckus Frickus Fruckus....
 
Too bad you're way over in Ontario. I'm in Tacoma WA (ish) which is not too far south of BC, toss in a few dinero for fuel and I wouldnt mind a bit bringing a pallet up north to BC. Its actually kind of a nice drive and I've been up or down the Alaska-Canada highway 6 times now.
 
Good luck moving them, they're a bear to move! I just had to get them out of the driveway ahead of rain and they took a lot out of us. Stairs are extra rough. You can hand-truck them from the.....boring end. We used some really stiff foam, that white opaque stuff on the hand truck foot.

I went thru all sorts of checking to get the posts all oriented the same and right-reading. I made a tall stack and a short stack in my living room. The next day it dawned on me that the RED plus terminals of both stacks didn't match. You can of course guess which stack I'd placed upside down... ?
 
Had quite the adventure just getting them off the truck and into my garage. The semi couldnt make it down my 100' gravel drive because of low power lines so we had to drop it at the street and strap the pallet jack to the tow hitch of my truck and drag it up the drive and onto the concrete pad in front of the garage. Told the driver "I dont think this is gonna work..." but it worked okay, left a long track in the gravel but it worked.

BTW, frigging hate gravel...
 
Good luck moving them, they're a bear to move! I just had to get them out of the driveway ahead of rain and they took a lot out of us. Stairs are extra rough. You can hand-truck them from the.....boring end. We used some really stiff foam, that white opaque stuff on the hand truck foot.

I went thru all sorts of checking to get the posts all oriented the same and right-reading. I made a tall stack and a short stack in my living room. The next day it dawned on me that the RED plus terminals of both stacks didn't match. You can of course guess which stack I'd placed upside down... ?
I bet you pulled a Steve and put the upside down one on the bottom of the stack, right ! resulting in some Blue Air and a Timeout no less.... Don't feel bad.

@Masst Thanks for the thought, I wish someone could do it for me and go down to Rochester NY to pickup but sadly not an option :( I'd be more than happy to fill up a pal with a cool brewski or two for such a favour, maybe even a nice Scrumpdillyicious cinnamon Beaver Tail. Mmmm Yum ! (BTW: It's a special pastry desert, not an actual beaver tail !)
 
Awesome!

PS -

1 January 2020 big load test:


Big Test
67A 63% 51.2V Clothes Dryer on (30Amp/240V)
68A 64% 51.2V Heater started
73A 68% 51.1V Heater On
73.0A 70% 51.1V TV/HomeTheater On and playing music
76.0A 72% 51.1V Refrigerator/Freezer/Water Cooler on. 51.1V
92.0A 87% 50.8V Microwave on
7203 VA 7131 W


Testing? Why? JUST USE THEM! ???
 
A way to get them on a shelf, if you don't have an overhead crane or block/tackle, or 3 helpers.

The shelf is a Heavy Duty Trinity from Costco. 1000lb per shelf rating when on leveling feet (8000 total). It comes with casters, when using casters the entire shelf is limited to 800lb total, YES WITH PLASTIC GRIPPERS!
.20191211_200000.gif
 
Last edited:
Nice use of a farm jack! After I strip them to get to the cell buss-bars I'm planning on using a block&tackle attached to an overhead joist to get them up on the rack I'm building. I've been told after stripping they lose 45lbs. If they had full metal cases I'd just stack 3, do a shelf then stack another 3 but I dont trust the plastic to hold any more than its own modules weight.

Going to arrange them side by side like yours except I'm going to make the inter-module connections by bolting the tabs that the posts are attached to directly to each other.
 
If they had full metal cases I'd just stack 3, do a shelf then stack another 3 but I don't trust the plastic to hold any more than its own modules weight.
I have a four stack in front of me and they seem really solid and unconcerned about it. I believe you could stack them about 6 high without problem. They are in no way tippy. I stacked them only four since I know they ship up to 18 on a pallet. They stack 2x2 on a pallet so that's four high with two on top of that! Shipping is vastly worse with the dynamics of psycho truck drivers than a static pile of them.

Wow Jason! I'd have never guessed those wire racks would take that kind of weight. Color me amazed.
 
Nice use of a farm jack! After I strip them to get to the cell buss-bars I'm planning on using a block&tackle attached to an overhead joist to get them up on the rack I'm building. I've been told after stripping they lose 45lbs. If they had full metal cases I'd just stack 3, do a shelf then stack another 3 but I dont trust the plastic to hold any more than its own modules weight.

Going to arrange them side by side like yours except I'm going to make the inter-module connections by bolting the tabs that the posts are attached to directly to each other.
I thought about bolting together also, but then you have to measure exactly right and have no wiggle room. With cables, you get some freedom of movement and can just eyeball measure it, I like to use my hand lengths to do a lot of measuring. I fist-width here, two fingers there, this knuckle, that line on the wrist, etc. It doesn't have to be exact. However, you have to have some uncommon tools to crimp and even cut 1/0 cable and of course, 1/0 cable is not cheap.

I'm going to do a long run test starting 3 Jan 2020 to see how long until the battery cutoff is reached, which I have a safe setting of 48V. I did a max draw test (1 Jan 2020) and pulled 92 amps (DC ~48, usually 51.1V showing) from the batteries to my house. I had all the lights on, the dryer going, the heater, the home theater, and the micro-wave. I did two loads of laundry with the washer and dryer going at the same time, my inverters hit 87%, and averaged around 70%. All happy through a 50 amp (AC 240)circuit into the loads panel.
 
  1. I finally have a wired connection to a monitor on each cell (just one pack for now)
    Getting charged at only 8 amps.
    IMG_20200103_031204638.jpg
  2. This is what happens when the float is set at 51.2V (the nominal voltage)
    IMG_20200103_110553997.jpg
  3. This is what happens when you try to have a rhinoceros breath through a stir straw. (Active balance engaged! ?)
    IMG_20200103_120429053.jpg
  4. This is what discharging looks like with 2S4P, monitoring one pack of 8.
    IMG_20200103_120749888.jpg
  5. This is what nearly four hours of use looks like running just normal things, about 600 watt draw. (Heater/Computer/Refrigerator/Freezer/WaterCooler/Computer)
    IMG_20200103_154451021.jpg
I have the "Inverter/Charger" MPP LV5048 setup to cutoff at 48V, which is 3.0V per cell, which is 10% SOC by most LFP battery charts.
The Entire setup hovers at 52.2V (26.1 per pack, and you can see the individual cells, 2.259V to 2.266V)

A couple screenshots of today's "how long will it go?" test:
2020-01-03 (3).png 2020-01-03 (2).png
 
If you need to.. It's a pretty quick operation to remove the heat sinks. I want to say it trims off 40lbs which is a lot when your moving it around. There is no glue and the large heat sinks will go on and off easy enough with just a few screws.

Here is a side by side of the battery with the heat sink and plastic covers taken off.

It's the fan moving air between the heat sink and rubber cover that cools the unit in a densely packed battery rack system.

Nothing offical.. but if your putting them on individual shelves, the monster heat sinks might not play a critical role in that type of setup. It's common to see these exact same type of BYD cells encased in hard plastic cases.

As far as build goes.. lets just say there are 32 units in a two pallet stack. ( that's how they are stored) .. There are 4 units per layer, 4 layers per pallet. The ones on the bottom with their heatsinks on have had ~1,100 lbs on them each for awhile and have also been shipped cross country. At the end of the day, giving each it's own shelf to sit on will always be the best solution.
 

Attachments

  • 20191211_170139.jpg
    20191211_170139.jpg
    56.4 KB · Views: 37
I just finished my first longevity test.
16S4P (or 2S4P when looking at the 8 BYD Packs)
My cutoff for the inverter is set at 48V, the alarm started at about 49V.
I got a solid 22 hours of normal house use out of the setup.
Cell
Pack 4112345678AverageMinMaxV Difference
1/3/2020
11:05:533.2983.2963.2953.3153.3103.3273.3313.3273.3123.2953.3310.036
12:04:293.3013.2993.2983.3183.3133.3303.3343.3293.3153.2983.3340.036
12:07:493.2823.2833.2843.3013.2913.3063.3133.3043.2963.2823.3130.031
15:44:513.2633.2623.2663.2643.2643.2563.2663.2593.2633.2563.2660.010
18:34:213.2693.2693.2723.2703.2683.2593.2723.2623.2683.2593.2720.013
19:33:063.2463.2493.2553.2513.2493.2383.2493.2413.2473.2383.2550.017
21:22:263.2653.2653.2693.2663.2633.2503.2653.2573.2633.2503.2690.019
21:22:343.2663.2673.2713.2673.2643.2523.2663.2573.2643.2523.2710.019
22:32:483.2623.2623.2683.2643.2613.2473.2613.2543.2603.2473.2680.021
23:31:313.2503.2523.2593.2543.2513.2343.2513.2423.2493.2343.2590.025
1/4/2020
08:35:553.1783.1813.1883.1823.1793.1453.1743.1643.1743.1453.1880.043
10:03:353.1623.1693.1823.1703.1483.0943.1453.1303.1503.0943.1820.088
11:52:253.0383.0643.0993.0603.0032.8962.9872.9663.0142.8963.0990.203

The tail ending drop off started about 49.9V and went to 48.8 in an hour.
The 8 packs stayed at ~51.9-52.1 V 80% of the time, between 52.1-51.1

Cell 6 on this pack(41) appears to be the weakest link. :-(

For me, this is far more than I need or expect. I only need the batteries for 6 hours a day to avoid TOU/Demand Tariffs.

I have 4 BMS's to install, and I have a complete, no cut harness plug and play harness for each pack. If it I get a year or two or more out of these without going through and completely dismantling it, that sounds fine to me.

It looks like I have 3 times the capacity than what I need. So I could dismantle it all and keep the 48 best cells and have a few spares, and recycle the few that are crapped out. I have not checked the other 7 packs yet with the BatteryGo to see what each cell is doing, but I can imagine at least one is sad in each pack. In this pack cell, 6 is 2nd highest in V when charged and always lowest in V when discharging.
 
If you need to.. It's a pretty quick operation to remove the heat sinks. I want to say it trims off 40lbs which is a lot when your moving it around. There is no glue and the large heat sinks will go on and off easy enough with just a few screws.

Here is a side by side of the battery with the heat sink and plastic covers taken off.

It's the fan moving air between the heat sink and rubber cover that cools the unit in a densely packed battery rack system.

Nothing offical.. but if your putting them on individual shelves, the monster heat sinks might not play a critical role in that type of setup. It's common to see these exact same type of BYD cells encased in hard plastic cases.

As far as build goes.. lets just say there are 32 units in a two pallet stack. ( that's how they are stored) .. There are 4 units per layer, 4 layers per pallet. The ones on the bottom with their heatsinks on have had ~1,100 lbs on them each for awhile and have also been shipped cross country. At the end of the day, giving each it's own shelf to sit on will always be the best solution.

I looked at that photo and immediately remembered a UT Video where the fellow tore a BYD pack apart completely and the cells puffed up on all sides. This is understandable given they are held in tight packs. BUT this also highlights a potential weakness in regards to the cells themselves and I have to wonder if removing the heat sinks is a smart move, not only because of potential expansion on two sides but the potential of damage being caused on those "exposed" sides without the heat sinks over the cells. One thing for sure, I certainly would not want to ship those packs without all 4 sides being well covered and WITH the heatsinks on.

I'm hoping to get 2 or 3 of these BYD packs sent up to Canada and am waiting to hear back on this but I would not want them torn down or heat sinks removed prior to shipping (aside from any usual testing the vendor may do). Given that Teardown Video it is pretty clear that the Cells cannot be removed & rebuilt using conventional busbars with screws / bolts as well as a few other issues which may not be readily apparent.

The video mentioned:

These BYD packs are used in Proterra transit buses, there are Proterra buses in Canada. :) My city just bought four of these buses, the bus costs $533,000, and the battery packs are leased.

Now consider the operational condition of a city bus, compared to sitting on a garage/basement shelf. Each bus my city bought has 40 of these packs installed! These packs are just now hitting the "recycle" market and we are the guinea pigs. :)

I just ran my entire house for 24 hours on 8 of them, and if I split them apart and make a battery of 48 cells, I can probably do 20 hours but have 48 good cells and a few spares to swap in. I've only been monitoring 1 of the packs and it has an unhappy cell in it. For or my needs it is quite adequate.

The pack voltage is only as good as it's lowest cell Voltage.
 
That paints a good picture. They won't be flogged to death, just being pensioned off because they have reached a point where their remaining capacity is not practical to run a bus on (ie, it can't travel far enough between charges).
 
I just finished my first longevity test.
16S4P (or 2S4P when looking at the 8 BYD Packs)
My cutoff for the inverter is set at 48V, the alarm started at about 49V.
I got a solid 22 hours of normal house use out of the setup.
Cell
Pack 4112345678AverageMinMaxV Difference
1/3/2020
11:05:533.2983.2963.2953.3153.3103.3273.3313.3273.3123.2953.3310.036
12:04:293.3013.2993.2983.3183.3133.3303.3343.3293.3153.2983.3340.036
12:07:493.2823.2833.2843.3013.2913.3063.3133.3043.2963.2823.3130.031
15:44:513.2633.2623.2663.2643.2643.2563.2663.2593.2633.2563.2660.010
18:34:213.2693.2693.2723.2703.2683.2593.2723.2623.2683.2593.2720.013
19:33:063.2463.2493.2553.2513.2493.2383.2493.2413.2473.2383.2550.017
21:22:263.2653.2653.2693.2663.2633.2503.2653.2573.2633.2503.2690.019
21:22:343.2663.2673.2713.2673.2643.2523.2663.2573.2643.2523.2710.019
22:32:483.2623.2623.2683.2643.2613.2473.2613.2543.2603.2473.2680.021
23:31:313.2503.2523.2593.2543.2513.2343.2513.2423.2493.2343.2590.025
1/4/2020
08:35:553.1783.1813.1883.1823.1793.1453.1743.1643.1743.1453.1880.043
10:03:353.1623.1693.1823.1703.1483.0943.1453.1303.1503.0943.1820.088
11:52:253.0383.0643.0993.0603.0032.8962.9872.9663.0142.8963.0990.203

The tail ending drop off started about 49.9V and went to 48.8 in an hour.
The 8 packs stayed at ~51.9-52.1 V 80% of the time, between 52.1-51.1

Cell 6 on this pack(41) appears to be the weakest link. :-(

For me, this is far more than I need or expect. I only need the batteries for 6 hours a day to avoid TOU/Demand Tariffs.

I have 4 BMS's to install, and I have a complete, no cut harness plug and play harness for each pack. If it I get a year or two or more out of these without going through and completely dismantling it, that sounds fine to me.

It looks like I have 3 times the capacity than what I need. So I could dismantle it all and keep the 48 best cells and have a few spares, and recycle the few that are crapped out. I have not checked the other 7 packs yet with the BatteryGo to see what each cell is doing, but I can imagine at least one is sad in each pack. In this pack cell, 6 is 2nd highest in V when charged and always lowest in V when discharging.
I am curious...

why are you only charging to 3.3V?
I am slowly building up pack voltage each day to get the pack up to 3.6V for a top balance... so far, all cells are evenly climbing voltage at each step.
 
I am curious...

why are you only charging to 3.3V?
I am slowly building up pack voltage each day to get the pack up to 3.6V for a top balance... so far, all cells are evenly climbing voltage at each step.
I tried 54.7, 56.6, even 58.4. within 10 minutes of bulk charging, the packs returned to 53.1-52.9 every time. Each time I switch over to the batteries even with float charging at 54.7 were all at 52.2 within 20 minutes. So I figured if that's where they are settled at, just charge them to that.

58.4÷16=3.65
56.6÷16=3.54
54.7÷16=3.42
53.1÷16=3.32

Best practices say charge to 90% and DOD to 20%, so that's what I'm doing as close to that as I can. I use the packs on purpose M-F for 6 hours. I can pull 92 amps from the batteries for a while. My normal load on the pack though is only 11 amps. I just ran the packs 24 hours of normal use, I set the cutoff to be 48.0V, and the Inverter started sounding the alarms at 49.0V. The chart shows what appears to be the start of the steep slope down to less than 10% SOC. I just finished assembling an active BMS and will see how the setup performs with a referee.
 

Attachments

  • IMG_20200104_195834705.jpg
    IMG_20200104_195834705.jpg
    49.8 KB · Views: 14
Hmmm

I am working on them 24v at a time, I will charge to 26.4 one day, then up to 27.2 then to 28 then to 28.8
test each cell voltage after I stop charging and log it on my notepad.
So far, no weak cells, no voltage drop after charging...

I don’t want to damage any cells, so I am being very slow charging.
 
Back
Top