diy solar

diy solar

Travel Trailer (1050w Solar, 3000w Inverter, 600ah LiFePO4)

Wow that's a very nice clean setup! I recently bought 40 acres to build a homestead. Been considering buying a small travel trailer myself to bring to the property in the meantime until I build something. Would make a fun project too.
 
Sweet build! Supper clean! Well organized with quality components. I've got a set of 8 panels on my shed that have opposite angles like yours. Shadding is a factor but I'm not sure exactly how much. Adding an extra charge controller or making or adjustable mounts might counteract that. For me I just don't care. :LOL:
 
Wow that's a very nice clean setup! I recently bought 40 acres to build a homestead. Been considering buying a small travel trailer myself to bring to the property in the meantime until I build something. Would make a fun project too.
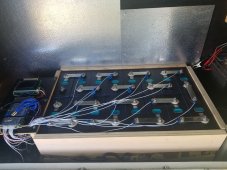
Your goals may make this an undesirable idea. That’s fine. FWIW I’ve modified three campers DIY now, including 1 for winter use. 2nd winter use happening a little at a time right now. (everything I spend <= normal monthly rent is ‘free’ or a savings)
However, I’ve worked on quite a few campers as part of vocation so I guess to some that’s “professional.”

Anyways, if a nice long-term camper with four-season is in mind, I’ve found the “better” (or top of line but not airstream or other big dollar) campers from the mid 1970s - if acquired in excellent repair- are the best, most modifiable and upgradable RVs for stationary or mostly stationary use.

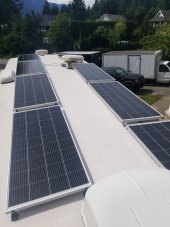
Other than the in-wall framework they are decidedly less “modular” and you can take them apart from inside a little or a lot at a time. This includes floors and allows insulating for subfreezing weather rather easily. More modern commodity RVs are less stout, and too many things are adhered together. Their structure is not only dependent on that, but it doesn’t always come apart well or permit rewiring like the old ones. Many newer ones often will not even tolerate walking on the roof.

Just some thoughts. Depending on your goals they may not be relevant.

The one I wish I’d never parted with 20 years ago was a 1957 Forester with sealed combustion convection ‘furnace,’ absolutely gorgeous golden maple panelling walks and ceiling with solid maple 6” radius curved corners, and an amazing aluminum-lined shower stall.
The original very retro refrigerator still ran and worked well and had drains and a rack for block ice. With the four or five propane mantel lighting fixtures with classic globes it made a truly off-grid electricity-free comfortable place to be.

You may not care about the kool-factor or retro ambience but that is something that appealed to me and still does. I love building totally retro-looking things with as much disguise as possible to incognito LED lights and other modern components in a retro setting.

Good luck with that 40 acre find! Sounds great to me!
 
Last edited:
It's been a longtime since I logged into this forum. I didn't know I had private messages and a bunch of replies to this build thread.

Thanks everyone for the kind and constructive replies.

This RV was used for 3 camping seasons and the system I installed in it worked flawlessly. Never an issue with it and it gave us so much flexibility. We travel with dogs and each travel day, we eat lunch in the RV with the dogs. During that lunch/rest period, we were able to run our 15k AC, use the microwave, use the Keurig coffee maker, use the induction cooktop and more. Also, all my electronics (comm, entertainment, security, home automation) never ever skipped a beat as it was all "always" powered (most if directly DC powered).

Recently, I changed employers and am now back in a 5th wheel RV. We sold the F150 and this travel trailer is being used by a new owner. But I did remove all the gear under the bed as well as the CCGX and BMV-712 displays. I left the solar panels and combiner box, then later gifted the MPPT charge controller.

So there will be a new build out for the 5th wheel. For sure, the Battle Born batteries will be used and possibly added to. I may also consider the MultiPlus II x2 inverter/charger. Maybe even 2 of them.
 
Reposted from Will's old forum - per his request.

I have installed a system in my demo coach (2020 Heartland RV Sundance 262RB Travel Trailer) that I use as a "generator replacement". We are not boondockers but this system gives us the capability to boondock.

OVERVIEW

DETAIL

Solar Panels Mounted to Roof - Jaboni Power Products (6 ea @ 175 watts ea - polycrystalline)
View attachment 728

Combiner Box - Eco-Worthy (fused, parallel bused, lighting protection, output breaker)
View attachment 730
View attachment 732

Battery/Inverter Box Overview Image
View attachment 733
Top: Battle Born GC2 Batteries Bottom: MPPT Charger Controller
Left: Lynx Power In (DC bus) Right: Inverter Right (gray): 50A AC disconnect

System Monitoring and Control:
  • Victron CCGX Color Display
  • Local Web Browser - Display and Manage CCGX
  • Victron VRM (remote monitoring via web browser and Victron VRM app)
  • Victron Connect App (Bluetooth)
  • GPS Antenna (mounted inside roof system)

View attachment 737

View attachment 735View attachment 736

Equipment Locations
  • Solar Panels and Combiner are mounted to RV roof
  • Solar Charger is mounted in box under bed
  • Inverter is mounted in box under bed
  • Batteries are mounted in box under bed
AC Wire Protection and Routing
  • Shore AC Power input was re-routed to box under bed and into a dual pole 50 amp breaker
  • Shore AC Power out of breaker box was routed inside Inverter with L2 passing back out of inverter without connecting to anything inside
  • Shore AC Power L1 connects in/out of Inverter
  • Shore AC Power L2 is spliced outside of Inverter into common jacketed (6-4 SOOW) wire
  • Shore AC Power routes out of box under bed and to RV OEM AC breaker panel
DC Wire Protection, Busing and Routing
  • Batteries are bused using 1/4 copper bar stock as 2 parallel strings of 3
  • Both strings of batteries are bussed at end using 4/0 welding cable
  • Combined battery + is protected with 400 amp ANL fuse, then switched with 600 amp switch
  • Combined battery - is connected to shunt from BMV-712 battery monitor
  • A reconfigured Victron Lynx Power In is used as the primary DC power bus with AMG fuses for branch in/out
  • Branch in/out are switched with 275 amp switches
  • Solar Combiner output wire gauge is 4 AWG
  • Solar input to MPPT Charge Controller is protected with dual pole 63 amp DC breaker
  • Inverter DC in/out is protected with 400 amp ANL fuse and switched with 600 amp switch
  • DC feed to RV OEM fuse panel is 4 AWG
Future
  • Alternator Charging
It looks like you have a LUAN roof with TPA. How did you mount the panels to the roof (fasteners?) Were there trusses to tie into or did you have another method? I ask because my rig only has trusses at the AC units, the rest is LUAN covered foam.
Also: How do you ground the combiner box (lightning/static discharge protection path) if your not connected to a rod ground via shore power?
 
looks like you have a LUAN roof with TPA. How did you mount the panels to the roof (fasteners?) Were there trusses to tie into or did you have another method? I ask because my rig only has trusses at the AC units, the rest is LUAN covered foam.
Every time someone posts something like this I wonder if this isn’t a business opportunity. I guess with my background this just doesn’t feel like an obstacle to me.
How do you ground the combiner box (lightning/static discharge protection path) if your not connected to a rod ground via shore power?
You ‘ground’ to the chassis. But really, if you were all aluminum sides and top I’d take comfort in the van de graaff effect. In fact I do now :)
 
It looks like you have a LUAN roof with TPA. How did you mount the panels to the roof (fasteners?) Were there trusses to tie into or did you have another method? I ask because my rig only has trusses at the AC units, the rest is LUAN covered foam.
Also: How do you ground the combiner box (lightning/static discharge protection path) if your not connected to a rod ground via shore power?
I did not look for roof trusses. I pre-drilled holes through the membrane and into the plywood. I added Dicor Lap Sealant to the holes. I applied a patch of Butyl tape to the bottom of each bracket foot. I used 1" SS lag bolts (wood thread) to mount the brackets to the roof. I applied Dicor Lap Sealant over the brackets and the lag head. Worked very well.

I ran a piece of maybe 8 AWG stranded, insulated copper wire from the ground point of the combiner box, to the RV frame. I never add an earth ground from the trailer to the ground outside of what I get via shore power when connected.
 
Combiner Box - Eco-Worthy (fused, parallel bused, lighting protection, output breaker)
View attachment 730

How is this box holding up on the roof (not sure if you've opened it and looked inside after 1-2 years of operation)? I've wanted it but avoided it due to the following in the description in the Amazon listing:

  • The equipment uses M6 screws to fix four mounting holes at the bottom of the PV Combiner Box , which are installed in the ventilated and dry place, please avoid direct sunlight, high ambient temperature and too wet environment, which will affect the performance of the equipment.

I sold this RV a few months back. Before I did so, I did open up the combiner box and it was well sealed and dry inside. So 3 years in direct sun and good to go.
 
How is this box holding up on the roof (not sure if you've opened it and looked inside after 1-2 years of operation)? I've wanted it but avoided it due to the following in the description in the Amazon listing:

  • The equipment uses M6 screws to fix four mounting holes at the bottom of the PV Combiner Box , which are installed in the ventilated and dry place, please avoid direct sunlight, high ambient temperature and too wet environment, which will affect the performance of the equipment.
I would run multiple strings into the RV instead of having a box on the roof.

Maybe string or parallel two panels and then go inside. Charge controllers are getting cheaper and I think we are going to end up with one MPPT per panel as on the residential side is already common practice sooner then later.

especially with non optimal RV roofs - on MPPT per Panel just makes sense to milk to most out of the limited roof real estate

I currently have a 2p5s configuration (without fuses, which is bad) on one controller and I am debating running 5 sets of lines down and parallel inside .. but given my config I need 5 fuses so I was hoping to reduce the complexity by leaving the box on the roof. I'm at a high voltage (140 per string) so I don't need large wires .. just 10 of them. I don't know how easy it will be to run that many wires yet... but yeah, I'm with ya -- it would be nice to have the box inside.
 
I am debating running 5 sets of lines down and parallel inside
If you run each line set to ONE MPPT each and don't parallel panels I don't think you need fuses between Charge controller and Panel.

But please read that in the manual of your chosen MPPT. Don't trust a random guy on the internet.

For my Growatt MPPT it's one or two panels in Series directly connected to the Charge controller - no fuse required - just between the controller and the battery.
The fuse would never open, since the maximum current of the panel would never exceed the one of the fuse.

So for example - your panel produced 9A - so you put in a fuse for 15A - your MPPT shorts out - - would the panel produce more amp? No it would not. Would the fuse blow? No, What happens when you short a solar panel? The panel starts getting warm and eventually you burn out the panel. But the fuse would not ever react. Because the panel stays at 9 amps.

If the short in the MPPT is no perfect - it could still start smoking and go up in flames - but the fuse would not protect you.
 
Last edited:
If you run each line set to ONE MPPT each and don't parallel panels I don't think you need fuses between Charge controller and Panel.

But please read that in the manual of your chosen MPPT. Don't trust a random guy on the internet.

For my Growatt MPPT it's one or two panels in Series directly connected to the Charge controller - no fuse required - just between the controller and the battery.
The fuse would never open, since the maximum current of the panel would never exceed the one of the fuse.

So for example - your panel produced 9A - so you put in a fuse for 15A - your MPPT shorts out - - would the panel produce more amp? No it would not. Would the fuse blow? No, What happens when you short a solar panel? The panel starts getting warm and eventually you burn out the panel. But the fuse would not ever react. Because the panel stays at 9 amps.

If the short in the MPPT is no perfect - it could still start smoking and go up in flames - but the fuse would not protect you.

Yeah, not looking to run 5 MPPTs (plus I already have the one I invested in originally).

The fuses are to prevent backfeeding a shorted panel - nothing to do with the solar charge controller. Only required with 3+ panels in parallel. https://diysolarforum.com/resources/fusing-wire-sizing-guidelines-for-solar-panels.143/
 
I built my whole rig for $2k less than cost of his batteries.
Gadgetnerd, I see what looks like black grommets and white grommets on the battery terminals. What are they, what do they do, and where can you get them? Thank you.
 
Reposted from Will's old forum - per his request.

I have installed a system in my demo coach (2020 Heartland RV Sundance 262RB Travel Trailer) that I use as a "generator replacement". We are not boondockers but this system gives us the capability to boondock.

OVERVIEW

DETAIL

Solar Panels Mounted to Roof - Jaboni Power Products (6 ea @ 175 watts ea - polycrystalline)
View attachment 728

Combiner Box - Eco-Worthy (fused, parallel bused, lighting protection, output breaker)
View attachment 730
View attachment 732

Battery/Inverter Box Overview Image
View attachment 733
Top: Battle Born GC2 Batteries Bottom: MPPT Charger Controller
Left: Lynx Power In (DC bus) Right: Inverter Right (gray): 50A AC disconnect

System Monitoring and Control:
  • Victron CCGX Color Display
  • Local Web Browser - Display and Manage CCGX
  • Victron VRM (remote monitoring via web browser and Victron VRM app)
  • Victron Connect App (Bluetooth)
  • GPS Antenna (mounted inside roof system)

View attachment 737

View attachment 735View attachment 736

Equipment Locations
  • Solar Panels and Combiner are mounted to RV roof
  • Solar Charger is mounted in box under bed
  • Inverter is mounted in box under bed
  • Batteries are mounted in box under bed
AC Wire Protection and Routing
  • Shore AC Power input was re-routed to box under bed and into a dual pole 50 amp breaker
  • Shore AC Power out of breaker box was routed inside Inverter with L2 passing back out of inverter without connecting to anything inside
  • Shore AC Power L1 connects in/out of Inverter
  • Shore AC Power L2 is spliced outside of Inverter into common jacketed (6-4 SOOW) wire
  • Shore AC Power routes out of box under bed and to RV OEM AC breaker panel
DC Wire Protection, Busing and Routing
  • Batteries are bused using 1/4 copper bar stock as 2 parallel strings of 3
  • Both strings of batteries are bussed at end using 4/0 welding cable
  • Combined battery + is protected with 400 amp ANL fuse, then switched with 600 amp switch
  • Combined battery - is connected to shunt from BMV-712 battery monitor
  • A reconfigured Victron Lynx Power In is used as the primary DC power bus with AMG fuses for branch in/out
  • Branch in/out are switched with 275 amp switches
  • Solar Combiner output wire gauge is 4 AWG
  • Solar input to MPPT Charge Controller is protected with dual pole 63 amp DC breaker
  • Inverter DC in/out is protected with 400 amp ANL fuse and switched with 600 amp switch
  • DC feed to RV OEM fuse panel is 4 AWG
Future
  • Alternator Charging
Wow, just wow.
 
Reposted from Will's old forum - per his request.

I have installed a system in my demo coach (2020 Heartland RV Sundance 262RB Travel Trailer) that I use as a "generator replacement". We are not boondockers but this system gives us the capability to boondock.

OVERVIEW

DETAIL

Solar Panels Mounted to Roof - Jaboni Power Products (6 ea @ 175 watts ea - polycrystalline)
View attachment 728

Combiner Box - Eco-Worthy (fused, parallel bused, lighting protection, output breaker)
View attachment 730
View attachment 732

Battery/Inverter Box Overview Image
View attachment 733
Top: Battle Born GC2 Batteries Bottom: MPPT Charger Controller
Left: Lynx Power In (DC bus) Right: Inverter Right (gray): 50A AC disconnect

System Monitoring and Control:
  • Victron CCGX Color Display
  • Local Web Browser - Display and Manage CCGX
  • Victron VRM (remote monitoring via web browser and Victron VRM app)
  • Victron Connect App (Bluetooth)
  • GPS Antenna (mounted inside roof system)

View attachment 737

View attachment 735View attachment 736

Equipment Locations
  • Solar Panels and Combiner are mounted to RV roof
  • Solar Charger is mounted in box under bed
  • Inverter is mounted in box under bed
  • Batteries are mounted in box under bed
AC Wire Protection and Routing
  • Shore AC Power input was re-routed to box under bed and into a dual pole 50 amp breaker
  • Shore AC Power out of breaker box was routed inside Inverter with L2 passing back out of inverter without connecting to anything inside
  • Shore AC Power L1 connects in/out of Inverter
  • Shore AC Power L2 is spliced outside of Inverter into common jacketed (6-4 SOOW) wire
  • Shore AC Power routes out of box under bed and to RV OEM AC breaker panel
DC Wire Protection, Busing and Routing
  • Batteries are bused using 1/4 copper bar stock as 2 parallel strings of 3
  • Both strings of batteries are bussed at end using 4/0 welding cable
  • Combined battery + is protected with 400 amp ANL fuse, then switched with 600 amp switch
  • Combined battery - is connected to shunt from BMV-712 battery monitor
  • A reconfigured Victron Lynx Power In is used as the primary DC power bus with AMG fuses for branch in/out
  • Branch in/out are switched with 275 amp switches
  • Solar Combiner output wire gauge is 4 AWG
  • Solar input to MPPT Charge Controller is protected with dual pole 63 amp DC breaker
  • Inverter DC in/out is protected with 400 amp ANL fuse and switched with 600 amp switch
  • DC feed to RV OEM fuse panel is 4 AWG
Future
  • Alternator Charging
Very nice work
 
jbeletti, thanks for the detailed show and tell! moving my home offgrid system to a travel trailer, so this post really helps me explain to my family what we need to plan.
 
jbeletti, thanks for the detailed show and tell! moving my home offgrid system to a travel trailer, so this post really helps me explain to my family what we need to plan.
Happy to hear my system inspired you. It was my first one and it really performed well for that small travel trailer. I have since removed that system, sold that trailer and moved to a new employer (another RV manufacturer) and have added to that system and installed it in a 38' 5th wheel RV. When I am complete with this new system, I'll start a new build thread on this forum to show what I have done.

Wishing you all the best with your install!
 
Back
Top