diy solar

diy solar

Travel Trailer (1660w Solar, 2400w Inverter, 608ah LiFePO4)

emerge411

New Member
Joined
Jul 28, 2021
Messages
27
Time to share my install. I borrowed the format from jbeletti's post which I found clear and concise. There are more details on my build log.

OVERVIEW
  • 1,660w of Solar on Roof (Trina Tallmax - 4 ea @ 415 w) - wired in parallel
  • 7,782wh / 608ah@12v of DIY LiFePO4 Batteries (2x DIY 12v batteries with 150a JBD SmartBMS each, 8x total 304ah Eve 3.2 LFP cells)
  • 3000va / 2400w Inverter/Charger/Switch (Victron MultiPlus 12/3000-120)
  • 100a MPPT Solar Charge Controller (Victron SmartSolar 150/100)
  • Battery Monitoring (Victron 500a SmartShunt)
  • System Monitoring and Control (Victron Venus OS on RaspberryPi 3B+ with rPi 7" touch screen)
DETAIL

RV Layout and component locations. The only space consumed that was usable before the install is for the batteries at the bottom of the bedroom closet.
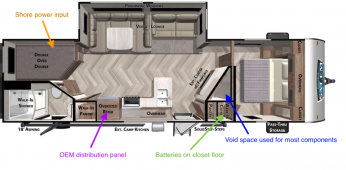
1657563267742.png
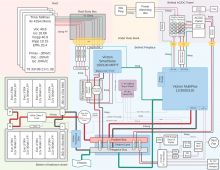
Schematic of devices and wiring
1657562510270.png

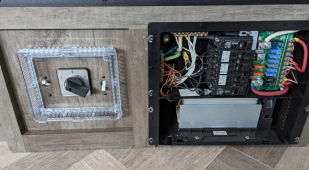
The original distribution panel was upgraded to a single 50a main breaker to leverage the power assist in the Multiplus. A change over switch was installed to allow power to flow to and from the inverter or to bypass it. The breakers by the change over switch is a disconnect for DC going to the panel and the fridge.
1657563339742.png

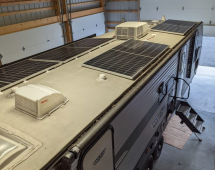
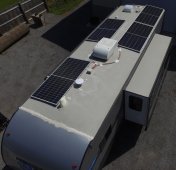
Panels mounted 4x 415w Trina Mono
1657564125051.png
Roof entry (pre lap sealant)
1657566258808.png

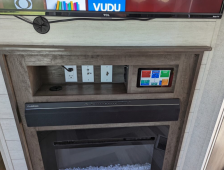
Hacked up the shelf above the fireplace to mount the display panel for the VenusOS display. I also added two 12v outlets for phone chargers.
1657564225566.png

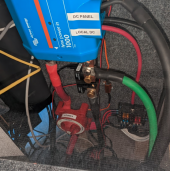
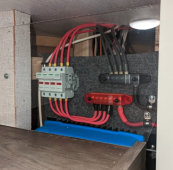
The inverter, solar charge controller, bus bars and wiring are all installed in the dead space behind the fireplace/entertainment center.

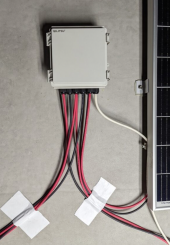
Solar panel wiring from the roof with fuses and bus bars.
1657563440155.png
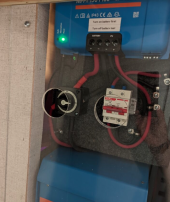
Solar charge controller and breaker/disconnect
1657563679336.png
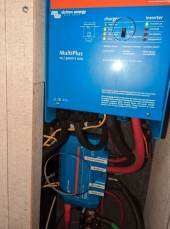
Inverter and primary bus bars
1657563802609.png
Max photos reached
 
Shunt, disconnect, local DC distribution
1657625952914.png

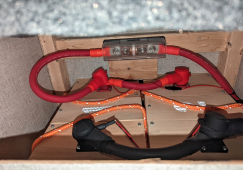
Batteries and main fuse
1657625922318.png

There was room for one more panel. The solar charge controller could have handled a fifth panel in parallel but it would have made access to the roof for maintenance more difficult.
1658848402390.jpeg
 
Last edited:
This is beautiful. Thanks so much for writing it up and photographing the process - very helpful! I adore the labeling. I have a label maker and I love it - and now I have found another use for it. Because in three months, it'll all be a distant memory, and when I need to fix something...labels will help!
 
Times 2 on the nice install. Could you tell me what fasteners you used to attach the brackets for the solar panels?
 
I'm sure there isn't anything wrong with mounting all the electrical stuff to a carpeted surface, but why?
I'd have mounted a nonflammable material and than mounted the components onto that.
It's a clean looking install though.
 
I'm sure there isn't anything wrong with mounting all the electrical stuff to a carpeted surface, but why?
I'd have mounted a nonflammable material and than mounted the components onto that.
It's a clean looking install though.
Do you mean less flammable? I'm not trying to be a tart about it, I'm honestly curious as I am undertaking my own build soon. I was planning on plywood, but I wouldn't call it nonflammable - if you have a better recommendation I am all ears! :)
 
metal, hardy board. Or a spacer between the plywood /or material of your choice so to allow an airgap and not let heat build up.
Just an extra precaution really. I suppose there shouldn't be any issue either way.
Do you mean less flammable? I'm not trying to be a tart about it, I'm honestly curious as I am undertaking my own build soon. I was planning on plywood, but I wouldn't call it nonflammable - if you have a better recommendation I am all ears! :)
 
Is it just me being stupid or am I right in thinking that you panels have the potential to produce over 120amps in parallel? If so then your breakers and even the MPPT SCC are not beefy enough for the job...
 
Nice install! Where did you find green cable? I would love 2 ft of 4/0 for my chassis ground.
https://www.wireandcableyourway.com/4-0-welding-cable-class-k has green available. I also have 6 feet left over. Shoot me a PM if you want it.

Is it just me being stupid or am I right in thinking that you panels have the potential to produce over 120amps in parallel? If so then your breakers and even the MPPT SCC are not beefy enough for the job...
Isc on the panels is 10.66 amps. Four in parallel would be 43 amps. NEC recommends sizing the fuses+ 25% larger then Imax which is defined as 25% more then Isc. So I took the Isc of the panel multiply by 1.56 (1.25*1.25=1.56).

My panel Isc = 10.66a * 1.56 = 16.63a. So I used 20a fuses for each panel.

For protection of the larger wire that connects the bus bars to the ncharge controller I need at least 10.66a * 1.56 * 4 = 66.52a. I used 80a.

If you mean the potential max amps the panels could create then yes they can create more the the 100 amps the SCC is rated for but I did that on purpose. There is no issue "over paneling" Victron solar charge controllers as long as you stay in the voltage and current specs. Search "over paneling" to find more info.

The important numbers for my SmartSolar MPPT 150/100 is staying under an input of 150v and 70 amps. My four panels in parallel are only ~50v and ~43 amps well under both.

Times 2 on the nice install. Could you tell me what fasteners you used to attach the brackets for the solar panels?
I have a walk-able roof with 5/8 plywood. I used mostly the hardware that came with the z-brackets. I put a layer of butyl tape under the mount then just used screws to attach the mounts, then covered it all in lap sealant.
 
Last edited:
Very nice system and installation! I'm quite envious of your talents.
Our camper's installation (2021 Rockwood Mini Lite 2205S, sorry, no pictures) is much more basic;
Two 190-watt panels on the roof, two more 190-watt panels awaiting installation.
60-amp MPPT solar charge controller.
3000/9000-watt 12-volt inverter-charger, 90-amp charging capability.
500 amp-hours of lithium iron phosphate batteries (one 300ah, two 100ah).
2/0 battery cables, distance between batteries and inverter-charger is 12" (24" round-trip).
500-amp shunt battery monitor.
Our installation is a functioning project. I perform upgrades on it as health issues allow.
 
Back
Top