


Frank in Thailand
making mistakes so you don't have to...
Some might be aware of my many adventures with my 88 LiFePO4 cells in the last 18 months or so, others will just step in.
First let me start by why I needed to repair 39(!!) Threads.
I was ignorant, noob, and stubborn.
Many of the now available advice wasn't there 18 months ago.
You might guess how it's available now, not just by me, other members as well who have faced similar issues.
When you receive your cells, first thing you need to do is throw away the bolts that you received with the cells.
They are either too long or too short.
Most are 10mm thread.
The cell is 6mm
Bus-bar 2mm, if your lucky
Washer 1mm..
You do the math, one mm to long to either penetrate the terminal, or have no grip.
Double busbars will give you 5mm inside the soft aluminium.... You really need all the threads you can get.
Besides this, the twisting motion during fastening will give a lot of force on the weak aluminium thread.
If you do like me, relocate and rebuild the pack a few times... You're screwed.
Easy solution:
Grubscrew, headless bolts threaded rods, what ever the name is in your location.
They can always utilise all available threads, and have no great force when twisting them in, gentle for the weak aluminium thread.
I prefer stainless steel.
Living in Thailand, rural area, most things are difficult to obtain, most need to go online and via China.
About 30% of the orders will be cancelled or lost.. challenge to get all.
Anyways.. for you probably more easy to get.
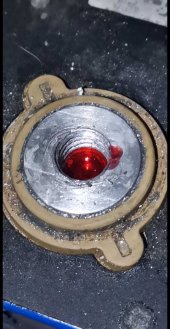
If you have clean, undamaged threads, Loctite red is the best advicable to use.
Both aluminium and stainless steel need primer to activate the Loctite (!!)
The primer has a small brush easy to apply to hole and stud.
As it's a blind hole, 2 or 3 drops of Loctite in the center, and twist till you reach the bottom.
Some say you need to go a half twist back for additional safety, I just twist a tiny bit back to loosen the tention in the thread.
The liquid will go via the threads up, and easy swiped off the terminal.
3 minutes well spent is to watch this video to understand:


(This is M8, 4 drops, with a stud without hex, so double nut is used to twist inside)
Best is to buy cells with the stud laser welded, or cells that are intended to be used with screws, like CalB.
Just to be clear: all thin aluminium wall cells aren't intended to be used the way we do.
The threaded holes are placed by the seller or third party, NOT the factory.
This is the only official way:
We can mimic to get as close with good studs, and clamping the sides to prevent delamination/bloating.
So you don't have to be surprised if a stud is skew, the threads are not smooth and weak.
It's not the factory fault.
When you fist assembled your battery pack and (smart) BMS you might notice voltages going unstable per cell.
In that case...
You didn't thighed strong enough.
Always remove oxidation from aluminium terminal and bus-bar,
Even if you don't see it, it's there.
Polish will leave residu, so best is fine sandpaper for the bus-bar, I use metal (stainless) sponge for the aluminium.
Aluminium oxidite in 10 seconds enough to be noticed..
Best to apply ox-gard or similar.
Even then, clean the terminal before installing that bus-bar, not all cells.
The bus-bar needs to be clamped tight, 3.5-4Nm with M6.
If you are ignorant and stubborn like me, you don't spend the +/- $30 on a simple digital Torquemeter.

My pricey lesson learned, you can't feel it
Different torque will give (slightly) different voltage readings, and not tight enough will give huge voltage drop, with matching heat prodiction.
Clamping them all at the same torque will save you a lot of trouble!!
Especially if you do more complex installations, S16P3 is one of them...
Don't be ignorant anymore BUY!
The amount of mount, remount, clean again, try and error...
Your weak aluminium thread won't hold...
That's how I ended up with 39 damaged threads, out of 176..
Over 20%...
This post will have several items, as I can't attach Many pictures.
First let me start by why I needed to repair 39(!!) Threads.
I was ignorant, noob, and stubborn.
Many of the now available advice wasn't there 18 months ago.
You might guess how it's available now, not just by me, other members as well who have faced similar issues.
When you receive your cells, first thing you need to do is throw away the bolts that you received with the cells.
They are either too long or too short.
Most are 10mm thread.
The cell is 6mm
Bus-bar 2mm, if your lucky
Washer 1mm..
You do the math, one mm to long to either penetrate the terminal, or have no grip.
Double busbars will give you 5mm inside the soft aluminium.... You really need all the threads you can get.
Besides this, the twisting motion during fastening will give a lot of force on the weak aluminium thread.
If you do like me, relocate and rebuild the pack a few times... You're screwed.
Easy solution:
Grubscrew, headless bolts threaded rods, what ever the name is in your location.
They can always utilise all available threads, and have no great force when twisting them in, gentle for the weak aluminium thread.
I prefer stainless steel.
Living in Thailand, rural area, most things are difficult to obtain, most need to go online and via China.
About 30% of the orders will be cancelled or lost.. challenge to get all.
Anyways.. for you probably more easy to get.
If you have clean, undamaged threads, Loctite red is the best advicable to use.
Both aluminium and stainless steel need primer to activate the Loctite (!!)
The primer has a small brush easy to apply to hole and stud.
As it's a blind hole, 2 or 3 drops of Loctite in the center, and twist till you reach the bottom.
Some say you need to go a half twist back for additional safety, I just twist a tiny bit back to loosen the tention in the thread.
The liquid will go via the threads up, and easy swiped off the terminal.
3 minutes well spent is to watch this video to understand:
(This is M8, 4 drops, with a stud without hex, so double nut is used to twist inside)
Best is to buy cells with the stud laser welded, or cells that are intended to be used with screws, like CalB.
Just to be clear: all thin aluminium wall cells aren't intended to be used the way we do.
The threaded holes are placed by the seller or third party, NOT the factory.
This is the only official way:
We can mimic to get as close with good studs, and clamping the sides to prevent delamination/bloating.
So you don't have to be surprised if a stud is skew, the threads are not smooth and weak.
It's not the factory fault.
When you fist assembled your battery pack and (smart) BMS you might notice voltages going unstable per cell.
In that case...
You didn't thighed strong enough.
Always remove oxidation from aluminium terminal and bus-bar,
Even if you don't see it, it's there.
Polish will leave residu, so best is fine sandpaper for the bus-bar, I use metal (stainless) sponge for the aluminium.
Aluminium oxidite in 10 seconds enough to be noticed..
Best to apply ox-gard or similar.
Even then, clean the terminal before installing that bus-bar, not all cells.
The bus-bar needs to be clamped tight, 3.5-4Nm with M6.
If you are ignorant and stubborn like me, you don't spend the +/- $30 on a simple digital Torquemeter.
My pricey lesson learned, you can't feel it
Different torque will give (slightly) different voltage readings, and not tight enough will give huge voltage drop, with matching heat prodiction.
Clamping them all at the same torque will save you a lot of trouble!!
Especially if you do more complex installations, S16P3 is one of them...
Don't be ignorant anymore BUY!
The amount of mount, remount, clean again, try and error...
Your weak aluminium thread won't hold...
That's how I ended up with 39 damaged threads, out of 176..
Over 20%...
This post will have several items, as I can't attach Many pictures.


")


