diy solar

diy solar

Mounting 400W panel on RV roof

reidfo

New Member
Joined
May 19, 2024
Messages
6
Location
Bayou Vista, TX
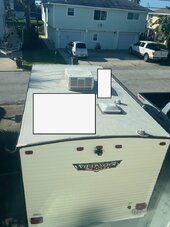
I am finalizing my RV solar install. I have a small travel trailer and it has a slightly curved roof. I plan to mount a 400W (68" x 45") panel and a 200W (54" x 30") panel on the rooftop in the next few days. What is recommended in this situation for such a large panel? Ignore the small rectangle. The large one is where I plan to put the 400W panel.

The perspective is off a bit in the picture. The 68 inch side of the panel will run front to back. The 45 inch side is left to right. I know it appears rotated in the picture.

9C31A186-8601-4432-B6B4-96CE1DC69C0A_1_201_a.jpeg
 
On my Dad’s 5th wheel he got a few feet of aluminum “L” channel 1” x 1” x .125”.

He made his own “Z” brackets.

He cut it into 3” pieces say 14 pieces - bolted half to the solar frame. Drilled a 1/4 hole then with some clamps set the height he wanted - drilled the other 1/4 hole - bolted it- then screwed it down to the roof and Dicor.

2 on front, 2 on port side, 2 on Starboard, and one on back. The homemade “Z” bracket was able to compensate for pitch of the roof.

Lots of different ways to do it.
 
I was looking at the Renogy curved Z brackets until I saw they are not recommended for large panels. I don't plan to change the solar setup on the camper once it's installed, and I'd be fine with standard Z brackets. I am just worried about the curvature of the roof.
 
The curve issue can be solved knowing that the roof is only curved side to side, but is flat front to back, so run the mounts front to back where it is perfectly flat.
Is this a rubber membrane roof? Are you going to drill the mounts to the roof?
The aluminum L-bracket (angle iron) is a good solution. However the L-bracket gets mounted to the roof, the panel can be screwed to it using self tappers. Have the hole drilled in the L-bracket already, and usee self tapper and just screw through the L-bracket into the sides of the panel. This will hold forever. You need skill to know when to stop tightening the screw, or use a drill, not an impact driver as you can strip out the aluminum easily.
Thank you. Yes, it's a rubber membrane and we'll be screwing the mounts into the roof and applying generous amounts of dicor. Seems Renogy recommends just standard Z brackets for a 400W panel. Fortunately the orientation of the panel on my roof is such that the brackets will be run down the "flat" edge.
 
Thank you. Yes, it's a rubber membrane and we'll be screwing the mounts into the roof and applying generous amounts of dicor. Seems Renogy recommends just standard Z brackets for a 400W panel. Fortunately the orientation of the panel on my roof is such that the brackets will be run down the "flat" edge.
Aluminum angle iron. One pic the foot is tucked under, the other pic the foot is outside. You want your not-tucked so you can re-do the Dicor yearly.
Mine roof is flat, so I ran side to side, but front to back is the same idea. The self-tapper screws miss the glass panel, so be careful of that. These are just #8 self-tapper metal screws. Been on here a few years. I have done this on other vehicles too.

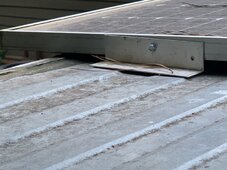
Shown is, first pic, is the front edge, short edge of a 100w panel.
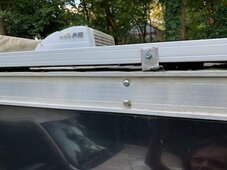
Second pic is the side, long side, with just a short piece of angle holding it. Same on other side, so 3 attachment points. The end of the panel hangs off the back is why I attached to sides. You see that it does not take a lot of metal to hold it to the roof. These are taped to the roof, but you will screw yours to the roof.
I have other panels that are like the first pic, front and rear of panel only attached at the short side. Leave room for air to flow under for cooling.

IMG_3953.jpg
IMG_3954.jpg

Well, here is the 3rd pic of the other side bc it is funny how small the bracket is. It holds, barely, but never had any issues with it.
IMG_3952.jpg
The vent cover is an issue bc it does make a small shadow on the panels except for around noon, but I dont have problems getting batts back to 100% so have left it on there, the cover is so useful for driving in the rain with vent open. The Air Cond would be a huge issue for shading, so is why the panels hang off the back so far from AC unit
 
Last edited:
If you use the Z bracket approach, make sure the brackets are screwed into a roof truss, not just to the rubber substrate which is often this waferboard that isn't going to hold well.

Last time I used Z brackets. This time I'm going to go with a Unistrut-like mounting system.
 
I have family that used Z brackets but used. Special type of glue to glue them to there RV roof. They had more of a hard top than the rubber roof. They actualy put about 6 pannels on the roof along with running all the wireing and made no holes in the roof. The system has been up and operational for about 9,000mi
 
That roof has a large pitch.
If you are fine with the panels angled to the sides, rails or brackets would be fine.
If you are preferring a flat mount, you will need a 1" angle at the top, and a 4" angle at the edge. Then you can adjust the height of the panel and get it closer to level.
 

diy solar

diy solar
Back
Top