


Nevadablue
New Member
- Joined
- Sep 3, 2022
- Messages
- 79
I decided to follow the advice I got here and set up my house system for a 24 volt battery.
I now have a 24 volt inverter (without charger).
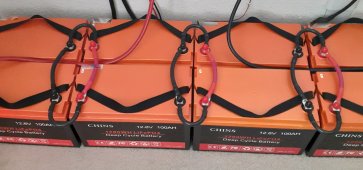
I have six 100 amp 12 volt Chins batteries.
I am told I should charge each battery before putting it in the bank.
So… I don’t have a charger and don’t really want to spend a fortune to charge these things so I can use them. Also, it would be nice to have a useable charger for emergencies.
So… why can’t I take the Renogy Adventurer charge controller I have (30 amp PWM) and hook my battery charger to it instead of solar panels, and connect that to the batteries. Chins just recommended to me to use a Renogy charger (or Vectron) because of the voltage options available. The Adventurer is Li capable and has user settings available to let me match it to the battery.
Will it work? Sure seems like a simple solution and one that also gives me the capability of charging the batteries with a generator in a dire emergency. (Days of no sun for example).
I now have a 24 volt inverter (without charger).
I have six 100 amp 12 volt Chins batteries.
I am told I should charge each battery before putting it in the bank.
So… I don’t have a charger and don’t really want to spend a fortune to charge these things so I can use them. Also, it would be nice to have a useable charger for emergencies.
So… why can’t I take the Renogy Adventurer charge controller I have (30 amp PWM) and hook my battery charger to it instead of solar panels, and connect that to the batteries. Chins just recommended to me to use a Renogy charger (or Vectron) because of the voltage options available. The Adventurer is Li capable and has user settings available to let me match it to the battery.
Will it work? Sure seems like a simple solution and one that also gives me the capability of charging the batteries with a generator in a dire emergency. (Days of no sun for example).
")


