diy solar

diy solar

MPP LV6548 Build

Nice setup Dan.

I'm in the process of getting an LV6548 set up and running. I appreciate the detail in your posts about settings. Very helpful.
 
I have studied the posts and thought about it, what about Amazon.com- Battery Disconnect Switch 12V 24V 48V 60V Battery Master Cut Off Isolator Switch Waterproof for Marine Boat Auto Camper RV ATV UTV Vehicles, Military Quality On:Off Position - Automotive.webloc for the positive leg of 48v battery input and I think a WATTS247 4 to 2 PV combiner box for the PV panel input. As a newbie I cannot get a clear idea of what is required for PV input protection and initially will have only 2 strings but the 4 to 2 combiner box seems to cover all the bases in an organized way.
 
Could someone explain to me what (back to grid) and (back to discharge voltage) mean/do?
Sure,
Back to grid - is the voltage setting that you want the inverters to transfer from using your batteries to using grid power. In my case this setting is 50v. (The lowest voltage that you want to drain your pack down to).

Back to discharge Voltage - is the voltage setting that you want your inverters to transfer from grid operation back to battery power. In this case mine is set to 55v. (The highest voltage you want to charge your pack up to).

You can use different settings if you want but I'm a bit conservative with mine. I have found that the minimal gain in amp hours isn't worth running the pack to maximum and minimum Voltage. This should help to achieve a long lifespan of the batteries as well.

Hope this helps,
Dan
Thanks Dan this is very helpful!
 
Sure,
Back to grid - is the voltage setting that you want the inverters to transfer from using your batteries to using grid power. In my case this setting is 50v. (The lowest voltage that you want to drain your pack down to).

Back to discharge Voltage - is the voltage setting that you want your inverters to transfer from grid operation back to battery power. In this case mine is set to 55v. (The highest voltage you want to charge your pack up to).

You can use different settings if you want but I'm a bit conservative with mine. I have found that the minimal gain in amp hours isn't worth running the pack to maximum and minimum Voltage. This should help to achieve a long lifespan of the batteries as well.

Hope this helps,
Dan
Hey Dan, I assume you finally have your panels up! How is it going? Have you expanded your battery?
 
I have 34 panels still on pallets in my garage... :rolleyes: I want to downsize, go with server rack batteries and ground mounted solar.
I'm doing okay here, just trying to figure out the timing of bringing the plan together. Stay tuned!

Hope you are well! Happy New Year! ?

Dan
 
I have 34 panels still on pallets in my garage... :rolleyes: I want to downsize, go with server rack batteries and ground mounted solar.
I'm doing okay here, just trying to figure out the timing of bringing the plan together. Stay tuned!

Hope you are well! Happy New Year! ?

Dan
Happy new year to you and your family also! Ground mount is the way to go! The Snap-N-Rack kits are nice, but you can build the same thing yourself way less expensive by going to a Grainger supply, which is where I think they get their components from.
My parts (minus pipes) for 18 panels was around $400 last year.
For your cells, you can get a Seplos Mason 280ah rack kit for about $400 also. Freaking heavy, but you can stack them. Check out Andy at offgridgarage youtube channel. He is doing the same thing I am with the Seplos solution. (You may want to keep your Heltec balancer though), and you can reuse all your DC connections.
I moved from the LV6548's to the LVX6048WP's, since I wanted to use them as an AC couple with my current house, which had SMA grid tied with LG panels already installed, and the WP's can handle 550V DC from a panel string(SMA's are 600V).
I Have 70KW of the Seplos gear, and am hoping to go off grid totally, with the batteries running nights and through hurricanes.
Best wishes, and thanks for your youtube uploads! They really helped me with the AC side of things when I first got into this stuff. So much fun!
 
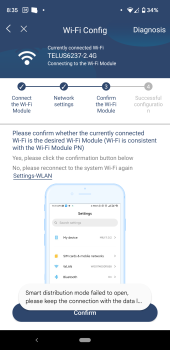
Hey any pro tips on getting the mpp lv6548 to connect to wifi? I keep getting the following error have tired many times.

(Smart distribution mode failed to open, please keep the connection with the data I...)
 

Attachments

  • Screenshot_20221230-203556.png
    Screenshot_20221230-203556.png
    191.9 KB · Views: 6
Hey any pro tips on getting the mpp lv6548 to connect to wifi? I keep getting the following error have tired many times.

(Smart distribution mode failed to open, please keep the connection with the data I...)
Turn on geo location. That may help. Chinese like to spy.
 
I will not be completely off grid. This will be grid assisted. I am monitoring the sub panel with a Myeyedro electricity monitor which I had on my mains for the past 4 years flawlessly. The Myeyedro is an excellent way to help determine sizing of a system, monitor your watts, amps, costs etc. You can turn on any load and within a second or two you can see how much draw it has.

I currently have all lighting circuits, security panel, 4 security cameras, the furnace, 3 T.V.'s, a refrigerator and my office computer on the sub panel. (about 95% of what I use daily in the house). With everything running at the same time I am drawing 2KW. I am saving head room for the A.C. (soft start) in the summer and will go from there.

Just at night (for the winter months) 8pm-8am the savings should be around 30%, then adding in the 12hrs during the day with proper solar panel sizing I am hoping to save another 40% with a goal of 70% overall.
Summer months will see a higher rate of savings. I will post true results at a later date.

I bought the copper (1/4"x 3/4") at McMaster-Carr. 1-6' piece was perfect for 16 cells. I ended up with 4 extra bus bars. $67.00 for the bus bar with a total of $96.00 after tax and shipping.
Any local metal shop has drops. Ask them
 
Yeah I made the wifi connection to the inverter and then tell the inverter to connect to my home wifi. It at this point when things fail.
Hmm. Are you using a mobile phone or laptop/iPad for comms via wifi? Did you try a secondary device? Perhaps see if wired works to a laptop first?
 
Hmm. Are you using a mobile phone or laptop/iPad for comms via wifi? Did you try a secondary device? Perhaps see if wired works to a laptop first?
Also, if you bought your inverter from Ian at Watts247.com, he is an awesome resource for support.
 
Hmm. Are you using a mobile phone or laptop/iPad for comms via wifi? Did you try a secondary device? Perhaps see if wired works to a laptop first?
Yeah I should try another device, I was a little nervous to install that software on my main computer tbh... Gonna give it another go here
 
Any idea if there would be setting on the router side or inverter that should be enable to allow this to work?
Nope. Mine worked once i figured out the wifi password. It could be a security setting on the router though. Is your DNS set to the right IP on your LAN? Its usually either provided by your internet provider, or set to the router IP address so it can provide it, like 192.168.0.1.
 
Back
Top