You are using an out of date browser. It may not display this or other websites correctly.
You should upgrade or use an alternative browser.
You should upgrade or use an alternative browser.
Ryobi Zero-Turn Mower SLA to LiFePo4 Conversion - (Updated - Build Complete With Pics!)
- Thread starter AMDPower
- Start date
AMDPower
New Member
- Joined
- May 18, 2021
- Messages
- 123
I just pulled the existing meter there is a six pin plug and a 4 pin opening. Only uses 3 pins. Trying to hunt down who actually makes this. Maybe the other pins are for different chemistry. I already have the bluetooth module on my BMS for accuracy. Personally, I just want a rough-ass look for SOC.
Edit: Looks like it's made by Curtis Instruments. Very similar to their 803 with the voltage curve dial missing. Doesn't look like it adjusts high enough anyway though. It does appear that it's 2" though! Maybe I'll grab the one with the shunt afterall. Do you think it maintains ah usage if power is disconnected though?
Edit: Looks like it's made by Curtis Instruments. Very similar to their 803 with the voltage curve dial missing. Doesn't look like it adjusts high enough anyway though. It does appear that it's 2" though! Maybe I'll grab the one with the shunt afterall. Do you think it maintains ah usage if power is disconnected though?
Last edited:
rio
New Member
Cool! I hope to get my batteries ordered soon so I can catch up with you guys. This is all very exciting.
Once you have the charger stuff all figured out, do you plan to keep it plugged in through the winter?
Once you have the charger stuff all figured out, do you plan to keep it plugged in through the winter?
AMDPower
New Member
- Joined
- May 18, 2021
- Messages
- 123
I'm not sure on that one. I might. The BMS has hot/cold disconnect so it probably won't hurt. But I'd probably lower the full charge voltage on the BMS to like 50-60% if I did that which is recommended for long term storage from what I've read. I might just leave it disconnected and occasionally monitor state of charge. If it makes it through winter without losing much, I'll go that route.
Negative, lifepo4 especially does not like charging in sub freezing. I will disconnect the charger for the winter but will keep a watch in voltage to make sure the bms(or anything else) doesn't leech the battery dry.Cool! I hope to get my batteries ordered soon so I can catch up with you guys. This is all very exciting.
Once you have the charger stuff all figured out, do you plan to keep it plugged in through the winter?
I'm in Alabama, RTR.
+1 for needing a quick look at SoC while mowing, again, would also like to monitor amperage to keep my mind at ease.I just pulled the existing meter there is a six pin plug and a 4 pin opening. Only uses 3 pins. Trying to hunt down who actually makes this. Maybe the other pins are for different chemistry. I already have the bluetooth module on my BMS for accuracy. Personally, I just want a rough-ass look for SOC.
Edit: Looks like it's made by Curtis Instruments. Very similar to their 803 with the voltage curve dial missing. Doesn't look like it adjusts high enough anyway though. It does appear that it's 2" though! Maybe I'll grab the one with the shunt afterall. Do you think it maintains ah usage if power is disconnected though?
rio
New Member
Just ordered my batteries! Went with CALB 100Ah cells (L160F100B), via Amy Z. $940 shipped, but already in a USA warehouse so I'll get them within a week. Then ordered an Overkill 16s BMS, but just learned that it's on backorder, so that may take some time to get to me. In the meantime I can build my enclosure I guess. Bit of a bummer, but I really want to go with this BMS based on everything I've read.
AMDPower
New Member
- Joined
- May 18, 2021
- Messages
- 123
Great news rio! Good luck with everything I've got some updates too.
1.) I dialed down the voltage to 56V using variable resistor VR2. Worked perfect and no more overvoltage! This should allow the cells to better balance while plugged in too. The charger now shuts off at 56V, cells top balance through resistors and then charger kicks in as it drops below 56V. Works great.
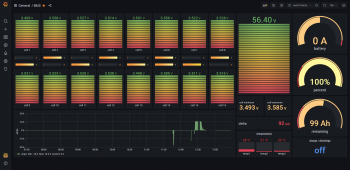
2.) I was able to configure a Raspberry Pi3 with bluetooth and use @tgalarneau's program to setup remote monitoring. It's sweet! I had to tweak a line in the Python though because the current Overkill BMS 16S units only have 3 temperature sensors (used to have 4). Because of this, his parsing routine didn't execute. After that, I slightly tweaked one of his grafana dashboards. It's really clean looking! You can download his program here if you have a JBD/Overkill Solar BMS. You can look under "issues" and see my fix in the report titled "not getting cellinfo2 data" if you have a newer 16S model.

3.) I should be getting that gauge that @rio recommended any minute. I'll report back / post after I get it hooked up.
1.) I dialed down the voltage to 56V using variable resistor VR2. Worked perfect and no more overvoltage! This should allow the cells to better balance while plugged in too. The charger now shuts off at 56V, cells top balance through resistors and then charger kicks in as it drops below 56V. Works great.
2.) I was able to configure a Raspberry Pi3 with bluetooth and use @tgalarneau's program to setup remote monitoring. It's sweet! I had to tweak a line in the Python though because the current Overkill BMS 16S units only have 3 temperature sensors (used to have 4). Because of this, his parsing routine didn't execute. After that, I slightly tweaked one of his grafana dashboards. It's really clean looking! You can download his program here if you have a JBD/Overkill Solar BMS. You can look under "issues" and see my fix in the report titled "not getting cellinfo2 data" if you have a newer 16S model.

3.) I should be getting that gauge that @rio recommended any minute. I'll report back / post after I get it hooked up.
rio
New Member
Dang, that looks awesome!
Looks great! I have a similar Grafana dashboard for my Solar setup using Batrium BMS. Not sure I want this for my lawn mower... haha... but really cool.
I got the 350A shunt today and while not the size of Texas, the terminal/posts are much larger than my ring terminal connectors, so I'll have to get creative here on how to redo my terminal ends.
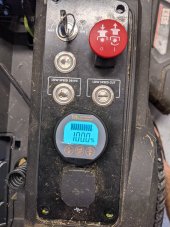
Just looking at the display, it almost looks like it will drop right in to replace the old one.
I got the 350A shunt today and while not the size of Texas, the terminal/posts are much larger than my ring terminal connectors, so I'll have to get creative here on how to redo my terminal ends.
Just looking at the display, it almost looks like it will drop right in to replace the old one.
AMDPower
New Member
- Joined
- May 18, 2021
- Messages
- 123
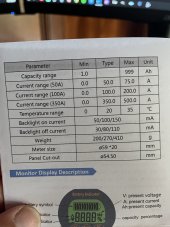
Ahhhh!!!!! I just stripped my positive terminal. Damnit... I tried to rethread to M8 and then stripped again. Just bought a knock-off helicoil kit. From what I read here those work pretty good? Maybe I'll just order up a different meter too. @tentious did you say you saw a 150A peak somewhere? I didn't see that on the one I was looking at. Have a link?
Sucks you stripped the threads! I've been very careful because I know it's just aluminum there. I made sure to add lock washers to keep things tight.
I managed to widen the holes a bit to fit around the 500a shunt.
The meter is just a TAD bigger than existing hole, I'll have to drimmel it out I guess. Otherwise, looks great.

I managed to widen the holes a bit to fit around the 500a shunt.
The meter is just a TAD bigger than existing hole, I'll have to drimmel it out I guess. Otherwise, looks great.


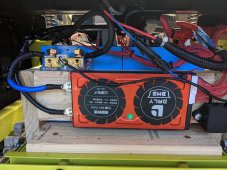
Just took it for a quick spin and I'd say it's accurate, the quick spin also put my mind at ease in regards to amperage draw, I only saw a brief spike up to 70-80amps when hitting some VERY wet and thick grass, which this won't happen that often. I won't have a chance to do the full yard/discharge until the weekend because of the rain. It's neat to also see regenerative breaking down a hill! Haha! It is sensitive enough to pick up on the amps used by the relay/contactor and control board when you turn it on. I'd say it's pretty much complete except for some retaining clips I'll print out to hold down the cells a little better vs just relying on the fixturing. My charger arrives tomorrow(bought the same one as you), so some splicing and heatsink is on the todo tomorrow. As long as the charger works out, I'd say this is a successful project.
rio
New Member
That's amazing. Is that an acrylic mount for your shunt? Did it come with it or did you make it? I'll wait to see what @AMDPower says about his new monitor and I might just get the 100A version as well. It's nice to be lagging behind you guys, haha!
Do you guys have any thoughts about compressing the cells? It looks from your build pictures that you're not doing that. I'm trying to decide whether or not to do it. Maybe not necessarily apply any pressure but just something to prevent them from expanding so that the battery terminals don't experience any stresses if the cells do want to bulge a little.
So now that you tuned the voltage output of your charger, are you happy enough with it to recommend it?
The acrylic mount comes with the shunt. Yes, I would see how @AMDPower gets on with his 100A version. The 350A version is cumbersome and the bolts are huge so I had to drill out my lugs a bit.
As for compressing the cells, wow, where do I start, it's contentious. You should follow the spec sheets if available. If that's not available, if you check most spec sheets, most manufactures don't mention to compress the cells... they want them fixtured. Meaning, they should be snug so that when fully charged and they naturally expand, they should be compressed at that state. When in a discharged state, they should decompress and be snug. I'm using a 2x4 positioned center mass on the ends of the 2 rows of cells as the expansion will be more in the center of the cells vs the edges. I also left a little room on the bus bars so that as they expand, they can move a bit as to not put stress on the cell terminals.
Again, the who cell compression is a huge discussion and most will tell you you're doing it wrong. Regardless, LiFePo4 batteries without ANY compression will have many 1000s of full charge cycles vs 3000-5000 with depending on mfg, this way outlasts these lead acids we're replacing. I will likely only put 30-40 discharges a year and with only ~1000 LiFePo4 uncompressed, I'm still looking at 30+ years of service. I think something else will break.
Similar threads
- Replies
- 3
- Views
- 369
- Replies
- 16
- Views
- 399
- Replies
- 7
- Views
- 863
- Replies
- 2
- Views
- 287


