diy solar

diy solar

Cleaning the terminals after JB Welding studs in

SlimyLemur56

New Member
Joined
Feb 20, 2020
Messages
27
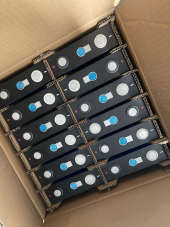
My cells came with mincy M4 screws holes, 50% wouldn't accept the provided screws, and several stripped out just trying to get the screws to go in the very first time to test the threads. I retapped them to M8, using a drill press to start the tap in an attempt to keep it as square as possible. I am able to get M8 studs threaded in to almost the full depth of the original screws, but there is some slop and wiggle between the stud and the tapped hole because aluminum terminals were so gummy that the tap kept getting stuck, probably removing more material than it should.

Because of the slop, and the fact that unscrewing stud nuts could just unscrew the stud from the terminal, I want to epoxy the studs into the terminals. I have seen a lot of discussion about this but it seems to mostly gloss over what worries me the most, which is protecting the tops of the terminals from excess epoxy. I'm sortof looking for a sanity check about my paranoia about this, and any advice on techniques.

From what discussion I've read they seem to just say "clean the studs with acetone". Is it really so simple? I imagine a solvent just thinning the epoxy down until it's invisible but creating an invisible laminant reducing the conductivity. Is this an issue?

What I am planning to use currently is J-B Weld KwikWeld "Quick Settling Steel Reinforced Epoxy"

Would it be a good idea to do multiple wipes with fresh paper towels, a process for each terminal like:
1. get mixed epoxy in the holes and on the stud threads and insert them
2. dry wipe excess epoxy with a paper towel
3. solvent on a paper towel and rewipe, with the paper towel around the stud twisting like I was screwing the paper towel down on the stud against the terminal
4. new paper towel, new solvent, repeat #3 several times

Is there any chance of the epoxy offgassing some vapor as it cures/drys and depositing insulating material on the surrounding terminals the way superglue would? I know it's totally different than superglue but I don't know if something similar might happen
Am I making too big of a deal of the concern?
Is acetone is a better solvent for this than 70% isopropyl?

I'm expecting to run low (<5A) current on this and will have a 15A breaker on it.

Thanks for any comments
 
Consider some type of adhesive tape on the terminal. Cut a hole to insert the stud & epoxy. Use the epoxy sparingly. Wipe up any excess. Then remove the tape. Next day do a normal cleaning on the terminal for assembly.

I don't think there is any outgassing of JB that would be a concern. Does have a slight smell but the two parts just combine and harden.

Have used lots of JB but not for this specific use.
 
So we are assuming that the epoxy is conductive?
Or are we relying on the flat part of the terminals carrying all the current. How many amp hours are these batteries.
Personally if they are already this shit they're not going to be any better when you fix them up, I would just send them back.
 
Andy, from Off-Grid Garage has a easier and faster method of repairing terminals. https://off-grid-garage.com/batteries/ Scroll down just about halfway on that page. He also has a video on it.
I wish I had known about that earlier, although it is for stripped M6 threads and mine were initially M4. Though really, drilling the m4 to m6 and then self tapping those repair studs in would have been easier and probably worked well. The gummy terminal aluminum would have been an advantage in that case instead of a problem.

So we are assuming that the epoxy is conductive?
Or are we relying on the flat part of the terminals carrying all the current. How many amp hours are these batteries.
Personally if they are already this shit they're not going to be any better when you fix them up, I would just send them back.
I'm mostly following other threads about thread repair on this forum. The consensus is although the studs can theoretically help carrying current it's a trivial amount and if you had to rely on them you have much worse problems, so when people are talking about epoxy or loctite red on the studs it's not expected that they continue to be significantly conductive.

I wish returning them was an option, but I'm over 2 years past purchase. This has been an ongoing nightmare basically since covid started.

Consider some type of adhesive tape on the terminal. Cut a hole to insert the stud & epoxy. Use the epoxy sparingly. Wipe up any excess. Then remove the tape. Next day do a normal cleaning on the terminal for assembly.

I don't think there is any outgassing of JB that would be a concern. Does have a slight smell but the two parts just combine and harden.

Have used lots of JB but not for this specific use.
I had sorta considered using tape like this but I was worried about even the tape residue plus the possibility of ending up with tape epoxied on. But the process you describe sounds good. Clean the tape off immediately, then remove the tape, then reclean the terminals.

I'll give it a shot!
 
Before I glued my terminal studs in using blue lock tite, I tried using acetone to clean up a piece of glue on my bench after the glue hardened. The acetone had zero effect, even after I soaked a small piece in the acetone. This stuff hardens fast.

You might experiment cleaning up some of your JB weld with various solvents on the bench, before and after the JB weld dries.
I think you are wise to be concerned about contaminating your flat terminal surfaces.
 
Good idea. I'll make some swatches of this particular JB weld and then try cleaning them off after different increments of time.
 
Tape on the surface before the gluing or use conductive silver epoxy. Expensive, but you do not need much.
 
I just used blue painters tape when I used red locktight on mine, hole for the stud can be cut with a sharp drill bit turned counterclockwise gently. Cleaned of excess lock tight, pulled tape and cleaned terminals.
 
I ended up knocking it out last night. I'm going to describe how I did in excruciating detail because that's what I wish I could have found when I was searching. I was probably way more careful than I needed to be but very much better safe than sorry.

I used electrical tape, because I wanted something that wouldn't be porous. Also, I had arbitrarily chosen the dark grey JB weld, not the clear kind, but that turned out to be a good thing. With the grey it's easy to see if any of it is coming up (or when it stops coming up) while wiping it. If it was clear epoxy I don't think that would have worked, so I really recommend grey epoxy.

I'd use a 2 inch piece of electrical tape going across the top of the cell so I'd have plenty on either side to grab onto, to lift it off when done.

After pushing the electrical tape down onto the terminal, the outline of the hole is very obviously visible through the tape. I used a hobby knife to carefully cut through the tape and make the hole, taking care not to mess up the threads with the razor. I didn't want any tape getting pulled down between the stud and threads. I'd prep both terminals on a single cell this way and then mix a small amount of J-B weld. Used a popsicle stick to scoop some mixed epoxy right into each hole, and then rolled the very bottom of the stud in the epoxy so it was deep in the threads. Care is needed not to get excess epoxy higher up on the stud threads because it's very difficult or impossible to clean epoxy out of the troughs of the threads and obviously the threads above the terminals have to stay functional.

Then I'd put the stud in and slowly screw it down, working it back and forth almost like a tap to be sure the epoxy got spread around in the threads all the way to the bottom. Sometimes it would seem I had hit the bottom, but then after a short pause, trying again it would easily go farther. I think it was the pressure of epoxy in the hole under the stud needing to work its way up and out to make room. Also wiggling the studs (there was slop after all) would help work them down more easily when they seemed stuck. Once at the bottom I'd run them back and forth one last time and then move onto cleanup.

I had initially imagined trying to do this without tape and in such a way that the epoxy just went in the hole and if I was careful enough it wouldn't spill. That would have been a disaster. There is no avoiding spill over.

I probably put slightly too much epoxy in each hole given the ring that pushed out onto the tape as the stud went in, but I wanted it to be enough. Even with the 6 minute quick-set epoxy there was really more like 10 minutes just to get tacky and it still wiped very clean with acetone on foil in my tests. So it does clean up, but the only risk of too much epoxy is that as it spills out in a ring when the stud goes in, if the ring gets too tall, it's a lot of epoxy touching threads that are outside of the terminal. And as I said before, getting epoxy out of the troughs of the threads is effectively impossible. Care must be taken when cleaning not to just smear this ring-blob of epoxy around - getting it deeper or higher on the stud threads.

So, I'd start with little squares of toilet paper and just precisely dab the excess blobs of epoxy off, throwing the square away and getting a new one after each dab. When the bulk of it was off I'd switch to blue disposable shop-paper-towels (whatever they are called), put some acetone on and clean the top of the tape with acetone. When I pull the tape up over the stud, I don't want epoxy left on top of the tape getting smeared across the threads. So I'd put acetone on the folded edge of the paper towel, and then wrap it around the stud with the folded, acetoned edge down against the terminal/tape. Then with my fingers i'd pinch it against the threads while also pushing it down on the terminal, and rotate the whole cell around counter-clockwise under my pinched fingers so the threads were guiding the paper towel ever lower and tighter against the terminals while getting circular coverage on both the thread and terminals.

Once the tape looked clean, I'd just pull both sides of it up and lift it over the stud. For some reason I expected to have to cut the tape but of course with a hole in it you can just lift it straight up/off. With the plastic/rubber electrical tape there is no chance of it tearing up or leaving little pieces behind. Then with the tape off, the terminal looks clean, but I repeat the process with the acetone and the paper towel, pinching and spinning the battery to "thread the paper towel down" against the terminal. After each pass, I'd examine the paper towel for signs of any grey epoxy that came up. I throw the paper towel away (so not to smear what I pulled up back on) get a new one, and repeat until there is no sign of epoxy on the paper towel. Really, I did it atleast one more time after I stopped seeing anything coming up.

Clean up both terminals this way and then repeat the whole process for the next cell, doing them one at a time so there is no time crunch with regards to the epoxy setting.

It should be about dry by now but I haven't tested it. If I have any issues that make me second guess the way I did this, I'll update this post.
 
Great writeup!

In order to measure how far the stud should be screwed down into the hole, I applied a short piece of painters tape onto the threads of the terminal to mark the proper depth. The tape acted like a depth gauge.

Please let us know how things are working out for you. I am very interested.

Thank you!
 
Doesn't the stud stop turning once it bottoms out? If that is the case, why need to mark it? When I glued mine in, I turned them in by hand and once they bottomed out, just a tad bit tighter. It's not that difficult and it sure seems like people over think this.

You only need a small bit of epoxy. Just paint the threads. You do not want it inside the hole because you could cause hydraulic issues and break the pad.
 
I don't have a lot of experience with this and depending on the activity I could either ruin expensive cells or at worst start a fire. So I won't argue at all that I'm overthinking it, but that's the side I prefer to err toward...

Obviously the stud stops turning when it bottoms out but as mentioned in my wall of text above, there were points where it refused to go down more because there was epoxy under the stud that needed to work it's way out. It shouldn't be hard to figure this out like I did, but I wanted to mention it anyway. I was turning them only by hand and just gave them a chance for what was under pressure to work it's way out, and/or wiggled them a bit and they would keep going. But if I was in a rush I could have thought they were at the bottom and walked away which would have been bad.

I also agree that I used too much epoxy, but on the other hand just painting the threads I think would have not been enough. At least in my case because of the way my tap kept getting stuck in the gummy aluminum and I had to fight it to get it back out, there was more slop than I liked in the threads. I think just painting the threads would have spread the epoxy way too thin and left bubbles and weak spots. The way I did it, all of the space between the thread and stud is filled solid.

The tape to mark the depth is not a bad idea, but given that I did put epoxy in the holes, the way the excess pushed out would have hidden the edge of the tape as it was close to the bottom. But really it was not hard to find the bottom anyway without the tape, just watching out that it was actually the bottom and not just the epoxy saying "wait and give me a chance to get out of the way".

Although now that I think about it, taping the entire upper part of the stud might have been a good idea to protect it from excess epoxy so there would have not been a chance of derping the threads while cleaning it.
 
In hindsight I would recommend a sleeve/spacer over the stud and hand tighten the nut to pull the stud straight and hold it there while the epoxy hardens.
 
How would one go about adding a thread to these terminals? regular thread tapper? how deep should it go?

1666278673818.png
 
How would one go about adding a thread to these terminals? regular thread tapper? how deep should it go?

View attachment 117129
Ouch, I believe you want to have them laser welded.
I would make sure you use a flat bottom tap if you try to drill and tap them, I would say that is extremely risky unless you have precision down to thousandths of an inch and detailed specs from the manufacturer.
 
I didn't know they sold cells like that? Maybe they are Bluetooth? :p

That packaging - seems - minimal - amazing they aren't damaged.
 
I would suggest you find someone nice to find out how deep their holes are.
 
Back
Top