silverstone
Solar Enthusiast
- Joined
- May 3, 2022
- Messages
- 1,041
I'd like to have some cross-checking of my current ideas for my Battery v2 Project.
The Battery v1 was:
- 2x16s in Parallel
- Over designed
- Too complex
- Non modular
- Non accessible (e.g. to torque cable lugs to busbar)
- Lots of features not used
- Took 3-6 moths to build
- Super expensive
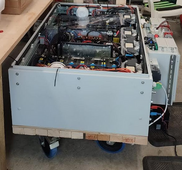
For the Battery v2 I'm looking for a MUCH more streamline design.
Always a box on wooden platform with wheels, but:
- 1x16s only - Easier to manufacturer
- No mounting plate suspended on these steel rods (see middle of the picture) - The BMS mounting is a nightmare and torquing the cable lugs on the bottom busbar is next to impossible when assembled
- Same 2 boxes "strategy" (BIG for battery cells + BMS/Fuse and SMALL for Breakers / Relays / Power Supplies)
- Eliminate the Precharge Resistor Circuit on the top of of Battery v1, already on the Inverter Side (4 x 1P Breakers saved + lots of terminal blocks/busbars not needed)
- Only 2 Mounting Plates and Pre-assembly
- Use WAGO 285-150 for EVERYTHING - Lot less of Cable Lugs to crimp etc - Costs a bit, but save lots of time
- Use the same OLD JK BMS Board (NO inverter communication - anyway the Emerson charger has no communication to the batteries)
- LF304 cells instead of LF280 cells (prefer double terminals & the studs on the LF280 are just too short )
)
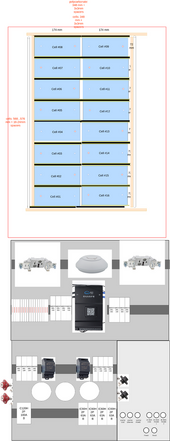
It might not fully easy to see, but:
- Battery cells seen from above
- Mounting plates seen from the back/front
- 1st mounting plate is internal mounting plate facing cells
- 2nd mounting plate is the additionnal box mounted on the front (left)
- Right side light gray of the bottom of the picture is the unoccupied portion of the BIG box that is NOT covered by the SMALL box (although I could at that point most likely use the full width & move the signal connectors as well).
That would be 600mm wide x 800 mm long x 400mm tall for the BIG box (excluding wheel platform) + additional 400mm wide x 210mm deep x 380mm tall for the SMALL box bolted from the front.
When looking at a more compact solution like this, I wish they would manufacture boxes in that size
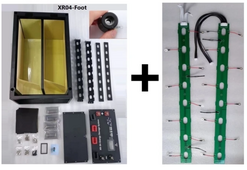
Of course the width of 440mm is standard 19'' Server Rack, but the height and depth are not.
That box for instance is 440 mm wide x 720 mm long x 240 mm tall. 240mm tall is approximately 5.4u. So the next possible is 6u.
Mechanical integrity is also a requirement so of course the enclosure has to be steel, NOT aluminum.
I have approx. 4.8m of place for those batteries, so 8x600mm would be what I could fit if I use my original idea.
But if it's only 440mm wide, I could fit 4800mm/440mm = 10.9 batteries. And maybe also squeeze an 11th battery in ? .
The problem with that black box from Aliexpress and other similar (e.g. Seplon MASON) is that there is barely ANY space in front of the cells.
Yes, I could take that and bolt a custom box on the front instead of using their front panel but where could I buy / how could I build comething custom like that ???
If I think like Supermicro 2u and Supermicro 4u Cases, they could be the right size and they are built like a tank, but I need a 6u-9u case and those are more difficult to find.
So something like 6u-9u 800mm deep would be ideal. But then I need to figure out how to do cells compression & bolt another box to the front .
.
Carrying / lifting handles would be a plus of course ...
Any ideas ?
The Battery v1 was:
- 2x16s in Parallel
- Over designed
- Too complex
- Non modular
- Non accessible (e.g. to torque cable lugs to busbar)
- Lots of features not used
- Took 3-6 moths to build
- Super expensive

For the Battery v2 I'm looking for a MUCH more streamline design.
Always a box on wooden platform with wheels, but:
- 1x16s only - Easier to manufacturer
- No mounting plate suspended on these steel rods (see middle of the picture) - The BMS mounting is a nightmare and torquing the cable lugs on the bottom busbar is next to impossible when assembled
- Same 2 boxes "strategy" (BIG for battery cells + BMS/Fuse and SMALL for Breakers / Relays / Power Supplies)
- Eliminate the Precharge Resistor Circuit on the top of of Battery v1, already on the Inverter Side (4 x 1P Breakers saved + lots of terminal blocks/busbars not needed)
- Only 2 Mounting Plates and Pre-assembly
- Use WAGO 285-150 for EVERYTHING - Lot less of Cable Lugs to crimp etc - Costs a bit, but save lots of time
- Use the same OLD JK BMS Board (NO inverter communication - anyway the Emerson charger has no communication to the batteries)
- LF304 cells instead of LF280 cells (prefer double terminals & the studs on the LF280 are just too short

It might not fully easy to see, but:
- Battery cells seen from above
- Mounting plates seen from the back/front
- 1st mounting plate is internal mounting plate facing cells
- 2nd mounting plate is the additionnal box mounted on the front (left)
- Right side light gray of the bottom of the picture is the unoccupied portion of the BIG box that is NOT covered by the SMALL box (although I could at that point most likely use the full width & move the signal connectors as well).
That would be 600mm wide x 800 mm long x 400mm tall for the BIG box (excluding wheel platform) + additional 400mm wide x 210mm deep x 380mm tall for the SMALL box bolted from the front.
When looking at a more compact solution like this, I wish they would manufacture boxes in that size

Of course the width of 440mm is standard 19'' Server Rack, but the height and depth are not.
That box for instance is 440 mm wide x 720 mm long x 240 mm tall. 240mm tall is approximately 5.4u. So the next possible is 6u.
Mechanical integrity is also a requirement so of course the enclosure has to be steel, NOT aluminum.
I have approx. 4.8m of place for those batteries, so 8x600mm would be what I could fit if I use my original idea.
But if it's only 440mm wide, I could fit 4800mm/440mm = 10.9 batteries. And maybe also squeeze an 11th battery in ? .
The problem with that black box from Aliexpress and other similar (e.g. Seplon MASON) is that there is barely ANY space in front of the cells.
Yes, I could take that and bolt a custom box on the front instead of using their front panel but where could I buy / how could I build comething custom like that ???
If I think like Supermicro 2u and Supermicro 4u Cases, they could be the right size and they are built like a tank, but I need a 6u-9u case and those are more difficult to find.
So something like 6u-9u 800mm deep would be ideal. But then I need to figure out how to do cells compression & bolt another box to the front
Carrying / lifting handles would be a plus of course ...
Any ideas ?


