robot_zombie
New Member
- Joined
- Sep 22, 2022
- Messages
- 68
So over the last few months (and with increasing power prices here in Australia), I decided to upgrade my home solar setup to include storage, and being the crazy DIY type, I got sucked into the idea of building a DIY 16S pack. Previously I had upgraded my solar system (6.1KW PV, goodwe 5048D-ES hybrid inverter), and was running with a borrowed 204AH 15S pack, which was... poorly built. The pack was constructed in a 15S3P setup with 70AH cells, and the Alu bus bars caused all kind of frustrating balance issues. I originally planned to run this pack in parallel with the new pack (but only using 15S obviously), however I had to return the 204AH so have gone with the full 16S for this build.
So here is my build thread... criticism welcome... it is a little rough around the edges and could be improved but fingers crossed it works well and shouldn't catch on fire haha.
My journey of ordering batteries has been a little hectic, I originally got sucked into ordereing cheap cells from Ali which ended up being a scam (got the money back from paypal). After realizing alibaba was the place to order cells, I ended up ordering 24 CATL 302AH cells from shenzen EEL battery co (16 for me, 8 for a friend), at USD$108 each. Freight to Australia was $350 USD. Landed cost around 0.21$/whr AUD incl paypal/currency conversion (~$211/cell AUD). Why shenzen eel? I wanted to get the largest cells that were easily available, and most other suppliers I talked to were pushing the EVE280K, also, Rosa@shenzen EEL was good at sales, and the price was competitive. The order was placed on the 27th Sept, cells delivered 28 Nov.
Cells look good - flat, no swelling, appearance new, every cell delivered @ 3.299V. Capacity test on a few cells pending, as well as the pack (first charge today). QR code inconsistency as reported by others on the forum (QR not in original CATL location), despite this if the capacity is good I will be a (reasonably) happy customer.
After reading threads about compression for hours, I decided to make a basic fixture, holding the cells in place, without worrying too much about compression pressure etc (calendar aging and all that...). Cells are in 8S blocks, with 20mm ply end plates. Some cut pieces of old solar mounting rail are used to spread the force from 2x m10 threaded rods per side. I used 3mm EPDM foam tape between cells and on the end plates (stuck to cut A4 sheets so I didn't need to stick anything directly to the cell).
I used a workshop/tool shelf with wheels from amazon as an enclosure, with 8 cells on each shelf. Seems sturdy enough, and has wheels... cheap too. Not bad, but probably fairly close to its limits with 16 cells on board! Each 8S block of cells is sitting on a wooden plank, with a layer of fire blanket between the cells and the wood. Before assembly I lightly wire brushed (brass brush) the terminals, then cleaned with INOX MX3. I used the as supplied bus-bars for the cell connections, also coated with a little MX3.
BMS is a 150A JK 24S/2A balance unit, with a 100A MCB (this is a polarized MCB, so not entirely suitable... will replace with non polarized ASAP). There is also a 160A ceramic fuse between the battery and the inverter.
I made a busbar from 20x6mm copper, with a 3d printed housing (yet to add the cover plate), if anyone is interested in the designs let me know, happy to share. I used a CNC to cut the threads in the copper and machine a 100 micron recess for the cable lugs.
I planned to build the pack - charge from inverter until close to full, then disassemble for top balance. I hoped to get away without the top balance, as shenzen EEL assured me the cells were shipped as fairly closely matched, relying on the BMS to even out minor imbalance over time.
Onto some pics; cells delivered!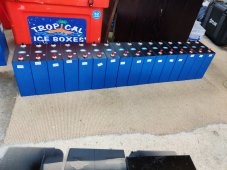
Building 8S cell blocks, this worked fairly well, and I could build the packs on the floor before lifting them up and putting them on the shelf.
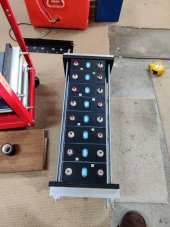
assembling into the shelf:
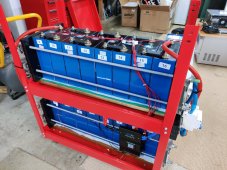
finished setup:
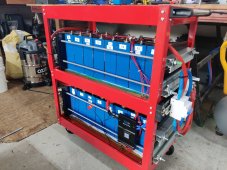
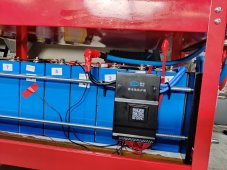
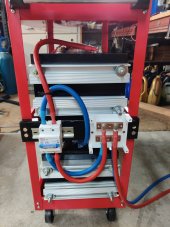
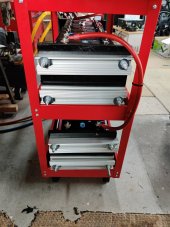
The rest of the setup in the shed (yes those are beer taps, keg freezer is under the inverter):
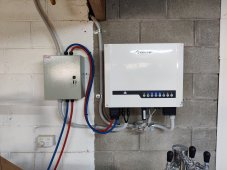
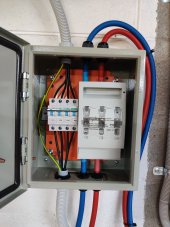
Box has PV circuit breakers and DC battery fuses:
After firing up the BMS for the first time and connecting the setup to the inverter, I proceeded to charge the pack up (with baited breath haha) from the grid. After having all kinds of balance issues with the previous 15S3P pack, I was expecting problems and runners, and planned on dissasembling, re-wiring each 8S block to 8P and top balance to 3.6V. Anyway... from delivered SOC the pack took 11 kwhr with absorbtion at 3.475 VPC (which on my previous battery, gave pretty much full capacity +/- a few %), no runners, no BMS disconnects, maximum delta of 100mV right as charging stopped, and delta's sitting around the 15-20mV point until the last kwhr or so.... ! woooo... first charge success!!
So... so far so good... hopefully managed to get away without the top balance.
Will update in a few days with pack capacity and a few individual cell tests! (take ages as I only have a 15A PS to charge and 30A discharge tester available)
So yeah... questions / comments / roast my build ahaha
So here is my build thread... criticism welcome... it is a little rough around the edges and could be improved but fingers crossed it works well and shouldn't catch on fire haha.
My journey of ordering batteries has been a little hectic, I originally got sucked into ordereing cheap cells from Ali which ended up being a scam (got the money back from paypal). After realizing alibaba was the place to order cells, I ended up ordering 24 CATL 302AH cells from shenzen EEL battery co (16 for me, 8 for a friend), at USD$108 each. Freight to Australia was $350 USD. Landed cost around 0.21$/whr AUD incl paypal/currency conversion (~$211/cell AUD). Why shenzen eel? I wanted to get the largest cells that were easily available, and most other suppliers I talked to were pushing the EVE280K, also, Rosa@shenzen EEL was good at sales, and the price was competitive. The order was placed on the 27th Sept, cells delivered 28 Nov.
Cells look good - flat, no swelling, appearance new, every cell delivered @ 3.299V. Capacity test on a few cells pending, as well as the pack (first charge today). QR code inconsistency as reported by others on the forum (QR not in original CATL location), despite this if the capacity is good I will be a (reasonably) happy customer.
After reading threads about compression for hours, I decided to make a basic fixture, holding the cells in place, without worrying too much about compression pressure etc (calendar aging and all that...). Cells are in 8S blocks, with 20mm ply end plates. Some cut pieces of old solar mounting rail are used to spread the force from 2x m10 threaded rods per side. I used 3mm EPDM foam tape between cells and on the end plates (stuck to cut A4 sheets so I didn't need to stick anything directly to the cell).
I used a workshop/tool shelf with wheels from amazon as an enclosure, with 8 cells on each shelf. Seems sturdy enough, and has wheels... cheap too. Not bad, but probably fairly close to its limits with 16 cells on board! Each 8S block of cells is sitting on a wooden plank, with a layer of fire blanket between the cells and the wood. Before assembly I lightly wire brushed (brass brush) the terminals, then cleaned with INOX MX3. I used the as supplied bus-bars for the cell connections, also coated with a little MX3.
BMS is a 150A JK 24S/2A balance unit, with a 100A MCB (this is a polarized MCB, so not entirely suitable... will replace with non polarized ASAP). There is also a 160A ceramic fuse between the battery and the inverter.
I made a busbar from 20x6mm copper, with a 3d printed housing (yet to add the cover plate), if anyone is interested in the designs let me know, happy to share. I used a CNC to cut the threads in the copper and machine a 100 micron recess for the cable lugs.
I planned to build the pack - charge from inverter until close to full, then disassemble for top balance. I hoped to get away without the top balance, as shenzen EEL assured me the cells were shipped as fairly closely matched, relying on the BMS to even out minor imbalance over time.
Onto some pics; cells delivered!

Building 8S cell blocks, this worked fairly well, and I could build the packs on the floor before lifting them up and putting them on the shelf.

assembling into the shelf:

finished setup:


The rest of the setup in the shed (yes those are beer taps, keg freezer is under the inverter):

Box has PV circuit breakers and DC battery fuses:

After firing up the BMS for the first time and connecting the setup to the inverter, I proceeded to charge the pack up (with baited breath haha) from the grid. After having all kinds of balance issues with the previous 15S3P pack, I was expecting problems and runners, and planned on dissasembling, re-wiring each 8S block to 8P and top balance to 3.6V. Anyway... from delivered SOC the pack took 11 kwhr with absorbtion at 3.475 VPC (which on my previous battery, gave pretty much full capacity +/- a few %), no runners, no BMS disconnects, maximum delta of 100mV right as charging stopped, and delta's sitting around the 15-20mV point until the last kwhr or so.... ! woooo... first charge success!!
So... so far so good... hopefully managed to get away without the top balance.
Will update in a few days with pack capacity and a few individual cell tests! (take ages as I only have a 15A PS to charge and 30A discharge tester available)
So yeah... questions / comments / roast my build ahaha


