diy solar

diy solar

I did a bad thing and now need advise to fix it.

zedconnor

New Member
Joined
Feb 16, 2023
Messages
83
Location
Myanmar
20240110_174439.jpg20240110_174508.jpg


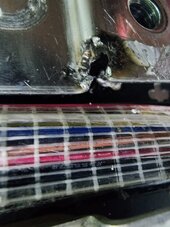
I did it several months ago when I accidentally shorted it with a wrench.

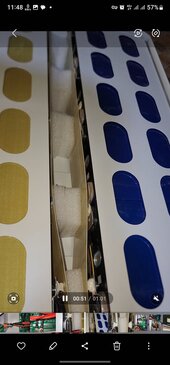
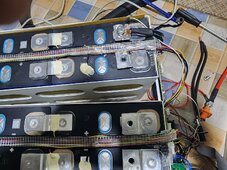
It's all laser welded. It is a 51.2V 200Ah pack.
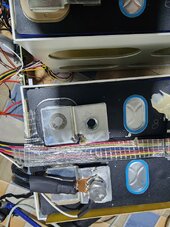
The style is 8 batteries facing each other.
Very difficult to work in that narrow area.

But that damage on the busbar is making me worried to just keep using it.

Any advise on how to fix it?
Are spot-welders any good on welding the busbars back to the cells?

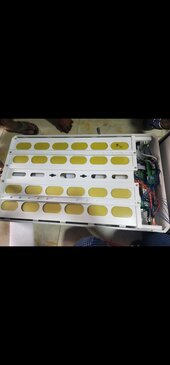
Current Condition of Battery Pack
_________________________________
All cells except cell no.9 are balanced.
No.9 will jump up high if charged with anything higher than 10A and trigger Cell OVC bms.
 
Could you just grind or file off the slag and then soldier the gap? The gap doesn't look like it goes super far into the bar / lug... If you wanted, could cover the gap with some copper strands like a wire section or something (and flow the soldier in to fill the gap with copper embedded in).
 
Additional pictures of pack.
 

Attachments

  • Screenshot_20240112_114826_Gallery.jpg
    Screenshot_20240112_114826_Gallery.jpg
    74.4 KB · Views: 33
  • Screenshot_20240112_114759_Gallery.jpg
    Screenshot_20240112_114759_Gallery.jpg
    46.4 KB · Views: 34
All cells except cell no.9 are balanced.
No.9 will jump up high if charged with anything higher than 10A and trigger Cell OVC bms.

I didn't see this part the first time. Do you think shorting it damaged a FET on the board maybe? Perhaps the shorting on it did more unseen damage than just burn the connector...

Is that connector on the BMS itself or where is it exactly?
 
I didn't see this part the first time. Do you think shorting it damaged a FET on the board maybe? Perhaps the shorting on it did more unseen damage than just burn the connector...

Is that connector on the BMS itself or where is it exactly?
No it is on the connector.

I stripped everything down now.
And I tested it again with bms all connected and cell no 9 is no longer causing any troubles.

Maybe loose connection was the culprit.
 

Attachments

  • 20240112_183512.jpg
    20240112_183512.jpg
    207.2 KB · Views: 45
  • 20240112_183508.jpg
    20240112_183508.jpg
    150.8 KB · Views: 49
  • 20240112_183616.jpg
    20240112_183616.jpg
    359.8 KB · Views: 42
  • 20240112_183512.jpg
    20240112_183512.jpg
    207.2 KB · Views: 44
Clean the connections. Repair that balance lead.

BTW That cell(s) maybe damaged.

Go ahead and manually top balance your pack. If you don't have an adjustable power supply, you can use a known DC load to bleed power from the high voltage cells. (DC Light buld, resistor, DC fan.)
 
Clean the connections. Repair that balance lead.

BTW That cell(s) maybe damaged.

Go ahead and manually top balance your pack. If you don't have an adjustable power supply, you can use a known DC load to bleed power from the high voltage cells. (DC Light buld, resistor, DC fan.)
All cell voltages are perfectly balanced.
(It is only when charging or discharging does cell no.9 was draining/charging up very rapidly and causing bms to shutdown.
But the problem seems have disappeared after i disassembled the pack and temporarily reassembled it outside the box and tested with a 2000W load.<induction stove>)
Balanced...at what voltage did you check the balance?
 
Back
Top