diy solar

diy solar

Teardrop caravan is mouldy ? solar system removal?

new teardrop shape? Flat roof still or curved

  • flat roof

    Votes: 1 50.0%
  • curved roof

    Votes: 1 50.0%
  • flat roof, curved edges

    Votes: 0 0.0%

  • Total voters
    2

Paul standen

New Member
Joined
Sep 21, 2019
Messages
70
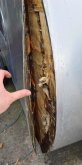
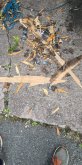
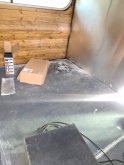
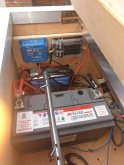
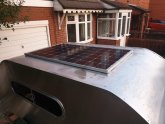
ok so sadly my teardrop caravan which i was building last year has become a waterlogged hell hole of black mould. How do i safely remove my 310w solar panel without frying anything?

Im thinking i remove the 12v fuse from the fuse board first then disconnect the positivw and neutral in that order??

If anyone can confirm this as im going to rebuild the teardrop caravan using a new technique of rigid foam board and fibreglass to make a composite shell. Im hoping the only thing i have to replace is the shell. Heres a couple of sad times images.....

I didnt seal the edgea qell enough on the front and ita got through somehwere on my flat roof too causing mould on the floor inside ?
 

Attachments

  • received_307962230532932.jpeg
    received_307962230532932.jpeg
    92.2 KB · Views: 25
  • received_330136021365733.jpeg
    received_330136021365733.jpeg
    197.7 KB · Views: 26
  • 20200820_163330.jpg
    20200820_163330.jpg
    129.2 KB · Views: 23
Heres my battery box. Im pretty sure you can see everything in that picture
 

Attachments

  • 20191022_133700.jpg
    20191022_133700.jpg
    126.7 KB · Views: 26
Pull all the fuses, remove the battery, and start unplugging?
Cover the panels with cardboard or a blanket if you're worried about them producing current.
 
Thats what my worry was. Not sure how long it will take for me to release the solar panel as the cables run through the inside of the roof thanks for the reply bud ?
 
It looks like the fuses are on the output side.

I would first disconnect the solar from the controller.

second, disconnect the battery, then cover up the battery terminals.

it’s a 12V setup? Easy.
 
Yeah 12v setup and your correct the solar goes to the charge controller then to the fuse board on a 20 or 30a fuse i forget which size fuse. I followed one of wills videos for the setup process. Was very easy to follow tbh (nice job will)
 
When you rebuild, consider an underlayment product called Azdel. It's the new material that is being used in place of that lousy Luan plywood that has typically been used under fiberglass. It won't go bad if there is water intrusion. Good luck finding any for a DIY project. I would have had to drive 12 hours to get three sheets.

I fixed similar delamination on both sides of my 14 year old trailer last fall and a small delamination on the rear last week.

Getting molding to conform to curves is part of your problem. Teardrop shaped campers look cool, but I can see where sealing them is problematic. Plus, the shape doesn't seem to provide good use of interior space. Then again, I'm a bit biased because I'm used to a toy hauler that holds my Polaris Ranger side-by-side UTV.

RV trailers are not a "set it and forget it" vehicle. They require constant attention, annual inspections, fix this, fix that. If' you're not handy, you better be willing to spend the money with someone who is.

As said above, disconnect the panels from the charge controller first. Then you're free to continue with the rest of the system.
 
Ive managed to safely disconnect the system now so thankyou everyone for the help and advice on that one.
I agree the mouldings where hard to do and i shall look into that material "azdel" maybe im lucky and its made here in the uk and thats why you struggled to get hold of it ?? lol.
If you google "foamie camper" they basically make the shape with rigid foam and then they fibre glass over it.
Insulated and watertight for about £350 i can make the whole thing and probably have enough spare towards the next one. This time im not starting until ive got every last bit good to go. Pick a week where there is no rain due and just go nuts on it i think.
Sad thing was this was done with my inheritance as a buisness idea but my health stopped me working on it then my money situation changed and thats how 12 months later its just a rotten mess sadly.
Im actually a qualified joiner but metalwork was a new challenge.
Upon teardown inside to free the solar connectors i seen a huge 2 foot wide strip from side to side of pure black mould. Seems it had been getting in under the panel of all places via the wires holes into the ceiling. I'd used a metal bar over the holes and plenty of sickaflex and still it found its way in quite easily. Interior cladding had blown away from the roof and wall in places as the damp had made it pop off.
Onwards and upwards though. 3 weeks i reckon ill have this ready to start again
 
Use marine components for where wiring goes through the bulkhead.


They aren't cheap, but neither is rebuilding your caravan. Buy once, Cry once.
 
Fair enough lol. Been thinking over my solar setup now and thinking i may have to either give it an additional battery or some kind of back up option like a campsite hookup. I think half my issue was the flat roof setup. The trim kept the water on the roof and that allowed it to qork its way in. Slight slope on the roof would solve all them issues i think
 
Isn't that a feature of a tear drop? The curved roof?
Go Lithium - they aren't tragically expensive and they're pretty easy care...
You've got a decent charge controller and if you can put an extractor fan to help circulate air then you can help avoid the issues from any minor leaks.
Just set a low voltage cutoff to kill the house circuits (fan etc) below 11v & reconnect above 12v and you'll be golden.
More panels is always a good idea :cool:
 
Yeah i flattened the roof for the solar panel its a standard rigid type edging 310w panel. I was thinking id have to match the battery up for this system to increase storage? I managed to get 3 days out of one full battery when it ldv'd i had it running the mini fridge which was a standard house one and some led lights via a 12v power pack in the mains socket for a load test. Ideal for a weekend getaway almost. Extra battery im thinking would allow it to fully charge and float charge whilst awaiting an adventure and then it would give 3 full days of fridge use, lighting and runa few small electronic devices such as a phone charger, laptop charger and a 12v tv.
The 310w panel pretty much filled the entire roof of the teardrop so another panel would sadly not be an option.... p.s. i never got to the clean up and polish stage, it was to be cleaned to mirror finish eventually
 

Attachments

  • 20190917_193841.jpg
    20190917_193841.jpg
    69.7 KB · Views: 9
Looks good - That should give you plenty of power.
Maybe just tilt the roof back a couple of degrees to give better run off?
More battery capacity is always a good option, and doesn't take up much more space.
 
It was a buisness idea originally. Im going to have to see how it turns out the second time around i guess. I was thinking if i had it angled slightly forward this would help with aerodynamics of the caravan as it would help pin the wheels to the road better at the same time as giving a run off option.
As i typed that ive just pictured rain being forced upwards with wind during travel could be an issue but if its fubreglassed it wouldnt matter i guess ?‍♂️
Limited budget so im going to buy the fibreglass first as its easier to store than 8 x 4 panels of insulation board. Order that on payday tomorrow and then order the rest if i can once ive done everything else although it may be a case of wait a month for the ordering of the rest.
It didnt take long to remove the electronics. Made a small pile of mouldy wood ready for the dump. Not sure if any of thw wood will be useable for other peojects ill have check it out as i free it all up. It may be good everywhere apart from in certain areas. Wood is quite expensive for the end user in the uk by the time you have built a shed you could have easily spent roughly £600 and still wished you could have used better materials ?
 
Back
Top