Hopefully this post will help anyone else considering this combination.
First, if you want to use this combination for partial home backup, make sure you get a Growatt V2 inverter. The V3 inverter which is all most sellers have will only do whole home backup and you must use their pricey SYN transformer. With the V2, you can do partial home back and use a much less expensive autotransformer.
The biggest problem I found comes when the grid is down (I don't use my LG battery for night time backup, only power outages). What happens is that if the grid is down and it is night time, and if a large load trips off the inverter (in my case it was a water well that would run fine during the day), there is no way to restart the inverter. You will have to wait till daytime. The reason is that the battery does not energize the output terminals until it receives comm from the inverter. And you can't get comm from the inverter until it is powered up. Catch 22.
I have a possible workaround, but not recommended for those uncomfortable working with high voltages. I haven't tested it yet so use at your own risk! If you apply about 80 volts DC to the PV input from a small battery, it will start the inverter. I tested it with two 40V power tool batteries in series and it worked. So it should start the inverter long enough to get the LG battery back on line. Then you would disconnect the portable battery and you are back in business.
One thing I'm not sure of and am hesitant to test on my system is whether the solar panels can handle being back driven by 80 volts. It depends on the diodes and my data sheet doesn't list a reverse voltage. Does anyone have any thoughts on this? Worst case is that you disconnect the PV inputs at the inverter and then apply the 80 volts.
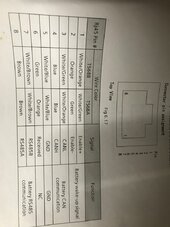
") ) I notice some versions on the MIN inverter have a small button on the back and I seem to remember in one of their manuals that it is used to manually start up the inverter. I've even seen a picture of one with the cover off on Ebay and it goes to the top right connector on the comm board, which my inverter, and most likely yours, has. But it can't do anything that I can think of since the inverter is off. Not sure I want to test it with my system.
) I notice some versions on the MIN inverter have a small button on the back and I seem to remember in one of their manuals that it is used to manually start up the inverter. I've even seen a picture of one with the cover off on Ebay and it goes to the top right connector on the comm board, which my inverter, and most likely yours, has. But it can't do anything that I can think of since the inverter is off. Not sure I want to test it with my system.