diy solar

diy solar

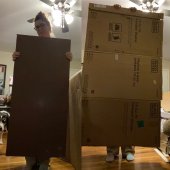
What I expected…. What I got…

The_Kobayashi_Vroom

New Member
Joined
Oct 26, 2021
Messages
55
Location
Indiana
8394C521-9EF7-4563-BB06-EFEDE5C77C82.jpegSo I’m working to see how many panels I can fit on top of my skoolie. I made a template of one and apparently I was very disillusioned. The left is how big I expected them to be - but the right is how big it really is after measuring and cutting it out of cardboard. Thought you might get a laugh at my expense and ignorance #themoreyouknow ?
 
So, how was your template off? What did you not account for. I need to know these things for when I start mounting/purchasing solar panels.

Currently, I've got my inverter plugged in, and have a battery bank, almost ready to finish my build... just waiting on a BMS and crimping a few more wires. ?
 
Depending on elevation... also need to add 6" to 12" space near roof items that create shade. Could be minimal on a schoolie.
Must say that looks like a massive panel. I think my old stuff is what you expected ;)
 
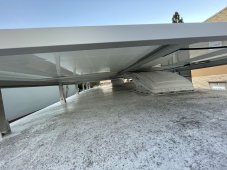
If you want to avoid having to worry about fans and other roof penetrations and want to fit a bunch of solar on top, you can elevate the panels ABOVE the fans. A maxxair fan needs about 9.5 inches of space to fully open.

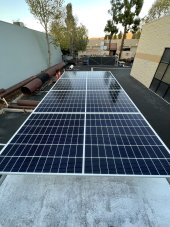
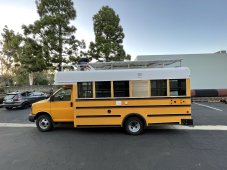
We decided on Iron Ridge tilt mounts (north side only) with XR10 rails and 425 watt Qcell panels. There are a total of 16 mounts through bolted at each bus rib location. Everything is torqued to spec with a calibrated torque wrench. Still we might consider tack welding the tilt mounts and adding safety wire to each panel for piece of mind. We will also add a wind fairing up front to avoid lift.

I can’t say what the long term success of this arrangement is but judging by the engineering data we should be fine up to 100+mph winds. If we were to do it again we may have opted for the XR100 rails for more margin.

DFF7A43B-869D-442C-B46C-72DC0526B8A7.jpeg

C9CA79EB-F99B-4CC3-8B0A-B74A03C8C52E.jpeg


AC909EAE-3BCF-4E64-ABD8-82A161058E21.jpeg
 
Back
Top