CharlieBB
New Member
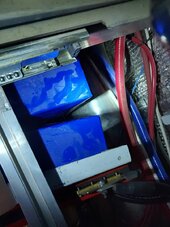
Yes, 280s and 304s mixed.


There are 5 - 04QCB 73710000JI did not install it, but I have my suspicions. I will check the labels for the rest of the cells and get that information.
After taking time to heal from the PTSD the fire caused us, I have replaced the batteries with 2 LiTime 24v 230ah batteries and with the assistance of Victron knowledgeable folk, got settings adjusted. Things are now functioning better than they have since I purchased the unit. In the process, I have learned my 9 panels are 3s3p and at least one panel could be faulty, meaning I may only have 3s2p!? I can not troubleshoot/fix this at this time.Should you decide to redo the battery there is plenty of help available to make sure things are done correctly.
This sure can get complicated. Turns out the old house system I was plugging into was antiquated and faulty in itself. I has also used an odd collection of extention cords to reach. I bought a heavy duty outside cord long enough to reach a single outlet one a single fuse. All connection/adapter plugs were checked and cleaned. Numerous small extension cords were removed. Thus allowed me to have basic power and function while solving the battery situation.12 awg ampacity is 30A, 10 awg ampacity is 40A. at least with 90C insulation; extension cords would be less.
Relatively short periods at that current would cause no damage at all. It takes a while for copper to heat up.
Repeated hits of current enough to trip a circuit breaker same current rating as wire ampacity will damage insulation - after about 100 times it is shot, from what I've read.
House wiring, 90C ampacity of 30A, breaker rating 20A, an overload of 30A for about 10 to 15 minutes will trip the breaker. In that case, wire was never over-current so not damaged. If wire was actually 20A ampacity, maybe an extension cord with lower temperature insulation, (30/20)^2 = 9/4, a bit over 2x the temperature rise, which would damage insulation.
It is suspected at one point there were 2 MPPT controllers in here but there is only one now. The data cord from it to Cerbo evidently got knocked out at some point. The way the Cerbo is mounted it is impossible to get a normal sized hand in to plug it back in.I may have just found the problem? (One of them?) There is nothing plugged in to the Cerbo but two dangling black cords nearby. Pretty sure the fell out.
Finally, I almost have my schematic and user manual finished, for my future reference (or for potential future owner/buyer?). A lot of work. I highly recommended all individuals keep up-to-date notes and sketches of any installs/updates to their systems, and user manuals (even if only digital). Very unfair to sell a trailer with nothing like that included. Anyone doing so should not be considered a "professional" installer of electronics (IMHO).Yes, I have it all and have been compiling a "user manual" for my system. It's very complex and frankly I got overwhelmed by it all and needed a break. Now have 120 shore power which gives me limited power... refridge, ceiling lights, fans. Can not use a/c or microwave. Some wall outlets are not live. Only AC1 is live. Nothing connected to AC2 at this time.
Also have an extension cord running to house for other items, floor fans, laptop, chest freezer. I can limp by like thus, but have to go inside son's house if trailer temps get up to 90f and higher.
Need to buy new batteries, and get solar working again, so I can return to full-time boondocking. Hope to sort this all out soon.
In addition to the user manual... I am working on a schematic.
Thank you for all your help.CharlieBB
I have been following along. Wondering if this ever worked only wired to AC2. I do no have experience with Quattro.
"Looks" like its been this way for years so not what i would look at.
Sorry, out of my experience. I will follow along an chime in with anything i can add.
My generator was plugged into the regular r.v. shore power connector.Your wiring pic showed that the EMS was connected to AC2 and nothing was connected to AC1 where i would expect the generator would be connected.
Can you tell where the generator output was sent? It may have been connected to a different battery charger than the Quattro.
Looking at your pic again. Is there anything connected to the Quattro AC out? Its partially concealed by the red wire.
You mentioned you were working on a wiring diagram. It would be mighty helpful as I think most of us (just me?) are trying to understand how your system is wired.
Actually, there was a small black switch on the Quattro. Due to the way Quattro was installed, we could not see it and could barely reach it. Once it was discovered, switched off a couple minutes, and back on... Quattro began booting up. A miracle!?So they used a new extension cord with fewer connections and now have E0 (no errors on surge protector).
The Quattro has not come on but maybe they did not reset the "converter" breaker to it. There is also a delay of a few minutes.
Have not heard back so hopefully up and running.
Actually, there was a small black switch on the Quattro. Due to the way Quattro was installed, we could not see it and could barely reach it. Once it was discovered, switched off a couple minutes, and back on... Quattro began booting up. A miracle!?
Thank you for Victron offer. My one concern is that I don't want previous owner/installer to have remote access to my system. I want his name removed. But I don't want him to know in advance and it is my understanding that his permission is required. I own the equipment free and clear.Didn't read the whole thread.
As you learned, Quattros need a battery connected to pass shore power.
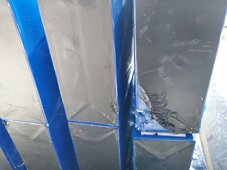
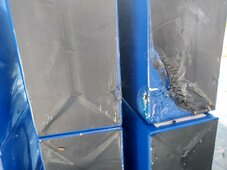
Thanks for the follow-up. That stacked battery arrangement sounds pretty scary. IMHO, these big cells need to at least be secured and protected from abrasion with separators between the cells, and I would never consider any sort of asymmetric stacking, i.e., vertical cells on top of horizontal cells as that places uneven pressure on the lower cell. The cans are flimsy.
Some of those can corner deformations look like they came that way, which is all too common and should not be accepted, but suppliers often pressure of offer discounts to accept them. Those could have rubbed through the shrink.
Glad you're getting it all sorted out. If you have any Victron specific questions you can't get answered through your existing channel, please ask away.
Thank you for Victron offer. My one concern is that I don't want previous owner/installer to have remote access to my system. I want his name removed. But I don't want him to know in advance and it is my understanding that his permission is required. I own the equipment free and clear.
Advice?
I am not sure. Finishing up with repairing a major leak and re-doing front seam of my trailer next couple days. Age, major hand and feet cramps, and curing time... it making it a lengthy task.Given the little I see in that installation, that's an excellent idea. That person shouldn't be in business.
Do you have admin access to VRM?
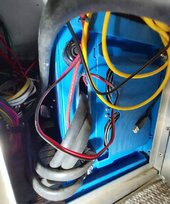
Yes.FFS, is that quattro resting on its side?
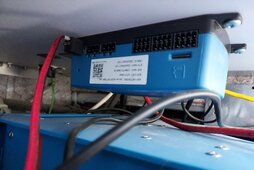
Yes. And the Cerbo is mounted above it... you can not reach your hand in there to plug/unplug anything.FFS, is that quattro resting on its side?

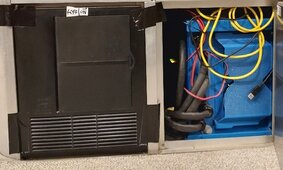
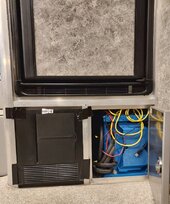
It is internal door, under the refidge, next to fuse panel. No external door.This installation is absolutely shameful. Period. While there may have been severe space restriction, there is NO excuse for mounting it like that. It's absolutely critical that space be left on the SIDES as that's how they eject their heat. As it stands 100% of the waste heat is exiting here and it's heating the Cerbo:
View attachment 210125
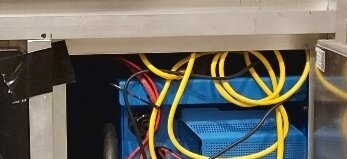
It also looks like a door can close where the intake fans are located. I hope that door is left off or open most of the time.
is that compartment externally accessible? If so, picture?
To immediately restrict remote access, disconnect the cerbo from the internet, and all remote access is disabled.
You can still access it via the touch screen.
Good luck on the leak! Hate that!
It is internal door, under the refidge, next to fuse panel. No external door.

He never told me to leave the door open, I just started doing it as it made sense. I can add a fan.
That is the refridge. It is always cutting on and off. That was next thing I wanted to resolve.
Not sure how to disconnect from internet! I will come back to this when the roof is under control. (I kinda hate it right now too!)
Cycles on and off frequently. I have not timed it, but will check it for 1 min and report back... or 5 min!That vent at the bottom of the fridge is atypical of a propane fridge. Is that a compressor or propane fridge?
What do you mean by cutting on and off? Fridges typically cycle their compressors on and off.
If it's a propane fridge, and you're running it off either AC or DC electricity, it consumes a massive amount of power - about 5-6X a comparably sized compressor fridge.