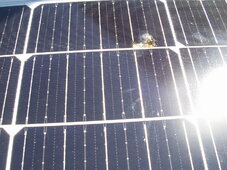
Just out doing some work on my panels when I spotted the burn mark pictured below. It has to be of fairly recent vintage because I check the panels routinely. I am not noticing a reduction in output from the string but it makes me wonder if this is a replace now situation. Anyone have any advice?


You are using an out of date browser. It may not display this or other websites correctly.
You should upgrade or use an alternative browser.
You should upgrade or use an alternative browser.
Burn spot on panel.
- Thread starter Mattb4
- Start date
robbob2112
Doing more research, mosty harmless
can you feel the surface? it looks like it was maybe a hail stone then water got in? If that is what it seems like I would think a dab of clear RTV and wait for failure if it comes.
Lt.Dan
Solar Wizard
I'm not sure about any implications of what this might mean, but I would be worried about shorting and/or fire. I would say replace it
efficientPV
Solar Addict
- Joined
- Sep 24, 2019
- Messages
- 1,517
A razor blade at the bottom might get you a half string. Might be quite touchy to make two connections at the cell. I sold some old panels to a guy who made his system out of electrically damaged panels. That is not for me.
Hedges
I See Electromagnetic Fields!
- Joined
- Mar 28, 2020
- Messages
- 21,899
If that is a diode junction, it suggests that panel section had a hard shadow blocking a least one cell.
Other panels were in full sun, pushed Imp through the diode.
Some panels may have diodes with amperage rating and thermal path able to handle it, others don't and prohibit use where bypass diodes activate in full sun.
Try to figure out how it happened before damaging another.
Replace the panel.
You could use this one with SCC for a lower voltage battery charger. Somewhere that it can't cause a problem; if a 34 Vmp panel is used for 12V battery charging, could still push bypass current.
For now, bypass that panel by jumpering around with MC4 connectors (assuming you're not in the camp of permanent connections instead of MC4.)
Yeah there are some hard shadows due to trees and building shade. But it has been like that for sometime. I am just wondering if the large rainstorm that came through on July 4th after a really hot day (over 100F) had anything to do with it. Got 1.5 inch overnight. (Plus a lot of lightning strikes)
Not sure what I could do about shadows. Where I live it is almost guaranteed that one or more panels will experience it during the day. I can take the string of 3 panels out of service but can not jumper around since they are in parallel with another string of 3. At least the spot has not grown any from my first notice a couple of hours ago.
Not sure what I could do about shadows. Where I live it is almost guaranteed that one or more panels will experience it during the day. I can take the string of 3 panels out of service but can not jumper around since they are in parallel with another string of 3. At least the spot has not grown any from my first notice a couple of hours ago.
Last edited:
robbob2112
Doing more research, mosty harmless
Ya know, I am just now having my roof replaced and the roofers will install the hard points for racking - that said, I have wondered about using relays or contactors to selectively disable panels or sets of panels to get the best sun all the time.
So would take a voltage/current sensor and contactor/relay spread every 3 panels in your case - so if you have the issue of shadows on 3 panels you could just drop those out of the loop. If you have matched sets of panels you could drop 3 and 3 at the same time.
I realize there is a cost in terms of wire to control the relays and also in hardware - but with those $15 contactors and some cheap ardiuno based voltage/current sensors you could do the job auto-magically for only a couple hundred I think ... especially if you only install them where it makes sense for your specific install.
Anyways - I would never expect something like that for a normal person's install, but for those of us that like to fiddle with things it might work.
Sigh - roof time - this will be expensive, but I got the goodie out of the current one, 25 years on a asphalt roof and taking a double handful of crap from the roof, little rocks, out of the gutters every year
Hedges
I See Electromagnetic Fields!
- Joined
- Mar 28, 2020
- Messages
- 21,899
Yeah there are some hard shadows due to trees and building shade. But it has been like that for sometime. I am just wondering if the large rainstorm that came through on July 4th after a really hot day (over 100F) had anything to do with it. Got 1.5 inch overnight. (Plus a lot of lightning strikes)
Not sure what I could do about shadows. Where I live it is almost guaranteed that one or more panels will experience it during the day. I can take the string of 3 panels out of service but can not jumper around since they are in parallel with another string of 3. At least the spot has not grown any from my first notice a couple of hours ago.
I think it could melt, crack, burn.
This might be a situation where changing from say 8s2p to 2s8p would be beneficial (or something similar that delivers enough voltage.)
With several strings in parallel, Vmp could be held up pretty well.
Without Vmp dropping, little current gets pushed through the partially shaded panel and its diode.
If you've got hard shadows in a couple places and full direct sun on the rest of the string, that isn't good.
See if a different brand of panel can handle full current going through Bypass diodes.
SunPower P19 are a funny configuration for commercial arrays. The literature said they do not have bypass diodes, but tolerate current pushed through them. (Internally wired as several strings of shingled panels.) I passed on those, got E20 instead. Don't know that they would like being treated that way, however.
Replacing panels with something robust against this abuse is probably best approach.
Could be just a manufacturers defect allowing moisture in that caused the spot. I have been operating many solar panels for years at my location with the shading issues and it is the first one to experience this. Now that the day is mostly over and my batteries are full I am considering if I will change things tomorrow or let it ride.
I would not replace my panels over one failure. Unless it was to explode in a fiery ball of destruction.
I would not replace my panels over one failure. Unless it was to explode in a fiery ball of destruction.
Suijkerbuijk
I cannot be held responsible for this information.
See it on solar panel on a boat.
I have test tist it for the man and its go down a lot.
He had only 1 panel 22 volt on a pwm for the battery.
The pwm do nothing to charge it , the volt its to low to use .
I have look on it and really its under the glas its self.
So i think a cell burn out.
Well more info to read if you like.

 winaico.com
I have test tist it for the man and its go down a lot.
He had only 1 panel 22 volt on a pwm for the battery.
The pwm do nothing to charge it , the volt its to low to use .
I have look on it and really its under the glas its self.
So i think a cell burn out.
Well more info to read if you like.
11 Common Solar Panel Defects and How to Avoid Them - WINAICO
Watch out for these common solar panel defects in your solar installations. Visit to learn how to avoid these defects in your solar investments.
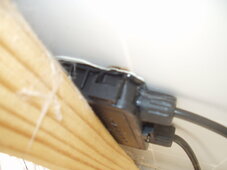
After more examination of the back side I can see burn marks at the bottom side edge of the Diode junction box. This decides it for me that it is not worth keeping the panel in service. Once I get it dismounted I will open the box and see if there is damage/moisture inside of it. Not sure if this image is clear enough to show the burn area but I will post it anyways.
Attachments
Suijkerbuijk
I cannot be held responsible for this information.
After more examination of the back side I can see burn marks at the bottom side edge of the Diode junction box. This decides it for me that it is not worth keeping the panel in service. Once I get it dismounted I will open the box and see if there is damage/moisture inside of it. Not sure if this image is clear enough to show the burn area but I will post it anyways.
Well be nice if you thake out that diode junction box
So you can see how its look like .
And set some pictures .
I see your picture and that wood press that against the junction box ??
robbob2112
Doing more research, mosty harmless
Researching the panel it is a one off I bought back in April. Werchtay brand claimed to be all kind of good.
Looks like you are all wet..
Last edited:
No, it has a small separation space. I will get some pictures tomorrow of the junction box open....
I see your picture and that wood press that against the junction box ??
ETA: I went ahead and sent a message to the seller of the panel along with the pictures of the damage. Should be interesting if I hear anything back.
Last edited:
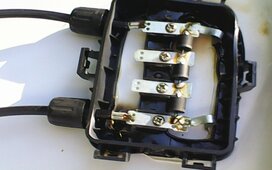
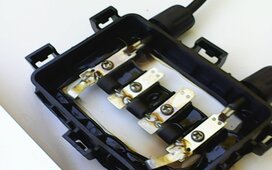
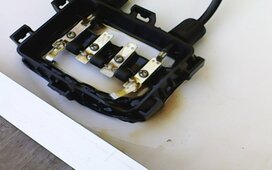
Took the panel down and pried off the junction box cover. It was pretty obvious from the misshapen box that it had been subjected to a great deal of heat. The damage area of the panel burned through the back white vinyl cover but it does not appear to have been a diode failure. It rather seems to be some flaw in in cell connections that just happened to be in front of the junction box. No moisture was evident in box.
Attachments
robbob2112
Doing more research, mosty harmless
Did you check the diodes with a meter? You say it wasn't a diode failure but don't explicitly say you checked the diodes.
What I wrote was, "does not appear to have been a diode failure". If I had tested them I would have mentioned that. I do not know electronics and what is involved with testing diodes. There is no areas of excessive heat observed around the diodes and they are not melted/fused.Did you check the diodes with a meter? You say it wasn't a diode failure but don't explicitly say you checked the diodes.
Suijkerbuijk
I cannot be held responsible for this information.
What I wrote was, "does not appear to have been a diode failure". If I had tested them I would have mentioned that. I do not know electronics and what is involved with testing diodes. There is no areas of excessive heat observed around the diodes and they are not melted/fused.
Here is how you can do it
robbob2112
Doing more research, mosty harmless
Almost any meter can be used to test a diode. Most have the diode symbol  can make it simple. The line is the negative side so if you put your negative meter lead there first you should get a beep.
touch leads on either end and you should get a beep
reverse and you should get nothing.
If you get a constant tone both ways the diode is shorted.
If you get nothing both ways the diode is open.
can make it simple. The line is the negative side so if you put your negative meter lead there first you should get a beep.touch leads on either end and you should get a beep
reverse and you should get nothing.
If you get a constant tone both ways the diode is shorted.
If you get nothing both ways the diode is open.
My meter lacks a diode symbol but it has a resistance (ohms) position. I cut out the 3 diodes and they all give me a reading of about 40-45k ohms in one direction but not the other. Is that good or bad I really don't know but it is consistent.
ETA: it is not easy to hold the diode in position and use both leads of the DMM to touch both cut off ends nubbins of the diodes while avoiding touching the probe metal with fingers. At my age I am not exactly nimble.
ETA: it is not easy to hold the diode in position and use both leads of the DMM to touch both cut off ends nubbins of the diodes while avoiding touching the probe metal with fingers. At my age I am not exactly nimble.
Last edited:
Hedges
I See Electromagnetic Fields!
- Joined
- Mar 28, 2020
- Messages
- 21,899
Diode scale typically will show about 0.7V for forward polarity, "overrange" for reverse.
(0.4V for germanium vs. 0.7V for silicon)
Old analog meters deliver positive voltage from black negative lead.
Modern DMM deliver positive voltage from red positive lead.
Can't judge diode with ohms scale because don't know voltage applied.
If you have two DMM, try measuring voltage with one and ohms with the other. Then reverse connections of ohms meter. See what voltage applied in each case.
I haven't tried it, so tell us what you see.
Diode scale typically will show about 0.7V for forward polarity, "overrange" for reverse.
(0.4V for germanium vs. 0.7V for silicon)
Old analog meters deliver positive voltage from black negative lead.
Modern DMM deliver positive voltage from red positive lead.
Can't judge diode with ohms scale because don't know voltage applied.
If you have two DMM, try measuring voltage with one and ohms with the other. Then reverse connections of ohms meter. See what voltage applied in each case.
I haven't tried it, so tell us what you see.
") I see nothing.
I see nothing.I tossed the diodes in the trash* and I do not care enough to sort them out from the coffee grinds and other nasties. It is sort of moot in any case because the panel is FUBAR and pulled out of service. Glad all my arrays are ground mount so my recent incidents of failed MC4's, and now this panel, were easily gotten too. Roof climbing for me is a thing of the past. I have temporarily replaced the failed panel with a shattered glass panel (I sprayed the front with a sealant) I had in storage of the same wattage and voltage. Should give me some output.
What will be of further interest is if I hear back from China about any Warranty. Not that I expect much but have to give them time to respond since it is still the weekend.
*Update ETA: After getting out the magnifying glass and looking at my DMM it does show a diode symbol above the Ohm selection. If I had pushed the Select button I get a Diode icon to appear on the meters display. Learn something new every day. I fished the diodes back out, brushed them off, and the testing showed all good with ~ .4 TAJs. (Thing-Ama-Jigs)
Last edited:
Similar threads
- Replies
- 9
- Views
- 368
- Replies
- 9
- Views
- 494