


You are using an out of date browser. It may not display this or other websites correctly.
You should upgrade or use an alternative browser.
You should upgrade or use an alternative browser.
Movable solar panel cart version 2 in progress
- Thread starter JJJJ
- Start date


Bananaman321
⚡solar idiot ⚡
I find these adjustable wheels off of Push mowers super handy ror small builds they're easy to come by: scrap metal pile a the dump


Example I built this cart for an old excel power washer 15 years ago it's made of a brushguard from a truck
The adjustability of the wheels is super handy depending on the terrain you're working on say if you're on a roof you can retract the wheel so it doesn't roll off
Steve_S
Offgrid Cabineer, N.E. Ontario, Canada
Lookin Good, couple of questions:
1) Where you have Pivot Action, do you have a Pair of Washers between the wood ? Prevents rubbing against the wood and provides a smooth face to be against.
2) Is there supplemental brackets or other 45 degree angles planned to prevent the "frame" from racking (especially with weight on it) ?
1) Where you have Pivot Action, do you have a Pair of Washers between the wood ? Prevents rubbing against the wood and provides a smooth face to be against.
2) Is there supplemental brackets or other 45 degree angles planned to prevent the "frame" from racking (especially with weight on it) ?
Great point. Actually ended up putting three washers between the wheel and the wood. Improved the stand off and reduced the potential for friction.Where you have Pivot Action, do you have a Pair of Washers between the wood ? Prevents rubbing against the wood and provides a smooth face to be against.
The panel will be enclosed with 4x4s. I will be wrapping the four corners with heavy duty shelf angle. Also like the 45 degree angle idea! Should be easy to place these sideways under the panel.Is there supplemental brackets
Steve_S
Offgrid Cabineer, N.E. Ontario, Canada
Any joint or connection is subject to twisting etc when being moved but also wood being wood, expands & contracts with heat, damp etc and it may take a little while but things always loosen. Remember that S-Dry crap you get from the store is NOT that dry ! You just don't want any of it going Trapezoid while your hauling it across the yard. That would be the end of what little hair you got left Hahahaha.
45 degree angles planned
Worth considering some 45s at the base as well!You just don't want any of it going Trapezoid
So I was planning my day tomorrow. You know full time job during the week, projects on the weekend.
My daughter asked if I would like to do something tomorrow. I went outside and worked on the project as I thought about the day. Came to the decision that if need be I will simplify this build to allow for the more important things in life.
I think I will modify this so there are fewer holes. The upright support will designed for one angle only. Will probably choose the best overall angle for the year. This will enable me to build a couple of these faster. It would be fairly easy to build a variety of vertical supports if I decide to add additional angles in the future.
I added corner braces to the top piece that will hold the panel and 4x4 corner braces to the bottom. The rear two will serve as legs to counterbalance the wheels. Tomorrow I am hoping to finish up the solid stain after I install a holding bracket for the breaker box. Have rain scheduled the next few days after that.
Ok in this position not much to look at. Corner brackets have been attached, mounting bracket for breaker box is on the back and leveling legs are installed and a second coat of stain.
Not much to look at, meeting design specs perfectly due to low visual footprint.

Not much to look at, meeting design specs perfectly due to low visual footprint.
One advantage to creating a prototype prior to production is that one has a chance to work out the bugs.
Will need to keep an eye on this possible pinch point. Will probably add another wood spacer at this wheel if not on this one in a future build. Will open up the angle potential.

Will need to keep an eye on this possible pinch point. Will probably add another wood spacer at this wheel if not on this one in a future build. Will open up the angle potential.
Dadoftheturkeykids
Arc Angel
Your build is inspiring me to make a mobile solution as well.
Your build has inspired me to do away with the wood altogether and mount wheels and hinges directly on two panels.
By the way how many watts is your panel you will be mounting?
Your build has inspired me to do away with the wood altogether and mount wheels and hinges directly on two panels.
By the way how many watts is your panel you will be mounting?
By the way how many watts is your panel you will be mounting?

A benefit to being your own contractor is that you can choose your own design. I wanted to reduce the amount of moisture that may wick up the support posts. Picked up these galvanized post covers. Applied a generous amount of stain and then put on the covers.

Dadoftheturkeykids
Arc Angel
Bigger panel and frame than I thought. I'm digging the progress.
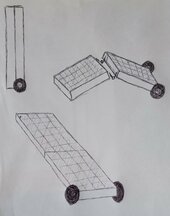
Here's a sketchup of something I thought up of from your build. I am going to use
2-100 Watt panels to prototype it. I need to figure out a way to lock them in the open and closed position, also an adjustable angled leg
Attachments
Sounds intriguing. Please link your thread when you do build it.
Just a thought. You may want to consider reinforcement of some kind for the frame when attaching the wheels and hinges. Perhaps I am being overly cautious. You might discover differently once you get started. That is part of the adventure during the creative process that goes with DIY.
Just a thought. You may want to consider reinforcement of some kind for the frame when attaching the wheels and hinges. Perhaps I am being overly cautious. You might discover differently once you get started. That is part of the adventure during the creative process that goes with DIY.
Ok. Have been distracted by life, moving my batteries to battery cases (another thread) and that thing called a full time job.
Anyhow pulled up an inclinometer on my phone and was able to get each side within a couple of degrees of each other. Inserted the holding bolts and touched up the stain. It rolled quite easily with the slope applied. It is sitting on a hill which makes the slope look a lot more than it is.

Anyhow pulled up an inclinometer on my phone and was able to get each side within a couple of degrees of each other. Inserted the holding bolts and touched up the stain. It rolled quite easily with the slope applied. It is sitting on a hill which makes the slope look a lot more than it is.
Last edited:
OK. So this is a mobile unit. How to wire it in.
I wrestled with this quite a bit. I didn't want separate strands of wiring laying around. I considered 10 awg which is a standard for panels. However I will be utilizing parallel input by design. If I decide to change to serial I can rewire at the wire input. This panel will max out at 10.4 amps in ideal conditions. Even at the 1.25 multiplication factor in cold conditions 12 awg according to charts I have looked at will meet the need very nicely.
Also I wanted to utilize something that was flexible. SJOOW according to the specs I read serves that purpose since it is utilized for extension cords. I chose a product by Windy Nation. Here are some of the product descriptions from the web page. I think this meets my needs nicely.
"extension cords, heavy equipment, construction machinery, motor leads, welding leads, portable lighting, battery chargers, shallow water immersion, mining environments, and applications where a rugged, heavy duty flexible multi-conductor cable is required... insulation resistant to abrasion, battery acid, diesel fuel, engine coolant, engine oil, ethanol, extreme temperatures, flame, gasoline, power-steering fluid, transmission fluid, and water. Rated for outdoor use."
Ok, I know it shows 150 feet. I will be building multiple units. Plus does it ever hurt to have spare wire for projects just in case?
Kenny_
Solar Wizard
love it! All you need now is a an engine and transmission! 
matttelz
New Member
Looks nice. I may do something similar to your design... I have 600W of solar panels I need to create a cart/mobile mount for... I like the idea of a single post/pole mount but I don't think for a non-concrete base, that likely won't be possible...
Kenny_
Solar Wizard
Yep, I may do something like this....looks reasonable compared to many of the 'manufactured' solutions and I want ground mount in any case, moveable is best given my situation.Looks nice. I may do something similar to your design... I have 600W of solar panels I need to create a cart/mobile mount for... I like the idea of a single post/pole mount but I don't think for a non-concrete base, that likely won't be possible...
Similar threads