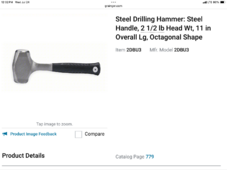
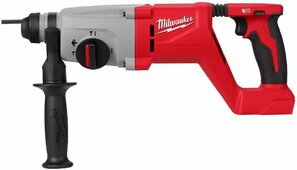
Ground rod? All I see is those wires, a hockey stick and a bowl of rat feces on the floor.I think it's two wires with terminal ends. One of them has a bolt through it, the other isn't connected. When he wants to couple them, he is attaching a nut on the other side of the bolt with both terminal ends touching each other.
I'm just trying to figure out if he is putting in a second ground rod at his solar array or something.. and determining whether he should be doing that or not.
You are using an out of date browser. It may not display this or other websites correctly.
You should upgrade or use an alternative browser.
You should upgrade or use an alternative browser.
ground rod pounder
- Thread starter e67
- Start date
I said it looked makeshift.Bit it's spherical unless they didn't have a bolt and used some form of threaded ball joint.
cs1234
Solar Wizard
- Joined
- May 9, 2022
- Messages
- 2,922
The thread was created asking about a ground rod pounder. I asked him why he wanted to pound in a ground rod in the first place. He replied with that photo.Ground rod? All I see is those wires, a hockey stick and a bowl of rat feces on the floor.
cs1234
Solar Wizard
- Joined
- May 9, 2022
- Messages
- 2,922
I figured it's a bolt like this.Bit it's spherical unless they didn't have a bolt and used some form of threaded ball joint.

Yep makes more sense it's too late for me to try be inspector cluedoI figured it's a bolt like this.

e67
New Member
- Joined
- Jul 7, 2022
- Messages
- 222
guys, take it easy....its just a bolt together ground extension....it attaches to the grid house ground. Like I said before if I had built this house I would have done some excavating 10 ft below grade and would have at least 2 below ground lightning proof ground systems separate from each other... but this rig will work when the inverter is in use and will keep any grid anomalies and spikes etc from going up to the new expensive inverter..current can go either way on a wire...
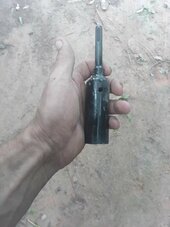
I welded a peice of spring steel to a broken sds bit then welded some steel conduit to that took 5mins and about $0.20 of welding rod, might start renting it out if i can get $9 a day for it, any takers?
I really want to see this!
I didn't particularly want to show it as it gives @Daddy Tanuki an opportunity to rip into my welding skills(not my finest work plenty of inclusions and melt through) but it works though mainly I use it for sinking rebar now. since your a mod and this feels like the closest I get asked for presenting a degree, here you go.
I really want to see this!
Daddy Tanuki
Solar Wizard
does it work? did it do the job you needed? then who am I to moan and complain. not everybody is sporting a 3000.00 wire feed welder and a 4000.00 miller tig welder. about the only stick welding I do these days is with hardfacing rodsI didn't particularly want to show it as it gives @Daddy Tanuki an opportunity to rip into my welding skills(not my finest work plenty of inclusions and melt through) but it works though mainly I use it for sinking rebar now. since your a mod and this feels like the closest I get asked for presenting a degree, here you go.
View attachment 230074
It does work, it's actually ended up doing other jobs other than pounding ground rods, it's made with a $60 pos Chinese welder that's got no idea what amperage it's actually running at(200 amp is more like 70) but it's worked through multiple projects in the last 5 or so years and hasn't gone pop yet. I learnt to weld mig when I was in my teens(grand dad never let me play with his stick welder as a kid) I started playing about with stick fixing cast iron stoves with a Tig/MMA/plasma cutter stoves are great to fix as preheating just means you have to light the thing and burn a ton of softwood. Never got far with the Tig all my aluminium welding attempts turned into puddles. Now I use stick a fair bit making/fixing things but I might buy a fluxcore to fab my ground mounts.does it work? did it do the job you needed? then who am I to moan and complain. not everybody is sporting a 3000.00 wire feed welder and a 4000.00 miller tig welder. about the only stick welding I do these days is with hardfacing rods
Daddy Tanuki
Solar Wizard
you want to cheat while welding aluminum to bring your skills up? put a piece of steel plate behind it as a backing.It does work, it's actually ended up doing other jobs other than pounding ground rods, it's made with a $60 pos Chinese welder that's got no idea what amperage it's actually running at(200 amp is more like 70) but it's worked through multiple projects in the last 5 or so years and hasn't gone pop yet. I learnt to weld mig when I was in my teens(grand dad never let me play with his stick welder as a kid) I started playing about with stick fixing cast iron stoves with a Tig/MMA/plasma cutter stoves are great to fix as preheating just means you have to light the thing and burn a ton of softwood. Never got far with the Tig all my aluminium welding attempts turned into puddles. Now I use stick a fair bit making/fixing things but I might buy a fluxcore to fab my ground mounts.
aluminum and steel will not weld together no matter what happens.
as your aluminum goes molten you can learn to recognize the change of state without the puddle blowing through. then after a bit of practice you can lower your the total current to match the aluminum and learn when it is starting to hit that molten state.
for non welders: steel and any ferrous metal will change colors in the visible range which allows you to adjust your welders current, your travel speed, the amount of filler you use and many other things to compensate for whent he metal goes molten. aluminum unfortuantley does not change colors like steel. so its very difficult easiest way to describe if you were looking at it with your bare eyes (don't it will blind you). would be that the aluminum goes from a dull color to instantly being a mirror and then the whole mess melts through and you have a big gaping hole in whatever you were welding.
it is similiar to brass in this respects, but brass does nto blow through as easy as it the amount of heat required for it is higher which makes it so that the heat that radiates off is easier to control and match to get that sweet spot of molten metal without a hole or a blow through forming. next up kids is penetration 101, and porosity (inclusions).
Good trick but the reason it turned into puddles is I didn't clean off the oxide first this was a long time ago and when I was far more arrogant than I am today. I always thought Its better to learn doing something which I I know now is only partially true, you need to understand the underlying basics first one of which being aluminium oxide melts at nearly 3x the heat compared to aluminium.you want to cheat while welding aluminum to bring your skills up? put a piece of steel plate behind it as a backing.
aluminum and steel will not weld together no matter what happens.
as your aluminum goes molten you can learn to recognize the change of state without the puddle blowing through. then after a bit of practice you can lower your the total current to match the aluminum and learn when it is starting to hit that molten state.
for non welders: steel and any ferrous metal will change colors in the visible range which allows you to adjust your welders current, your travel speed, the amount of filler you use and many other things to compensate for whent he metal goes molten. aluminum unfortuantley does not change colors like steel. so its very difficult easiest way to describe if you were looking at it with your bare eyes (don't it will blind you). would be that the aluminum goes from a dull color to instantly being a mirror and then the whole mess melts through and you have a big gaping hole in whatever you were welding.
it is similiar to brass in this respects, but brass does nto blow through as easy as it the amount of heat required for it is higher which makes it so that the heat that radiates off is easier to control and match to get that sweet spot of molten metal without a hole or a blow through forming. next up kids is penetration 101, and porosity (inclusions).
Bananaman321
⚡solar idiot ⚡
I've driven over 50 foot of single rod with one of these before
I've misplaced the driver head to this one but I can make another one fairly I also have a dozen or so ground rod couplers laying thought I'd throw a few of them in the pic
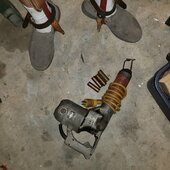
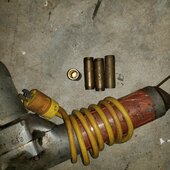
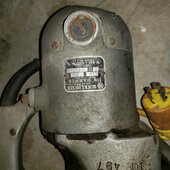
Weighs about 12 kg but a lot better than using a Georgia Boy and a sledge hammer just don't forget ear protection.
I've misplaced the driver head to this one but I can make another one fairly I also have a dozen or so ground rod couplers laying thought I'd throw a few of them in the pic


Weighs about 12 kg but a lot better than using a Georgia Boy and a sledge hammer just don't forget ear protection.
Daddy Tanuki
Solar Wizard
OK this is one where I will tease you as if its important enough for me to break out the TIG welder, then I clean everything religiously. If the project is low grade enough that Ican use a MIG welder or a stick welder then I might not get so crazy with the prep work, but If its a specialty alloy like Monel, Iconel or aluminum of any sort, I tend to be very picky about it.Good trick but the reason it turned into puddles is I didn't clean off the oxide first this was a long time ago and when I was far more arrogant than I am today. I always thought Its better to learn doing something which I I know now is only partially true, you need to understand the underlying basics first one of which being aluminium oxide melts at nearly 3x the heat compared to aluminium.
Dull aluminium didn't compute to oxide at the time I always hit cast or steel with a scotch disk before welding but I'd only turned down the piece in a lathe a few days before. It literally went from a 2 inch pipe with 3/8 wall to a puddle after poking it with a filler rod for 10 or 15 mins straight, I look back and laugh at my stupidity now but remember it fondly but almost 20 years have past since then and have never tried to weld aluminium since.OK this is one where I will tease you as if its important enough for me to break out the TIG welder, then I clean everything religiously. If the project is low grade enough that Ican use a MIG welder or a stick welder then I might not get so crazy with the prep work, but If its a specialty alloy like Monel, Iconel or aluminum of any sort, I tend to be very picky about it.
Daddy Tanuki
Solar Wizard
you should try Monel or Copper Nickel sometime... one is like pushing snot, the other one is like trying to keep jello in an upside down bowl. either one if the weld is not perfect the SRF demands a reweld and they are very particular about grinding on the welds as it causes stress risers that can lead to early cracking...Dull aluminium didn't compute to oxide at the time I always hit cast or steel with a scotch disk before welding but I'd only turned down the piece in a lathe a few days before. It literally went from a 2 inch pipe with 3/8 wall to a puddle after poking it with a filler rod for 10 or 15 mins straight, I look back and laugh at my stupidity now but remember it fondly but almost 20 years have past since then and have never tried to weld aluminium since.
Quattrohead
Solar Wizard
I limit myself to soldering, welding seems dangerous 
I almost lost my ground rod when pounding it in, pure sand here.
And yes, lube er up
I almost lost my ground rod when pounding it in, pure sand here.
And yes, lube er up
aluminum goes from a dull color to instantly being a mirror and then the whole mess melts through and you have a big gaping hole in whatever you were welding.
Been there. So far, all I TIG weld is aluminum. The results are a bit ugly, but none of my welds have broke.
I stick to steel thicker the better and have to special order 7018 rods because all you can get around here locally is 6013 my welds ain't always pretty but they don't often break.Been there. So far, all I TIG weld is aluminum. The results are a bit ugly, but none of my welds have broke.
No idea about the locals you can see the welds aren't pretty but no idea if they're broken or not because they always leave the slag on then paint over it with silver acrylic spray paint because they think that's the same as galv.....
EnergizerNate
New Member
Or flip over the fence post driver and use the other side to get the last few inches!Yep, fence post driver. Just have to sledgehammer the last 18"
View attachment 223466
I can't see where the battery goes in that drill
Bananaman321
⚡solar idiot ⚡
Does anyone else test their driven ground?I've driven over 50 foot of single rod with one of these before
I've misplaced the driver head to this one but I can make another one fairly I also have a dozen or so ground rod couplers laying thought I'd throw a few of them in the pic
Weighs about 12 kg but a lot better than using a Georgia Boy and a sledge hammer just don't forget ear protection.
I drive 18 m and test Ohm test from rod to system neutral (neutral bonded ground wire) for 12 ohms or less if need be drive further.This is old work related habit but it doesn't seem like a bad practice.
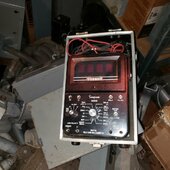 This old meter is excellent for testing ground rods it has an analog dial on it right below the LED numeric display.
City of Homestead only required a single 3 m rod but sometimes even that posed to be a difficult task in the coral rock. (Referring to utility side)
going_commando
New Member
Whatever extra tools you need depends entirely on your soil type. I have pushed ground rods in for the first 5', and then wailed them in the last 3 feet with a sledge, and I've fought with them for an hour driving the thing at a 45 degree angle ( max allowed by code iirc). The rotary hammer attachments are great, either sds-max or spline drive, but you need a beefy rotary or demo hammer for it to do it. If you have rocky soil (NH ain't called the granite state for nothing), then expect to finish it with a sledge or a bandsaw (never do this, because code). I have a cheater for a sledge hammer so I can farmer that ground rod in. In sandy soils some people can pour water over the ground rod and push it in. You also, unless you have a ground resistance meter that can prove 1 has a resistance to ground of 25 ohms or less, have to drive 2.
Similar threads
- Replies
- 2
- Views
- 391
- Replies
- 1
- Views
- 169
- Replies
- 18
- Views
- 590


