diy solar

diy solar

problem with capacity tester?

I'll just point out that i used mine several times right on the maximum edge...took the amps up slowly, and for 6-7hours at at time....guess in the end i just over stressed it. Probably about a 1/2 doz uses before it gave up. A little kindness and it will probably do fine :ROFLMAO:

I wonder if you holes drill in the board around the mosfet and a cpu fan mounted underneath the board, if it might be happy then...that might give a better passage of air past it????
We’re you taking Watts ‘right to the maximum edge’ or current?

When testing individual cells, you are generally maxing out on current while Watts are modest, while when testing a series string of cells as a battery, you are generally maxing out Watts with modest currents...
 
Turn the amp knobs to zero. When you turn up the knobs turn them slowly and try not to go over the rated watts.
I never had a problem using as many amps possible as long as I stayed under the max watts.
Exactly correct, move amps slowly. The MOSFET will develop hotspots internally and die (I'm told, by people who know). Usually they die as a short, that would be very bad. This failure is different and usually dies as an open. It is the thermal shock from rapid power changes.
 
So knowing what you know about these cheapo 150W/180W testers and the components they use, would you have a recommendation for ‘safe’ current levels to run when testing an 8S string?

Or said another way, the temperature read out on these boards seems pretty reliable - is there a temperature you would recommend staying under?
Yes and most likely yes. I am less concerned about the MOSFET blowing if you adjust current slowly then I am about the very hot diodes next to it that are not covered by the heatsink and cause my PCB discoloration. I just received more fuses so I can run more tests myself, I highly recommend having a fuse just in case the MOSFET dies as a short. I am using #10 Guage copper wire, 40 amp automotive fuse, and 45 amp anderson connectors, now I have enough to run 4 simultaneously instead of just one. Using a Riden 12 amp supply to charge, it has a nice battery charge mode, set at 3.65v and when amps drop below .1, it will shut itself down (and tell you how much it put into the cell). Very accurate and even has a temperature probe, 3.65v on the Riden is 3.654v according to my Fluke. I can take power out of cells faster than I can put it into a single cell. Waiting patiently for the upgrade board to make it an 18 amp supply (and a second complete 18 amp kit).
 
Mine went up to 24A. I pointed a fan at it.
I ran mine through 3 full cells at 22 or more amps. The MOSFET is no problem, however the diodes right next to it gets too hot to touch and discolor the PCB. Had to drop it to 10 amps (display said 45 degrees C) to bring that to a level I was comfortable with. The temperature displayed is of the MOSFET (pretty sure), It would not worry me to run that to 70 or 80 degrees Celsius, but those diodes get crazy hot if you do.
 
I ran mine through 3 full cells at 22 or more amps. The MOSFET is no problem, however the diodes right next to it gets too hot to touch and discolor the PCB. Had to drop it to 10 amps (display said 45 degrees C) to bring that to a level I was comfortable with. The temperature displayed is of the MOSFET (pretty sure), It would not worry me to run that to 70 or 80 degrees Celsius, but those diodes get crazy hot if you do.
Sounds like the lack of any heatsink near those diodes is the design flaw in these cheapo capacity testers.

I’m not sure what the design used is, but in general, the voltage across a diode when forward-biased is relatively fixed independent of current, meaning power being dissipated through a diode is roughly proportional to current (where power through a power transistor is proportional to current times voltage).

What that means is that at low-voltage, high-current testing of single cells, those diodes are going to be generating a great deal more heat than they are when testing battery strings at higher voltage and lower current.

Overlooking any kind of heatsink in the diodes sounds like the root flaw, but it’s less likely to be a problem at lower currents than higher currents.

So for now, I’m going to stick to my 10A limit on my 150W tester. Among other things, 10A is the calibration point, so testing at 10A is likely to provide the most accurate measurement (after calibration).
Sounds like pretty good logic to me. I am testing a more robust (supposedly) design called the ET5410 next. So far except for the "designed by a drunken donkey" menu interface, it looks promising. Still limited to 40 amps or 400 watts. The drunken donkey comment is a translation from a Russian review. I agree with it, terrible menu interface.
 
Sounds like pretty good logic to me. I am testing a more robust (supposedly) design called the ET5410 next. So far except for the "designed by a drunken donkey" menu interface, it looks promising. Still limited to 40 amps or 400 watts. The drunken donkey comment is a translation from a Russian review. I agree with it, terrible menu interface.
What did that model cost you?
 
We’re you taking Watts ‘right to the maximum edge’ or current?

When testing individual cells, you are generally maxing out on current while Watts are modest, while when testing a series string of cells as a battery, you are generally maxing out Watts with modest currents...
I was watching the watts as i moved the current up and took it to 179W. I'll just add, that it was when i was doing it on my whole pack, not an individual cell. The secret seems to be, move it up slowly. I maybe got a little impatient.
 
I'll just point out that i used mine several times right on the maximum edge...took the amps up slowly, and for 6-7hours at at time....guess in the end i just over stressed it. Probably about a 1/2 doz uses before it gave up. A little kindness and it will probably do fine :ROFLMAO:

I wonder if you holes drill in the board around the mosfet and a cpu fan mounted underneath the board, if it might be happy then...that might give a better passage of air past it????

I would guess they don't know that NASA learned at the school of hard knocks.
That particular transistor someone identified doesn't even spec DC operation.
You probably need to either derate further or modify the design.
For an 8s pack, use two testers each draining 4s, half the voltage and watts.

Or put in a better transistor.
Or add a resistor in series, so some of the voltage and watts are dissipated elsewhere (tune for a specific V/I operating range)

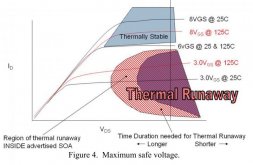
NASA's publication showed curved areas where they observed thermal runaway of MOSFET even though within data sheet SOA

NASA Thermal Runaway.jpg

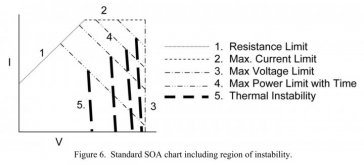
NASA added lines sloping more steeply down on the SOA graph to show where Operating Area that was actually Safe from thermal runaway.

NASA SOA with thermal instability.jpg

Although within published watt limits, higher voltage required lower current to avoid thermal runaway.

This would relate to failing shorted. Some members report the device failing open, which sounds like wirebonds burning out. With a battery behind it, could be shorted transistor resulted in the wirebonds blowing.

It also sounds like diodes need upgrading (or heat sinking) as well. Perhaps copper wire coming off the leads would serve as heatsink, adding to whatever PCB copper area is present.
 
So knowing what you know about these cheapo 150W/180W testers and the components they use, would you have a recommendation for ‘safe’ current levels to run when testing an 8S string?

Or said another way, the temperature read out on these boards seems pretty reliable - is there a temperature you would recommend staying under?
Ok, testing on the new and improved model. The one with Bluetooth, color display, remote voltage sense and comes with two temperature probes. They are very similar to the $30 models, just $20 to $30 more. The temperature sensor under the MOSFET reads low 30s Celsius at 15 amps, the diode (with no heatsink, heat dissipation side soldered to the board) measured right next to it low 70s Celsius. That same diode gets over 100 Celsius when run at 20 amps (with a Raspberry Pi heatsink on just not on the correct side). That is measured on the PCB with both the temperature sensor they send with it (taped to the spot) and a thermal temperature gun (not the most accurate, it's only $10)

I wouldn't run it above 15 amps if you have a lot of battery cells.
 
What did that model cost you?
Oddly enough, I asked the manufacturer some questions. They said that I might have a defective model, and are sending me two new models free. They made it sound like an older model had a problem but the new model doesn't. But I have the newest model. First time I have had a Chinese company offer free stuff. All it really needs is a voltage sense reading.

They are also about $140 directly from the factory.
 
Ok, testing on the new and improved model. The one with Bluetooth, color display, remote voltage sense and comes with two temperature probes. They are very similar to the $30 models, just $20 to $30 more. The temperature sensor under the MOSFET reads low 30s Celsius at 15 amps, the diode (with no heatsink, heat dissipation side soldered to the board) measured right next to it low 70s Celsius. That same diode gets over 100 Celsius when run at 20 amps (with a Raspberry Pi heatsink on just not on the correct side). That is measured on the PCB with both the temperature sensor they send with it (taped to the spot) and a thermal temperature gun (not the most accurate, it's only $10)

I wouldn't run it above 15 amps if you have a lot of battery cells.
Yeah, I think you’ve nailed why these units fail at 20A or even 15A - no cooling got the diodes and they overheat.

I’ve been limiting my current to 10A and if you want to be a real hero, it would be great to know what terms you are at 10A with your new fancy-dancy model with temperature probes.

I’m essentially using my 150W tester two ways:

-1S @ 10A (~32W)
-8S @ 5A (~128W)
You might have to wait a couple days, but I can test it and run it. I'll let you know. The 10 amp I think I measured at 50 degrees Celsius, but I will check.
 
You might have to wait a couple days, but I can test it and run it. I'll let you know. The 10 amp I think I measured at 50 degrees Celsius, but I will check.
No rush, really. Whenever convenient because your using your tester anyway.

I’ve used both settings for hundreds of hours now so I’m pretty sure those settings are both safe and I’m in no rush to try to push things higher/faster...
 
He didn’t say it clearly. It’s10A at low voltage to calibrate current and 30V at low/no current to calibrate voltage.

The calibration for current and voltage don’t happen together, they are two separate calibration steps...
I have the same unit. I have been trying to calibrate it and now it is stuck on the wrong cell voltage (.15v lower than voltmeter) and won't go above 5.64 amps, no matter how much I turn the two knobs. Also when the knobs are all the way counter-clockwise as soon as I connect it to the cell it immediately pops to the above (3.09v/5.64a) and just stays there.

In one try in trying to 'calibrate' it with my PS set at 30v and 0 amps, then moving to the 10 amp setting while keeping the voltage as low as possible it seemed to register. I then press the tester's button while plugging in the power the volts showed 30v in the menu but when hooking it up to the cell it now displays the discharge voltage as 30 volts at 5.64 amps. All this time the knobs do nothing. I must have confused it somewhere by not doing it right. I started everything with knobs fully 'off'. Blew a couple of 12v 5 and 10 amp fuses on the way.

When I first fired the thing up out of the box it all appeared to work. But because there was this .15v discrpancy between my voltmeter and the tester (HUGE difference when looking at SOC %). Then I thought on the low voltage setting on the tester, which I was going to set at 2.6v, maybe I should do 2.6v minus the .15v discrepancy, but that could be huge due to being in the 'knee'. So I am now just babysitting it - for hours, though I should be able to computer the rough time where it will sit on the level area of the curve. The cell with my meter is reading 3.230v. I have so far tapped 87ah from the 120ah cell. This is one of my overcharged cells so do not expect it to have 120ah capacity, therefore have to watch it closely going by voltage after I have perhaps tapped 100ah.

Sorry, just rambling now, thinking while inking to myself. Anyone else experienced this miscalibration mistake and can talk me through the proper way to do it?

I wish someone would do a video and walk us through the calibration scenario.

Thanks heaps
 
I have the same unit. I have been trying to calibrate it and now it is stuck on the wrong cell voltage (.15v lower than voltmeter) and won't go above 5.64 amps, no matter how much I turn the two knobs. Also when the knobs are all the way counter-clockwise as soon as I connect it to the cell it immediately pops to the above (3.09v/5.64a) and just stays there.

In one try in trying to 'calibrate' it with my PS set at 30v and 0 amps, then moving to the 10 amp setting while keeping the voltage as low as possible it seemed to register. I then press the tester's button while plugging in the power the volts showed 30v in the menu but when hooking it up to the cell it now displays the discharge voltage as 30 volts at 5.64 amps. All this time the knobs do nothing. I must have confused it somewhere by not doing it right. I started everything with knobs fully 'off'. Blew a couple of 12v 5 and 10 amp fuses on the way.

I hope you're adjusting voltage and current of the supply with battery disconnected!

Supply terminals not connected to anything, adjust voltage for target (e.g. 3.65V x number of cells)
Supply terminals shorted, adjust current for target (e.g. 10A)

Once adjusted, switch off supply, connect to battery (with BMS including disconnect) or cell, then turn on.

It appears many supplies end up regulating voltage as seen internally while battery sees a lower voltage. That slows the charging process, but best to just be patient. Good, low resistance connections and thick wires will minimize voltage drop outside the power supply itself.

If anybody cared and was willing to spend the money, they would get a supply with separate sense terminals.

If your supply is acting flaky, doesn't behave even open circuit or with a simple load like a resistor, could be damaged. Not surprising if cheap, or if it experienced overloads trying to charge batteries.
When you say 'supply', is this referring to the ‘Power Supply’ or the ‘capacity tester’ you are talking about? I need to calibrate my Capacity Tester.

Now it is saying voltage is 3.17v and my meter says the cell is at 3.605. I am testing another cell. So will the tester be basing the running capacity count as 3.17v times current drawn, which will be wrong, as the true voltage is 3.605v.

Now several hours later my capacity tester is showing 3.09v and the meter is showing 3.306. Such a difference! It the capacity being computed by this lower voltage or the actual voltage?

Cheers
You should only pay attention to the Ah readings on these testers and ignore the Wh readings.

Amps are amps are amps, so the voltage drop occurring in the wiring and the internal electronics of the tester do not impact it’s ability to integrate the amp hours of capacity the cell delivered...
 
This is bizarre... my 'overcharged' 120ah cell capacity came in at 124ah. I started from 3.65v and went down to 2.6v. Now I was sure that the capacity would have been diminished by 10% or so. If amps are amps are amps then my cell actually had the 'fear of DOD' put into it and performed better than normal, just to throw me off the scent. I have ordered another capacity tester that I will use to test a third cell, also overcharged, to see the results of that one.

BTW, the first cell gave me 118ah, which is closer to what I expected, though that was my first time testing so there were a few starts, stops and continues in trying to understand the unit. But the second was done in one go; averaging 5a discharge rate. The whole time the voltage on the unit was often far off compared to the meter, which has shown itself to be very accurate.

Again, thanks for everyone's help in this testing time. Everything learned by 'trial and terror' will be useful in the whole project.
 

diy solar

diy solar
Back
Top