AlaskanNoob
Solar Enthusiast
- Joined
- Feb 20, 2021
- Messages
- 907
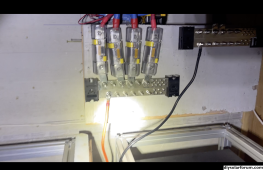
Thought about putting this in Beginner's Corner, but I suppose it's more appropriate here. After years, we're finally putting things up on walls. Got our solar shed built this summer, put the 160 pound Quattro 15K on the wall along with one of our MPPTs. Since we could only afford the metal for two of our seven custom ground mounts, we won't need the second MPPT until next year. Got the bus bar set up and I tried to size everything to make for short cables.
Later today I'll bring the generator cable up from under the shed along with two relay wires for the auto start and wire those into the Quattro and the Cerbo GX.
I'm waiting on some hardware to fix one of the battery racks, then I'll be able to add the last Pylontech battery and add insulation around the racks along with thin plywood walls around them. Then I will cut the supplied positive cables for each battery and crimp lugs, and mount t-fuse holders on the side of each rack near each battery and connect to the bus. We've had these batteries for more than a year now and they have never been turned on. Fingers crossed they work here in a few days when I finally power them up.
I still need to order a couple longer negative 1/0 cables for the MPPT to connect to the bus bar. And add a block of wood to relieve some pressure on the 4/0 negative cables from the Quattro to the bus bar.
And I need to mount the DC Isolators, put the solar panels up on our almost completed two solar ground mounts, and run the PV wire through conduit into the shed to the isolators and then to the MPPT. Then install the AutoTransformer at the shed and another Autotransformer at the cabin. Then put the t-fuses in the holders.
Then I'll disconnect the Cerbo and the MPPT from the bus temporarily, use a smaller 48V bank to pre-charge the caps on the Quattro, then turn on all the Pylontech batteries which are all individually wired to the bus. Then flip on the Quattro, turn on the Honda EU7000 generator (which later we hope to replace with a larger propane generator), and hopefully charge up all the Pylontech batteries to 100%.
Will finish the second ground mount and paint both to keep the aluminum on the panels from touching steel. Then trench to the shed to run the wires in.
Then I'll trench the 500 feet or so to the cabin and put the huge triplex aluminum wire connecting the Quattro to the autotransformer in the cabin.
Then the electrician will take it from there to do all the AC stuff, panels, and to ground everything.
Figured I'd post some pictures of our install so that generous folks have an opportunity to keep me from burning this place down with my craptastic skills.

Got one mount installed, and just put in the first beam for the second mount yesterday.


Later today I'll bring the generator cable up from under the shed along with two relay wires for the auto start and wire those into the Quattro and the Cerbo GX.
I'm waiting on some hardware to fix one of the battery racks, then I'll be able to add the last Pylontech battery and add insulation around the racks along with thin plywood walls around them. Then I will cut the supplied positive cables for each battery and crimp lugs, and mount t-fuse holders on the side of each rack near each battery and connect to the bus. We've had these batteries for more than a year now and they have never been turned on. Fingers crossed they work here in a few days when I finally power them up.
I still need to order a couple longer negative 1/0 cables for the MPPT to connect to the bus bar. And add a block of wood to relieve some pressure on the 4/0 negative cables from the Quattro to the bus bar.
And I need to mount the DC Isolators, put the solar panels up on our almost completed two solar ground mounts, and run the PV wire through conduit into the shed to the isolators and then to the MPPT. Then install the AutoTransformer at the shed and another Autotransformer at the cabin. Then put the t-fuses in the holders.
Then I'll disconnect the Cerbo and the MPPT from the bus temporarily, use a smaller 48V bank to pre-charge the caps on the Quattro, then turn on all the Pylontech batteries which are all individually wired to the bus. Then flip on the Quattro, turn on the Honda EU7000 generator (which later we hope to replace with a larger propane generator), and hopefully charge up all the Pylontech batteries to 100%.
Will finish the second ground mount and paint both to keep the aluminum on the panels from touching steel. Then trench to the shed to run the wires in.
Then I'll trench the 500 feet or so to the cabin and put the huge triplex aluminum wire connecting the Quattro to the autotransformer in the cabin.
Then the electrician will take it from there to do all the AC stuff, panels, and to ground everything.
Figured I'd post some pictures of our install so that generous folks have an opportunity to keep me from burning this place down with my craptastic skills.
Got one mount installed, and just put in the first beam for the second mount yesterday.
Last edited:
")