


JCSchwarb
Solar Enthusiast
- Joined
- Nov 26, 2022
- Messages
- 499
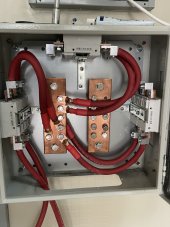
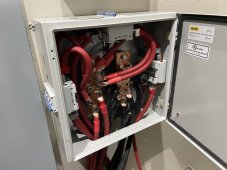
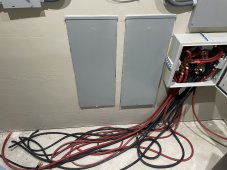
After seeing folks struggle with how to connect battery racks to busbars (buss bars) and circuit breakers, I share my Battery interconnect combiner design to give ideas to future built systems. Many use the puny busbars and then have exposed wiring and exposed circuit breakers. This single box design brings it all together positive and negative battery connections into an enclosure that is lockable. My system has six inverters so used a box large enough to house six circuit breakers (CB). I am surprised no solar company sells such a box or even busbars for that matter.
I used a 16” x 16” Vevor lockbox and added 2 200amp breakers on each of three sides, using the bottom opening for all wire routing. I used a copper grounding Busbar from Amazon.
I thought you might like some of my materials for the Battery interconnect box:
I purchased TEMCO battery wire and used a hydraulic 4/0 crimper and copper lugs putting carbon paste on all connections. Finish everything with heat shrink tubing. Be sure to count how many lugs you will need, because I miscounted twice! Use gloves when using the paste, I smeared inside each lug rim to reduce mess.
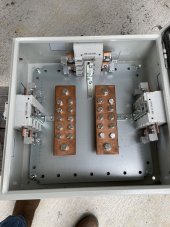
First, I mounted the busbars under the metal plate. My busbars had an extra bottom steel plate I removed and discarded. This required drilling four holes and torquing the bolts. I checked for continuity to ensure the busbars were isolated and did not conduct into the bottom plate.
For CB mounting, I placed blue tape for the two CBs to poke through, drilling two diagonal corners then used jig saw with metal blade (3) to finish the job. Sanded the edges. Used L brackets for mounting with 1/2” length 1/4” self tapping screws. You will notice metal plates added onto the case. This is where I thought offsetting the CBs would provide better cable connections, but that turned out to be false. Stacking both on top in the middle gives the most cable room and faster to modify the box with one larger cut instead of two separate.
Lastly, I built equal length 12” cables with crimped lugs and figured out the best wire routing. I could have used 1/0 copper, but like plumbing seemed best to keep same aperture through the path.
Building this was a lot of fun and very satisfying! The crimps turned out perfect. It took me about 10 hours for the entire build, spanning several days, so give yourself time to complete.
Hope this gives the solar community some good ideas on to build your next battery to inverter interconnect combiner box design that will provide years of safe enjoyment using easy to source parts.
Happy Solaring! -Jay
VEVOR Electrical Enclosure, 16''... https://www.amazon.com/dp/B0B8Z7WS49?ref=ppx_pop_mob_ap_share
Battery Bus Terminals for positive and negative GOUNENGNAIL-.157" x 2.36" x 7.87" Copper Ground Bar Kit with 5/16''x10 Terminal Positions,Copper Grounding Busbar Bar Kit https://a.co/d/iU2Usv7 note: they offer a tinned version if you like silver better. Since it is enclosed, I opted for pure copper.
TEMCo Wire Cutters TH0001 4/0 (0000 Gauge)... https://www.amazon.com/dp/B00HJWTBYS?ref=ppx_pop_mob_ap_share
LICHAMP Hydraulic Cable Lug Tool,... https://www.amazon.com/dp/B08BZTHKC5?ref=ppx_pop_mob_ap_share
10pcs 2/0 Awg - 3/8" (M10) Battery Lugs Sanuke... https://www.amazon.com/dp/B092ZKJGYV?ref=ppx_pop_mob_ap_share
8pcs 4/0 AWG-3/8" Battery Lugs. https://www.amazon.com/dp/B08R6X6W4Z?ref=ppx_pop_mob_ap_share
Example of wiring, buy lengths that can be equally cut for your installation to reduce waste: TEMCo INDUSTRIAL WC0047-30' (15'... https://www.amazon.com/dp/B00LIB6OL4?ref=ppx_pop_mob_ap_share
Carbon conductive grease paste - used on all lugs to wire crimps. MG Chemicals - 8481-1 Premium... https://www.amazon.com/dp/B00NB14C2C?ref=ppx_pop_mob_ap_share
I used a 16” x 16” Vevor lockbox and added 2 200amp breakers on each of three sides, using the bottom opening for all wire routing. I used a copper grounding Busbar from Amazon.
I thought you might like some of my materials for the Battery interconnect box:
I purchased TEMCO battery wire and used a hydraulic 4/0 crimper and copper lugs putting carbon paste on all connections. Finish everything with heat shrink tubing. Be sure to count how many lugs you will need, because I miscounted twice! Use gloves when using the paste, I smeared inside each lug rim to reduce mess.
First, I mounted the busbars under the metal plate. My busbars had an extra bottom steel plate I removed and discarded. This required drilling four holes and torquing the bolts. I checked for continuity to ensure the busbars were isolated and did not conduct into the bottom plate.
For CB mounting, I placed blue tape for the two CBs to poke through, drilling two diagonal corners then used jig saw with metal blade (3) to finish the job. Sanded the edges. Used L brackets for mounting with 1/2” length 1/4” self tapping screws. You will notice metal plates added onto the case. This is where I thought offsetting the CBs would provide better cable connections, but that turned out to be false. Stacking both on top in the middle gives the most cable room and faster to modify the box with one larger cut instead of two separate.
Lastly, I built equal length 12” cables with crimped lugs and figured out the best wire routing. I could have used 1/0 copper, but like plumbing seemed best to keep same aperture through the path.
Building this was a lot of fun and very satisfying! The crimps turned out perfect. It took me about 10 hours for the entire build, spanning several days, so give yourself time to complete.
Hope this gives the solar community some good ideas on to build your next battery to inverter interconnect combiner box design that will provide years of safe enjoyment using easy to source parts.
Happy Solaring! -Jay
VEVOR Electrical Enclosure, 16''... https://www.amazon.com/dp/B0B8Z7WS49?ref=ppx_pop_mob_ap_share
Battery Bus Terminals for positive and negative GOUNENGNAIL-.157" x 2.36" x 7.87" Copper Ground Bar Kit with 5/16''x10 Terminal Positions,Copper Grounding Busbar Bar Kit https://a.co/d/iU2Usv7 note: they offer a tinned version if you like silver better. Since it is enclosed, I opted for pure copper.
TEMCo Wire Cutters TH0001 4/0 (0000 Gauge)... https://www.amazon.com/dp/B00HJWTBYS?ref=ppx_pop_mob_ap_share
LICHAMP Hydraulic Cable Lug Tool,... https://www.amazon.com/dp/B08BZTHKC5?ref=ppx_pop_mob_ap_share
10pcs 2/0 Awg - 3/8" (M10) Battery Lugs Sanuke... https://www.amazon.com/dp/B092ZKJGYV?ref=ppx_pop_mob_ap_share
8pcs 4/0 AWG-3/8" Battery Lugs. https://www.amazon.com/dp/B08R6X6W4Z?ref=ppx_pop_mob_ap_share
Example of wiring, buy lengths that can be equally cut for your installation to reduce waste: TEMCo INDUSTRIAL WC0047-30' (15'... https://www.amazon.com/dp/B00LIB6OL4?ref=ppx_pop_mob_ap_share
Carbon conductive grease paste - used on all lugs to wire crimps. MG Chemicals - 8481-1 Premium... https://www.amazon.com/dp/B00NB14C2C?ref=ppx_pop_mob_ap_share
Attachments
Last edited:
