PhotonsAreNeat
New Member
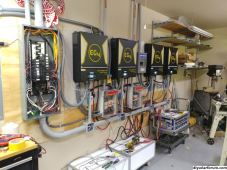
It looks like some Signature Solar folks read these forums, and I was told by tech support that I'm the first customer to try out the PDP, so here's the issues I encountered that you guys should fix:
1) One of the six front panel screws had it's threads stripped out completely. It would spin in place but wouldn't back out, and couldn't be pried out. I had to drill out the head to get the panel removed, then grab the remaining shaft with pliers and pull/unscrew as hard as I could to get it out. Not a good start.
2) The 3/4" knockouts are apparently slightly too small. All of my plastic 3/4" grommets for romex, which fit my panel just fine, were a smidge too large for every one of those holes. The 1" knockouts seem to be the right size.
3) Many of the knockouts are in really bad places. They are either just below a mounting bracket, where you can't really get a wire through them, or they are just behind the horizontal bar which has a sharp edge on top, so you end up damaging your wire as you pull it through. Basically every one of the rear knockouts are useless! They are all behind the horizontal bar, and again you can't pull wire through them without tearing it all up. I had to drill a custom hole for the rear entry.
4) Not a big deal, but each inverter is supplied with two green ground wires to connect to the AC input ground, and the AC output ground. These are tied together internally anyway, and connecting both of these will create a ground loop. Just unnecessary.
5) The breakers will easily slide around on the DIN rail with the cover off, and then you gotta place the front on it, see which one is off, move it, try again, etc. etc. There are plastic locks on both sides of them, but they apparently were loose from the factory.
6) The PDP came with two plates on top of the unit where the 6500s should mount, which had outlines for cutouts, and two cutouts already removed. The manual makes no mention of this plate, whether its supposed to stay or not, etc. I contemplated what to do with it for about 10 minutes before deciding to remove them entirely. The cutouts didn't seem like they would easily knock out, as that plate is pretty thick. Also, you can't get to the screws on the bottom of the 6500 if that plate is there, so I see no way of actually wiring it if the plate were left in place, unless you completely removed the 6500 from the wall and had someone hold it to wire it! No way that was gonna happen.
Anyways, the PDP is a really neat product, but it needs a few tweaks.


