UltraHeat and Annod Industries are located in the same 12,680 sqft building at 1314 Perkins Ave, Elkhart, Indiana. According to Dun & Bradstreet UHI Worldwide Inc (UltraHeat) has 13 total employees and Annod Industries has 3 total employees. I suspect the UltraHeat Z-25N60 8 x 11 Proto Type Kits are just one-off builds for specific customer requests. Elkhart, Indiana is known as the RV Capital of the World. More than 80 percent of global RV production is based throughout the region.


You are using an out of date browser. It may not display this or other websites correctly.
You should upgrade or use an alternative browser.
You should upgrade or use an alternative browser.
LiFePO4 Battery Warmer Install
- Thread starter HRTKD
- Start date
I figured that Annod was a subsidiary. My Original request for information to UltraHeat ended up going to Annod. It was fairly obvious that I was dealing with a lean and mean organization since my email conversations were with a VP.
I hope they aren't too hot. It is only 15 watts. And with the temp thermostat controller with the same ranges as you it should be OK. I guess it depends where I put the temp sensor.Yes, those pads are made by the same company. Yours are larger so that may account for the higher amp rating. But I'm not sure that they are designed the same. UltraHeat may be making two different lines of heating pads, one for water tanks and one for batteries. The water tank pads may have a heat range that is too high.
Last edited:
The pad is made for a battery. The model is Z-25N60-BAT832-13V-15W. The Ultra Heat label installation instructions under 3. state how to adhere it to a battery. So I should be safe. DO you think I should add the on/off toggle switch?
Good to hear they are battery specific. I did put a switch in my circuit. I didn't have room for a surface mount switch, but I had room on my DIN rail, so I put a breaker there.
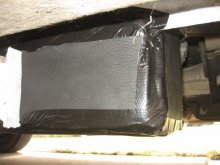
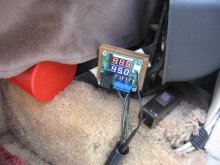
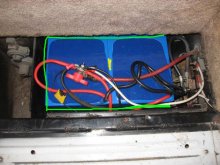
I finally finished the install of the Ultra Heat pad and parts. First I reinstalled the 2 batteries from storage. I barely can get the battery box lid on with all the wiring. I forgot to take pictures of the open box with the install. The previous pics showed the batteries in the box. I did install the 1/2" adhesive neoprene around the exterior after scraping and painting it. I sealed the edges with duct tape. I have since bought permanent Gorilla tape to replace the duct tape when it starts to come off which I expect. This morning it was cold, 28, so I turned on the thermostat/controller with the inline switch I installed. It is visible next to the thermostat. The neoprene insulation kept the batteries warm until they finally dropped below 38, and boom. The thermostat turned on and the heating started. It took about 2 hours when I checked again and the thermostat was off and the temp was 44 and on the way down. My Trimetric showed 2.2 amps of discharge doing the heating. Normally there is a 0.2 amp discharge due to the RV's propane detector, etc. The pad wraps around the 2 batteries. I did not adhere them to the batteries and left the adhesive covering on. That's so I can more easily remove the batteries for winter storage. The 2 sides are where the heating pads are. The temp sensor I slid between the tops of the 2 batteries.
Attachments
Looks good Steve!
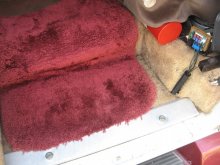
Thanks. It took a lot of planning and work. Here's a modified pic of the batteries before installation. The green line shows where the heat pad is and the yellow on the top middle shows where the sensor went in between them.Looks good Steve!
Attachments
Any idea how long it takes your battery temp to cycle between on/off states?
It would be handy to have that data stored within the thermostat, but that's a whole different level of sophistication for that device.
It would be handy to have that data stored within the thermostat, but that's a whole different level of sophistication for that device.
I was going to check it and write down the data, but did not check enough. I think I turned it on around 7AM, but the temp in the box had not yet dropped below 38. By 7:45 it had turned on with temp then at 37.5 AT 8 AM it was 38.7. By 10 it was 44.5, off and going down. At 11:20 it is 42.1. The outside air temp is 30. I have yet to plug in my RV and charge the batteries. I think I'll wait until it is warmer this weekend.
Thanks for all the info you posted. It really helped, although your situation is different than mine and you have an amazing battery situation. Lots of wires.
Thanks for all the info you posted. It really helped, although your situation is different than mine and you have an amazing battery situation. Lots of wires.
Last edited:
Thanks for all the info you posted. It really helped, although your situation is different than mine and you have an amazing battery situation. Lots of wires.
You're welcome. Yeah, the install looks really good until all the wires go in. LOL!
Ugh, how did you get those huge wires into those tiny holes of the temperature controller?I finally finished the install of the Ultra Heat pad and parts. First I reinstalled the 2 batteries from storage. I barely can get the battery box lid on with all the wiring. I forgot to take pictures of the open box with the install. The previous pics showed the batteries in the box. I did install the 1/2" adhesive neoprene around the exterior after scraping and painting it. I sealed the edges with duct tape. I have since bought permanent Gorilla tape to replace the duct tape when it starts to come off which I expect. This morning it was cold, 28, so I turned on the thermostat/controller with the inline switch I installed. It is visible next to the thermostat. The neoprene insulation kept the batteries warm until they finally dropped below 38, and boom. The thermostat turned on and the heating started. It took about 2 hours when I checked again and the thermostat was off and the temp was 44 and on the way down. My Trimetric showed 2.2 amps of discharge doing the heating. Normally there is a 0.2 amp discharge due to the RV's propane detector, etc. The pad wraps around the 2 batteries. I did not adhere them to the batteries and left the adhesive covering on. That's so I can more easily remove the batteries for winter storage. The 2 sides are where the heating pads are. The temp sensor I slid between the tops of the 2 batteries.
Really frustrated with that tiny thing.
Anyone know of a bigger controller?
Ugh, how did you get those huge wires into those tiny holes of the temperature controller?
Really frustrated with that tiny thing.
Anyone know of a bigger controller?
LOL! I know exactly what you're talking about. The amp rating of the thermostat doesn't seem to match the wire connections.
Jim,
Here's what yesterday morning showed, It couldn't cycle as it got too warm.
Batt temp Air temp
7AM ---- 30.3 --- 27 I switched it on
7:30 --- 32.6 --- 27
8 --- 34.8 --- 27
8:30 --- 37.1 --- 28
9 --- 39.1 --- 29
9:30 --- 41.2 --- 30
10 --- 43.0 --- 32
10:30 --- 44.8 ---- 33
11 --- 44.4 --- 34.8 It had switched off and was on the way down
11:40 --- 43.4 --- 37.2
1 --- 41.9 --- 41
2 --- 41.4 --- 43
Did you have insulation on top of the battery sensor? If you have a sensor on top, it needs to be taped down to the battery so the batteries temperature is being read. On the air side (top) of the sensor, you should have some insulation over it to avoid the air from heating the sensor. You are trying to read the internal core temp of the battery.Jim,
Here's what yesterday morning showed, It couldn't cycle as it got too warm.
Batt temp Air temp
7AM ---- 30.3 --- 27 I switched it on
7:30 --- 32.6 --- 27
8 --- 34.8 --- 27
8:30 --- 37.1 --- 28
9 --- 39.1 --- 29
9:30 --- 41.2 --- 30
10 --- 43.0 --- 32
10:30 --- 44.8 ---- 33
11 --- 44.4 --- 34.8 It had switched off and was on the way down
11:40 --- 43.4 --- 37.2
1 --- 41.9 --- 41
2 --- 41.4 --- 43
The dropping of temperature from 44+ to 41.4 seems like you may have air temperatures. The heaters could be 50-70F and flowing hot air to the top sensor. I don't see any way that the top sensor would drop below ambient, unless it was air heated, or the battery core was still very cold and cooling the air inside the battery box.
You mentioned that you put a battery cover on. Is there a possibility that the heat is rising from the heater wrap and filling the air space under the cover? That could give a false reading.
If you put a layer of fiberglass insulation all the way across the top of the battery, covering the battery temp sensor and the entire top, this would ensure that you are reading battery temperature. The heat hitting the sensor would have to come through the battery. The insulation would actually slow down the heating a little as the warm air could have heated the top of the battery.
Have you tested the BMS to see if it does shut off charging below 32F? That would be the number one best method of making sure you don't charge when too cold.
Thanks for the data.
Last edited:
Adding to what diyernh wrote, I did make a small "cap" out of the rigid foam insulation to go over the temperature sensors. That was an attempt to keep the sensor reading just the battery temperature and not the ambient air temperature. I have a 2" layer of rigid foam insulation on top of the batteries, offset about 1.5" from the top of the batteries to keep the heat in. The long sides of the batteries have 1.5" foam. The short sides have no insulation other than the 3/4" plywood for the compression frame. Under the batteries I have 3/4" plywood then 2" foam.
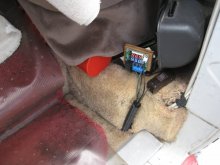
You need to look at my earlier post where I show where the temp sensor went between the 2 batteries, which are tight together. It is only a little below the top. The temp dropped because the thermo/controller shuts off at 45. Then the battery temp will drop (if the air temp is still cold). The other pics and comments showed there is almost no room on top of the batteries. There is a wood covering then another wood one with the carpeting seen in the pic. There is almost no air space under the covers.Did you have insulation on top of the battery sensor? If you have a sensor on top, it needs to be taped down to the battery so the batteries temperature is being read. On the air side (top) of the sensor, you should have some insulation over it to avoid the air from heating the sensor. You are trying to read the internal core temp of the battery.
The dropping of temperature from 44+ to 41.4 seems like you may have air temperatures. The heaters could be 50-70F and flowing hot air to the top sensor. I don't see any way that the top sensor would drop below ambient, unless it was air heated, or the battery core was still very cold and cooling the air inside the battery box.
You mentioned that you put a battery cover on. Is there a possibility that the heat is rising from the heater wrap and filling the air space under the cover? That could give a false reading.
If you put a layer of fiberglass insulation all the way across the top of the battery, covering the battery temp sensor and the entire top, this would ensure that you are reading battery temperature. The heat hitting the sensor would have to come through the battery. The insulation would actually slow down the heating a little as the warm air could have heated the top of the battery.
Have you tested the BMS to see if it does shut off charging below 32F? That would be the number one best method of making sure you don't charge when too cold.
Thanks for the data.
You need to look at my earlier post where I show where the temp sensor went between the 2 batteries, which are tight together. It is only a little below the top. The temp dropped because the thermo/controller shuts off at 45. Then the battery temp will drop (if the air temp is still cold). The other pics and comments showed there is almost no room on top of the batteries. There is a wood covering then another wood one with the carpeting seen in the pic. There is almost no air space under the covers.
Yes, I missed the text that the sensor was between the batteries. I just saw the yellow mark and thought it was on the top.
I did see why the internal battery temp appeared to drop below ambient temp. The insulated walls slow the temperature transfer. The temperature outside can take an hour or 4 to warm up the inside of the wall. aka thermal hysteresis.
I see 3:20 hour thermal lag from the time the outside air hits a low until the battery hits it's low. It's a BattleBorn 100AH inside a 3/4" wood box, 2" insulation board. Every installation will differ.

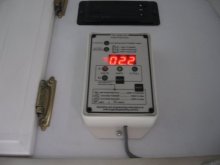
Does this controller retain the settings if power supply is interrupted?The new controller I'm using I got off Amazon for $11 based on recommendations from other forum members. It's the LM YN DC 12V Digital Thermostat Module. It has a programmable range, which I prefer to the preset range. Other benefits are that it shows you the observed temperature and the target temperature on the two displays. Each battery now has its own controller.
Similar threads
- Replies
- 5
- Views
- 462
- Replies
- 3
- Views
- 318
- Replies
- 1
- Views
- 168
- Replies
- 35
- Views
- 1K