Shannonsman229
Never done expanding
- Joined
- Mar 20, 2022
- Messages
- 143
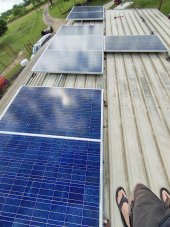
utilizing material laying around I was able to come up with this set up using the following:
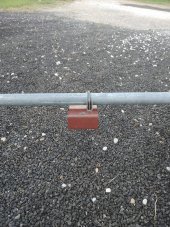
6in c purlin
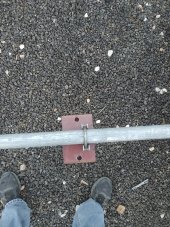
22 ft 1 5/8 galvanized chain link top railing
1 3/4 exhaust clamps
Np1 master seal polyurethane sealant
3 / 8 stainless steel washers
Loctite threadlocker
Any hole that I penetrate to hold down the C purlins has a glob of np-1 Master seal. Between the C purlin and the roof.
Using stainless steel washers to sandwich the aluminum frames of the solar panels to prevent chemical reaction between galvanized exhaust clamps and aluminum frames.
Loctite thread Locker not permanent used on any nuts threaded.
Leaving 20 in gaps between every other row for maintenance and slight gap between panels for expansion.
This setup actually worked extremely well. Very sturdy and will last many many years. I was able to access the underside of the panels with The Gap and keep my wiring off of the top of the roof. I am able to run my ground wire easily connecting all panel frames.
6in c purlin
22 ft 1 5/8 galvanized chain link top railing
1 3/4 exhaust clamps
Np1 master seal polyurethane sealant
3 / 8 stainless steel washers
Loctite threadlocker
Any hole that I penetrate to hold down the C purlins has a glob of np-1 Master seal. Between the C purlin and the roof.
Using stainless steel washers to sandwich the aluminum frames of the solar panels to prevent chemical reaction between galvanized exhaust clamps and aluminum frames.
Loctite thread Locker not permanent used on any nuts threaded.
Leaving 20 in gaps between every other row for maintenance and slight gap between panels for expansion.
This setup actually worked extremely well. Very sturdy and will last many many years. I was able to access the underside of the panels with The Gap and keep my wiring off of the top of the roof. I am able to run my ground wire easily connecting all panel frames.