diy solar

diy solar

My New DIY 100Ah 12v Pack Build

chevymike

New Member
Joined
Nov 18, 2019
Messages
89
I finally got all the parts and I have completed one of the two packs I am planning to build for my camper project. After a lot of research, lots of reading and a lot of searching for the right parts for my build, I finally got one done. My best friend was able to source me some very good condition ThunderSky 100Ah 3.2v cells. Most of the other parts were sourced from Amazon, local hardware store or stuff I had already. All told, I have less than $200 in each 100Ah bank.

I set out to build a full 12v pack that was functional, looked clean and serviceable. I did not want the end results to look hacked together. After measuring the size of the cells, I worked to find a suitable housing for them and the BMS. For the BMS, I ordered from @OverkillSolar a pair of 120A BMS's with BT and these are the new models with the shut off switch for the discharge side (charge side still stays active). Next was getting this all to fit and look clean.

First order of business was to convert the packs down to 4 cell. I had to pull the banding, re-bend, drill new screw holes in the straps and bolt back together. This took the most time. For two packs, this resulted in doing this 16 times.

0525201006.jpg

Now down to 4 cells

0525201126_HDR.jpg

Plastic ammo box. Nice thing about this is the sides are square versus tapering like many boxes do. Also being plastic, I wasn't worried about any conductivity from the box.

0525201129.jpg

They came with inner trays which I cut down to use between the cell terminals and BMS/cables

0525201155_HDR.jpg

Here it is fitted. Worked good.

0525201200.jpg

Shiny BMS!!! Thanks @OverkillSolar

0601201840.jpg

3/8" battery lug terminals

0608201318.jpg

Getting all of this to fit. It is snug and everything has to be routed correctly but it works!

0608201439.jpg

Wiring connected. Main positive is 4ga and the 3 common wires off the BMS go into a 4ga cable. Temp sensor drops down into a hole between the cells. BT module is taped down. The discharge cutoff switch wiring is routed up the positive lead to the switch. I used some high density packing foam to fill the gap between the cells and box at one end. You can just see the white peeking out in the lower left corner. Cells do not move.

0608201509.jpg

All closed up, terminals ready to connect and disconnect switch works well. Need to label it.

0608201510a.jpg

Very happy how this turned out. Very clean and serviceable. Just need to duplicate this to bank #2.

Amazon link to ammo cans - https://www.amazon.com/gp/product/B0000CEZ8O/ref=ppx_yo_dt_b_asin_title_o08_s00

Amazon link to terminals - https://www.amazon.com/gp/product/B07PQQ928V/ref=ppx_yo_dt_b_asin_title_o00_s00

Hope you all enjoyed checking out my project and it inspires others to try building your own pack.
 
Last edited by a moderator:
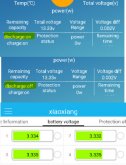
Here is what the Android app looks like. You can see in the highlighted area, the discharged showing on or off depending on if I turned the switch on or off. Cells are very well balanced.

BMS Info.jpg
 
Very nice build. But I have to ask. Did you put a fuse on the positive side?
 
Here is what the Android app looks like. You can see in the highlighted area, the discharged showing on or off depending on if I turned the switch on or off. Cells are very well balanced.

View attachment 15028
Very nice job indeed. May I ask what the purpose of the ’discharge port off’ switch is ? I know you can set ‘ battery off / on’ via the BT module but this disconnects both the charge and discharge ports. I have been experimenting with this BMS
( sourced from CH ) for a few months now and there is always something new to learn. My application runs on iOS.
Following with interest.
 
Last edited:
Very nice build. But I have to ask. Did you put a fuse on the positive side?
Most all DIY builds I have have seen (and Will has made videos for) does not put any fuse between the battery posts and BMS. BMS controls over amperage and should disconnect the battery if over my limit (I am going to set for 80 amps). Now between the battery and the terminal strip for all the electrical to hook into, yes I will have circuit breakers between those points. Actually each battery bank will have it's own breaker so each battery is independent of each other.
 
Very nice job indeed. May I ask what the purpose of the ’discharge port off’ switch is ? I know you can set ‘ battery off / on’ via the BT module but this disconnects both the charge and discharge ports. I have been experimenting with this BMS
( sourced from CH ) for a few months now and there is always something new to learn. My application runs on iOS.
Following with interest.

This gives me a manual way to disconnect any loads, primarily for long term storage but it also gives a manual override if for some reason the BT or phone app were to stop working. This would also allow me to perform any charging if needed without having any draws.
 
Most all DIY builds I have have seen (and Will has made videos for) does not put any fuse between the battery posts and BMS. BMS controls over amperage and should disconnect the battery if over my limit (I am going to set for 80 amps). Now between the battery and the terminal strip for all the electrical to hook into, yes I will have circuit breakers between those points. Actually each battery bank will have it's own breaker so each battery is independent of each other.

On the other hand most everyone says the BMS should be used as the last line of defense in case the BMS fails. I know it's not likely and to each their own. But when I get around to building mine I will put a fuse as close as I can to the battery post if not directly on the battery. This is in addition to other breakers or fuses as needed. Maybe I am being too cautious but that's just me.
 
I finally got all the parts and I have completed one of the two packs I am planning to build for my camper project. After a lot of research, lots of reading and a lot of searching for the right parts for my build, I finally got one done. My best friend was able to source me some very good condition ThunderSky 100Ah 3.2v cells. Most of the other parts were sourced from Amazon, local hardware store or stuff I had already. All told, I have less than $200 in each 100Ah bank.

I set out to build a full 12v pack that was functional, looked clean and serviceable. I did not want the end results to look hacked together. After measuring the size of the cells, I worked to find a suitable housing for them and the BMS. For the BMS, I ordered from @OverkillSolar a pair of 120A BMS's with BT and these are the new models with the shut off switch for the discharge side (charge side still stays active). Next was getting this all to fit and look clean.

First order of business was to convert the packs down to 4 cell. I had to pull the banding, re-bend, drill new screw holes in the straps and bolt back together. This took the most time. For two packs, this resulted in doing this 16 times.

View attachment 15016

Now down to 4 cells

View attachment 15017

Plastic ammo box. Nice thing about this is the sides are square versus tapering like many boxes do. Also being plastic, I wasn't worried about any conductivity from the box.

View attachment 15018

They came with inner trays which I cut down to use between the cell terminals and BMS/cables

View attachment 15019

Here it is fitted. Worked good.

View attachment 15020

Shiny BMS!!! Thanks @OverkillSolar

View attachment 15021

3/8" battery lug terminals

View attachment 15023

Getting all of this to fit. It is snug and everything has to be routed correctly but it works!

View attachment 15022

Wiring connected. Main positive is 4ga and the 3 common wires off the BMS go into a 4ga cable. Temp sensor drops down into a hole between the cells. BT module is taped down. The discharge cutoff switch wiring is routed up the positive lead to the switch. I used some high density packing foam to fill the gap between the cells and box at one end. You can just see the white peeking out in the lower left corner. Cells do not move.

View attachment 15024

All closed up, terminals ready to connect and disconnect switch works well. Need to label it.

View attachment 15027

Very happy how this turned out. Very clean and serviceable. Just need to duplicate this to bank #2.

Amazon link to ammo cans - https://www.amazon.com/gp/product/B0000CEZ8O/ref=ppx_yo_dt_b_asin_title_o08_s00

Amazon link to terminals - https://www.amazon.com/gp/product/B07PQQ928V/ref=ppx_yo_dt_b_asin_title_o00_s00

Hope you all enjoyed checking out my project and it inspires others to try building your own pack.
Please edit your links and remove the ? And everything after it. Like I did in my reply
Affiliate links are not allowed in the forum.
 
Please edit your links and remove the ? And everything after it. Like I did in my reply
Affiliate links are not allowed in the forum.

I don't have the ability to edit my post to remove those. If you can edit those, please do.
 
I will have to delete the post and have Will edit it.
After 1 hour, editing is locked.

I have been an admin on a couple different forums and I always had the ability to edit a post from another member. You don't have that access? Having to delete a full post just to make an edit seems ridiculous.
 
I have been an admin on a couple different forums and I always had the ability to edit a post from another member. You don't have that access? Having to delete a full post just to make an edit seems ridiculous.
Only Will has edit powers...
I have requested he edit it.
 
I have the same BMS and would like to use the same app. Where did you get it?

 
Thanks @chevymike!
I'll give that one a try.
I've had a few different ones, but they have been annoying because they are half Chinese.
 
Back
Top