diy solar

diy solar

Noobing myself on series/parallel tradeoffs

hour

New Member
Joined
Sep 26, 2019
Messages
155
I'm sure I knew this at some point and it's the crux of my wall of text post here where I'm planning my new camper build. Since that's probably a TL;DR and I have a concise more noobish question that could influence a lot of my decisions, I'll pose it here.

Situation: 2 12v panels already supplied from factory in parallel, one entry gland and I don't want to drill the roof again. One panel definitely will get shaded from AC unit.

roof_layout-png.205977


I would like to utilize the tracks seen in photo for more solar but want to step the voltage up. Here's a proposed idea that leads to the 101 question:
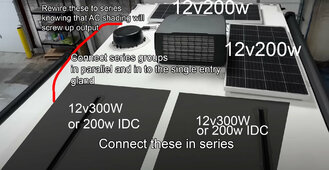
roof_layout_proposed.jpg

The question: If a panel is shaded in a series group, does it nuke the entire system's power, or just the power from that series group?

I could live with occasions where the panel to the right of the AC unit reduces the output of those two 200w panels from 400w to 25w as long as the rear panels kept chugging.

Additional question: Would there be any reason to not use 300w panels on the rear, the largest 12v I can find? I can't recall the rules for paralleling series groups and if it has to do with matching current.

Thank you, and f me it's still a TL;DR lol
 
Last edited:
Would there be any reason to not use 300w panels on the rear, the largest 12v I can find? I can't recall the rules for paralleling series groups and if it has to do with matching current.
Parallel conection of panels does not need matching current, however the shaded group will have a different maximum power point that may reduce the MPPT performance where a single controller is used.
Ideally seperate controller for each group would give best performance.
It's unlikely you will find a '12v' 300 watt panel.
 
Parallel panels or groups of panels in series are not all affected by one panel or series of panels being shaded. Just think of the panels like water valves. One in a series can limit the flow through the whole series, but shutting off one in parallel does not affect others in parallel. When a panel is shaded, it acts like a a valve partially shut.
 
Parallel conection of panels does not need matching current, however the shaded group will have a different maximum power point that may reduce the MPPT performance where a single controller is used.
Ideally seperate controller for each group would give best performance.
It's unlikely you will find a '12v' 300 watt panel.
Thanks. I was quite surprised to see that BougeRV does have a 300w 12v. Rather off the beaten path of my typical solar googling being close to Santan solar, but it does exist
 
I do think you’re on the right track of paralleling panels for an RV roof, however if the gland is wired internallly with 10 AWG, this is good for 30 amps, which could be reached with 500 watts of panels. At that point voltage would need to go up by putting them in series, or a thicker wire be put through the gland, or multiple wires added.

=======

Recommend you get the specs of the “12 volt Panels” and see how closely they match.

A “12 volt panel” I’ve seen goes from 15 volts to 26 volt, which can cause mismatched voltages, which could slash output. Math is in my signature block.

=======

For me cutting through the roof, adding a junction box, and sealing was easy. Learning how to cut through the roof correctly took days of research.

I decided to cut into my roof and put a PVC pipe in an obscure corner of the trailer. I made the PVC pipe larger than I needed it so I could add more wired through this pipe later. I ended up adding panels twice more after the original install.
As luck would have it, last night I joined a fartbook group for these campers and posted some questions. I didn't have high hopes since I had searched the group for buzz words related to the mods I'm hoping to do and it didn't seem like a very hands on bunch. But some guy came out of the woodwork also with a 2024 model to answer my questions. He had already drilled the roof, kept the existing solar and added another controller.

His floor plan is slightly different so he ran wires behind the refrigerator and in to the storage area beneath it. I don't have that storage area so I'll possibly go behind the fridge, through the floor, and run wire through the underbelly. Good idea on the pvc conduit
 
Yup, the refrigerator roof vent is a large handy pre drilled access hole for solar wiring. Unfortunately, on my TT I’d have to then go through the floor to get to my SCC & battery bank because the main door is in the way.
 
Yup, the refrigerator roof vent is a large handy pre drilled access hole for solar wiring. Unfortunately, on my TT I’d have to then go through the floor to get to my SCC & battery bank because the main door is in the way.
Hmm guy didn't even mention going through the roof vent, I took it to mean that he installed entry glands on the roof behind where the refrigerator sits, so that the wiring could be concealed behind it (and in his case/floor plan, the fridge is right beside the exterior storage beneath his bunks for his install - I do not have this floor plan)

Units mfgd at Forest River's PNW (Oregon? IDK) plant are two way propane/12v. My fridge is 12v so I don't know if I can expect any vents for it. I'd happily go through the floor if I had a convenient pre-existing hole in the roof, but I can't see why that would exist on a 12v only fridge. I can't assume they give enough fooks to try and passively ventilate heat from the compressor. I'm not sure if his fridge is 2-way or not.

Of other interesting revelations had when asking questions of the few people on the no boundaries camper fb group who are hands on, it's confirmed that the wire from the factory roof solar entry (front of camper) runs through the ceiling and then down to the bathroom wall, rear of camper. That's no less than 20ft, probably more like 25ft since they give you a few feet of spare in loops behind the wall. 25ft to solar->controller and another 25ft controller->battery. What a weird thing to do when the batteries are at the front, charger-converter in middle, and inverter control either in middle or front depending on how they were feeling that day. They could have done a straight shot down from the front of the camper to a controller mounted elsewhere.

chriski mentioned using thicker wire from the roof but it sounds like that's a bust. I know it's no less than 20 feet, and one person mentioned how infuriating that wire pull was. There is a rear wardrobe thing with a hidden compartment that goes floor to ceiling, and there's a hidden compartment beneath it that houses the gas line for the furnace, also located in that wardrobe. Not sure how to pop the panel off, but it lines up perfectly with the outside zamp style goofball plug for ground deploy panels.

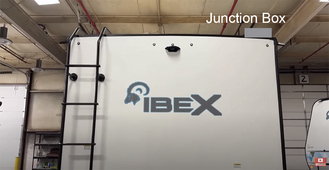
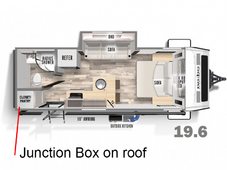
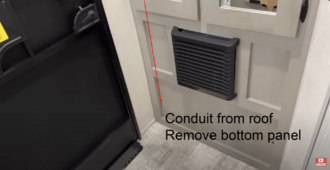
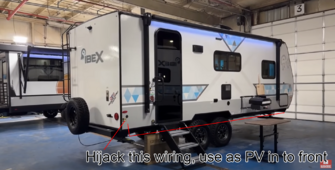
Thought may be to install a junction box on the roof at the rear corner of the trailer above this wardrobe. Tube goes down through the wardrobe, through the bottom in the hidden section. Cut the zamp plug off inside compartment and find its opposite end at the front of the trailer, disconnecting from the battery. Secondary solar array -> conduit -> hidden compartment at bottom of wardrobe -> splice wires there -> use that run (probably 10 gauge) and in to second charge controller. Then just fill the outside zamp plug with silicone or something so nothing can ever be plugged in. This would give me a passage for starlink to the roof as well should I ever need that.

junction_box.png
junction_box_floorplan.png
conduit_from_roof.png
pv_hijack.png
Even if that's 10 gauge, I'd be running two 24v panels in series so ~72v @ "optimum operating voltage". Say 2 x 450w, 72v, 12.5 amps, in the clear on existing wire run hijacked for PV only.

Anyway... thinking out loud. I'm sure I'll boof this spectacularly, by drilling in the mid section of the wardrobe instead of neatly in the corner, or destroying the roof membrane. I can't remember the last time I meddled with something that was "OK" and had it turn out spectacularly better. I've learend to just budget 2x the install time for shortcomings and unforeseen circumstances.
 
Last edited:
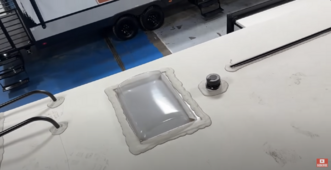
Yeahhh don't think there's any fridge vent. This video is of the sister camper (Ibex) same floor plan as mine. 12v only fridge. Only vent in the video must be a poop pipe. Fun thought though of having something I could repurpose without a new roof penetration after many drinks tonight. 🍻Screenshot 2024-04-01 at 11.43.23 PM.png
 
Back
Top