diy solar

diy solar

EG4 Mini-split kinked one of the copper line sets

There’s a drain plug on the outdoor unit (condenser)?
Yup that is working, its on the bottom, and the other drain is also working now from the indoor had unit. just had the hoses kinked, seems like i like to kink things alot when installing, have to be more careful

Well maybe it identifies as a "heat pump" in the winter.
 
500psi pressure test? You're lucky it didn't explode. Evaporator tubing is quite thin these days and not rated for that pressure. Glad you got it working.
 
Then the pre-charge might need to be different for each set. However, not sure how much of a difference a few feet actually makes on a mini-split.
Only if lines are over 25 feet in length. Read the manuals, just about every single manual will state the unit is pre-charged for 25 feet or less of line.

I've lengthened line sets, shortened long line sets. It is in the manual how to compute if additional refrigerant is needed and how much.
 
Also there is this to consider, make sure the line set tubing is the correct thickness, thinner tubing can rupture at these pressures. You better check if ordering from China.

E02E35BF-9F60-4309-9B7F-1674004F896D.png
 
If the manual calls for 500 psi, then you test to 500 psi. It is rated for it.
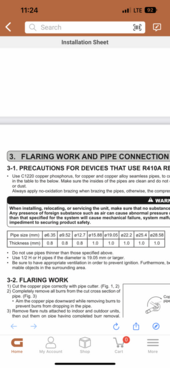
The manual doesn't call for any pressure testing but the label on the unit clearly states a maximum test pressure of 340psi at the evaporator. Like I said, lucky it didn't explode.
 
They call for that much pressure.

That’s also why I bought better line sets than the normal PRC made junk.
No they don't. The magic 651psi number is the MAXIMUM test pressure at the condenser. The label on the unit gives a maximum test pressure of 340psi for the evaporator. What tubing do you think is inside the unit? It's that normal PRC made junk that you're trying to avoid.
 
The manual doesn't call for any pressure testing but the label on the unit clearly states a maximum test pressure of 340psi at the evaporator. Like I said, lucky it didn't explode.
If a room is 102°F (or even higher), what is the static pressure of R410A in the evaporator with the mini split not running?

(I'll give you a hint, it's higher than 340 psi.)

You do know what a P/T chart is?
 
No they don't. The magic 651psi number is the MAXIMUM test pressure at the condenser. The label on the unit gives a maximum test pressure of 340psi for the evaporator. What tubing do you think is inside the unit? It's that normal PRC made junk that you're trying to avoid.
Meh, I would bet they use slightly better stuff internally.

I have six Mitsubishi Hyper Heats. Don’t mind spending a bit of a premium on the line sets. YMMV.
 
If a room is 102°F (or even higher), what is the static pressure of R410A in the evaporator with the mini split not running?

(I'll give you a hint, it's higher than 340 psi.)

You do know what a P/T chart is?
Incorrect. Yes I know what a P/T chart is and it looks like you need to reacquaint yourself with it. You need a temp of 105f to be over 340psi for 410a. Bottom line, you follow what's on the manufacturers label in regards to what test pressures are allowed. Exceeding those pressures leads to potential issues and 500psi isn't good for an evaporator of today's quality(or lack thereof). I've been at this far too long and am well aware of cost cutting measures in today's crap products, especially the junk that almost all of these chinese mini splits are made from. The copper in the evaporators is so thin I'm surprised they last as long as they do. Anyone looking for decent quality in a mini split should get a Mitsubishi and leave the rest behind.
 
Incorrect. Yes I know what a P/T chart is and it looks like you need to reacquaint yourself with it.

I used the Senville service manual, I've seen others with 105°F. Appendix 11 which you probably won't look.


You need a temp of 105f to be over 340psi for 410a.

I've seen both. The point is your stance is simply not correct. Any evaporator in a house that has an inside temp exceeding 102°F to 105°F will have the "evaporator blown up" according to your stance.

I've worked on HVAC for 27 years, I've nitrogen tested many components over the years, I have yet to "blow one up".


Bottom line, you follow what's on the manufacturers label in regards to what test pressures are allowed. Exceeding those pressures leads to potential issues and 500psi isn't good for an evaporator of today's quality(or lack thereof). I've been at this far too long and am well aware of cost cutting measures in today's crap products, especially the junk that almost all of these chinese mini splits are made from. The copper in the evaporators is so thin I'm surprised they last as long as they do. Anyone looking for decent quality in a mini split should get a Mitsubishi and leave the rest behind.
Oh, you're one of those. I've seen failures on what was considered high quality products and I've seen cheap stuff last far longer than the "high quality".

There is more than just installing a unit considered to be "high quality".
 
500psi pressure test? You're lucky it didn't explode. Evaporator tubing is quite thin these days and not rated for that pressure. Glad you got it working.
yes i did it slowly, 300, 400, 500

Not like i had ever done this before, so i would make sure i was away from the coupler, one of the users here said you did not want to be near it if it failed.

But yes my and my co workers were like wow that is alot of pressure, and we released the nitogen and it was very loud :)

Lots of cool fist time experiences with this unit.

I honestly expect it to just stop working anytime, but so far so good, i'm going to try to find time to see if i can hook up my manifold or the various other gauges i have and see if can check if its running as good as it should.
 
Only if lines are over 25 feet in length. Read the manuals, just about every single manual will state the unit is pre-charged for 25 feet or less of line.

I've lengthened line sets, shortened long line sets. It is in the manual how to compute if additional refrigerant is needed and how much.

i spent a lot of time in the manual for this unit, maybe i missed it, but there are no details on how much refrigerant to add or remove. The spec sheet does have an entry like .2oz per foot and then i purchased this book from AC service tech channel, Craig, he had some forumulas in there, that seemed like, well its just the way it works depending on length and pipe size, Craigs youtube and book had alot of useful information. Worth the $100 bucks or whatever his book cost.

System Data Design Pressure [PSI Gauge (PSIG)] <651
Refrigerant R410A/45.86 oz.
Refrigerant Pre-charge 16.4 ft.
Additional charge per ft 0.2 oz.
Liquid valve 0.25 in. (6.35mm)
Gas valve 0.5 in. (12.7mm)
Max refrigerant pipe length 49 ft.
Max difference in level 26 ft.

I have 30lb can of Refrigerant i bought, was like $299 shipped. Have not had to use it, but hopefully it doesn't go bad or anything, i'll have to look that up actually.

My co-worker, we had a good month so i bought him one of these mini splits but the solar hybrid one. When he gets back in a few weeks we will put his in and he already bought a 50 ft line set. So we will use that refrigerant can then I'm sure. Pull another vaccum, and see what happens.

So my career as an amateur HVAC installation specialist is far form over :)
 
Incorrect. Yes I know what a P/T chart is and it looks like you need to reacquaint yourself with it. You need a temp of 105f to be over 340psi for 410a. Bottom line, you follow what's on the manufacturers label in regards to what test pressures are allowed. Exceeding those pressures leads to potential issues and 500psi isn't good for an evaporator of today's quality(or lack thereof). I've been at this far too long and am well aware of cost cutting measures in today's crap products, especially the junk that almost all of these chinese mini splits are made from. The copper in the evaporators is so thin I'm surprised they last as long as they do. Anyone looking for decent quality in a mini split should get a Mitsubishi and leave the rest behind.
we only did the 500 for a very minimal amount of time, i know that might not matter, but yes it did feel a bit crazy to have it at 500psi.

I think next time we will take it to the one on the label. Which does say 340psi

I think the 500psi was done because that number is thrown around a lot by techs in various reddit, web, YouTube forums. and with all the issues i wanted to push it to the limit, I'd rather it fail while testing then later. that's probably not the best way to think since i could have damaged the unit internally and that will not become apparent until later. (something i didn't consider until after :))

And i have somewhat expected this unit to not be the one that will last 10+ years. I figure its been a learning unit :) So my expectations are that it will fail.

i'll send some pics and then you guys can really see how lucky/crazy/fortunate i was to not blow off that coupler :)
 
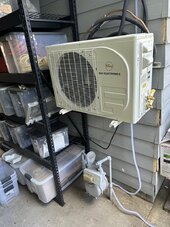
Probably shouldn’t have it above the gas meter I can move it later, just seems like that wouldn’t pass some sort of code enforcement or whatever
 

Attachments

  • IMG_2684.jpeg
    IMG_2684.jpeg
    201.5 KB · Views: 9
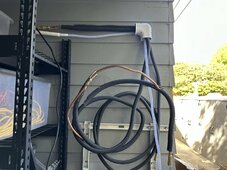
Very ugly but working, I actually have one of the line set inter twined with the other ones so it looks worse than it should have. I didn’t notice till I already released the refrigerant. One of the many things you learn as you go.🙂
 

Attachments

  • IMG_2683.jpeg
    IMG_2683.jpeg
    255.8 KB · Views: 9
The label does say 340PSI low side, the old pre DIY manual I have a copy of for my units says Nitrogen test to 3500kPa (508 PSI). So, make of that what you will...

You do have to get at the back of the outdoor unit to clean it once in a while - here it's cottonwood seed fuzz...it can be blown out too from the inside by disassembly of the case.

So I've wondered. Why don't minisplits have a CLEAN mode for a couple minutes to spin the outdoor fan backwards and blow coil debris off?? It's a BLDC motor right??
 
Interesting reading. I'm in the middle of installing a 3 head Pioneer in my house and a used off brand in my "power house". I believe I have all of the indoor parts including lines and drains done in the house, continuing on the outdoor tomorrow. Shop unit has indoor hung but that's it. One of the house line sets is a bit long, which is fortunate because the shop line set is a bit short and I have a hydraulic flaring set.
 
The label does say 340PSI low side, the old pre DIY manual I have a copy of for my units says Nitrogen test to 3500kPa (508 PSI). So, make of that what you will...

You do have to get at the back of the outdoor unit to clean it once in a while - here it's cottonwood seed fuzz...it can be blown out too from the inside by disassembly of the case.

So I've wondered. Why don't minisplits have a CLEAN mode for a couple minutes to spin the outdoor fan backwards and blow coil debris off?? It's a BLDC motor right??
Because it will dry and cake onto the coil........
 
@Shimmy220 was right. I found a reddit discussion, this is a new feature on Midea sourced units - and linked to this YT video @ 5:50 to skip 10 minutes of useless yacking for dollars...

If a cloud of bugs or wet leaves etc that would dry on coil in normal operation (?)

Fan reversing at 5:50
 

diy solar

diy solar
Back
Top