diy solar

diy solar

Cause of Battery Fire

Thanks!
My thoughts...as a noob:
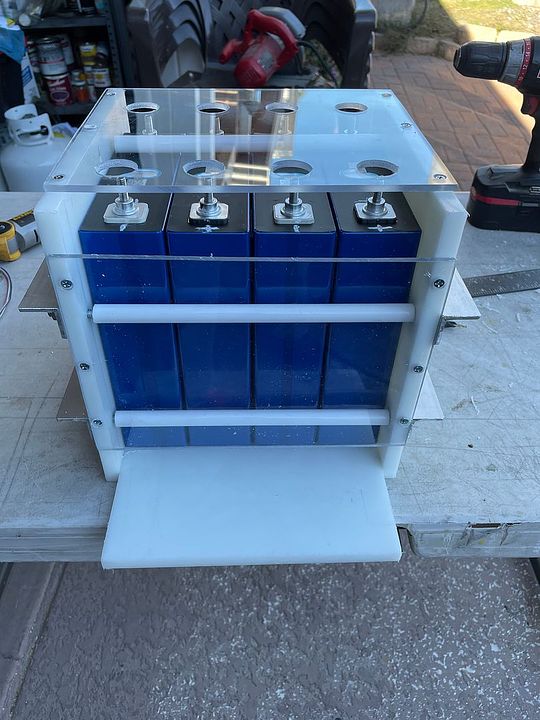
It's lexan - polycarbonate, three times stronger than acrylic. I can replace it with non-countersunk if it becomes an issue, but wanted a flush appearance. It would have been just as easy to use round-head screws, considered it. I build a lot with wood - boats, cabinets, etc., and it's natural to countersink and plug. Old habits die hard. ;)

Everywhere I searched said fuse comes before switch. Everywhere. It was a quandary. I even asked and got no replies. It's really there to protect the battery, and really that's the BMS's job. The only other thing on that leg is the charger and it has it's own 70A fuse. If the feed wire shorts when the battery switch is off it will blow the fuse to the charger if it's on, I suppose.

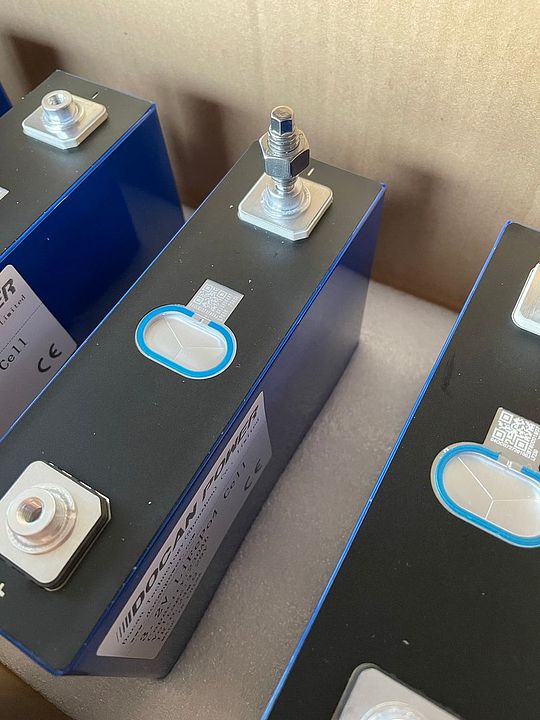
Yes, double crimp. Fits better on those smallish 6mm posts. I bought SS 8mm adapters but they're too tall and didn't like the way they fit over the very small contacts on the cells. Overkill/JBD actually recommend TRIPLE crimps to the cells. :rolleyes: I was going to buss the two posts on the bms and use a single 4awg wire, then decided it would be easier and cleaner to utilize two 6awg leads. Spec calls for 3@10awg or optional 8awg. Pos is 2awg all the way to distribution blocks. BMS build options are: no wires, 3@10awg,3@8awg, 12 or 24" leads, or 6mm screw posts. I figured I could make my own custom leads, hence....

Remember, this is a 120A bms, a 600w inverter is the highest load - the rest is lighting, fridge board, water pump, furnace blower. It replaces two GC2's.

Adapters from Pegasus racing I didn't use:


I've had Lexan crack (allot).
For the counter sunk screws you may have some luck with Nylon Shoulder Bushings to keep the screw threads away from the Lexan


Disconnect first so nothing / zero / zip is live when working on it.

I hate those terminals. Would be better if there's a battery clamp that fit. For decades 3M has tried to come up with a long term connection that allows bare copper and alum to be in contact with each other. At this point crimping (excludes O2 and H2O) is the only method that works.

Tin plating works but the aluminum and copper are not in contact with each other.

Shoot it with a thermal camera when it under load every so often to keep an eye on it.
 
Me too. But I'm getting better. Back in high school they kept telling us everything was going to switch over to metric. Gee, that was fifty years ago! :LOL:
Some things converted well some did not. C for temp measurement is awkward unless its all you know.
"Its a hundred degrees out there" isnt the same.
The foot and yard will always be superior to metric because nothing human visually relates to a meter. For most males at least, a foot is their foot, a man is two yards tall so we can easily visualize a distance. The way military binoculars have reticles, the vertical line is the height of a man.
Maybe 50,000 years in the future when the average man is 6'7"+ tall the meter will be accepted.
 
I've had Lexan crack (allot).
For the counter sunk screws you may have some luck with Nylon Shoulder Bushings to keep the screw threads away from the Lexan


Disconnect first so nothing / zero / zip is live when working on it.

I hate those terminals. Would be better if there's a battery clamp that fit. For decades 3M has tried to come up with a long term connection that allows bare copper and alum to be in contact with each other. At this point crimping (excludes O2 and H2O) is the only method that works.

Tin plating works but the aluminum and copper are not in contact with each other.

Shoot it with a thermal camera when it under load every so often to keep an eye on it.
I thought lexan doesnt easily crack, only acrylic. Not saying it doesnt I just havent seen it .
 
I thought lexan doesnt easily crack, only acrylic. Not saying it doesnt I just havent seen it .


That's what I used to think too. After using it for 1-2 years the pieces I made started to crack/spit at the mounting holes. The worst pieces were outside so I assumed it was stress from expansion contraction so I drilled the holes bigger. This reduced the cracking but still had issues with the holes at the bottom. I figured it was the threads cutting into the Lexan so I started to use rubber/plastic inserts around the bolts or clamping it.
 
started to use rubber/plastic inserts around the bolts or clamping it.
Yes. Oversized holes, nylon sleeves, and surprisingly: finishing washers under oval heads works ‘better’ than screw heads on plastic or flat washers.
 
That's what I used to think too. After using it for 1-2 years the pieces I made started to crack/spit at the mounting holes. The worst pieces were outside so I assumed it was stress from expansion contraction so I drilled the holes bigger. This reduced the cracking but still had issues with the holes at the bottom. I figured it was the threads cutting into the Lexan so I started to use rubber/plastic inserts around the bolts or clamping it.
Wonder if you could have heated it up around the cracks. Im sure its not that easy. I used to do car stereo competitions, I had a bunch of plexi stuff in my corvette. batvette1b.jpgbatvette5.jpgwith acrylic you had to be real careful just drilling the stuff, use a special drill bit or it chips as it breaks through.
I considered learning how to flame polish the edges a great accomplishment, its very hard to master but sooo much faster and prettier than machine polishing. What makes it hard is theres such a fine line between a clear glass finish and it bubbling up and catching fire. Guy who first showed me used an oxy acetylene torch to do it and it was 1/2", the thicker the stock the harder it is to get right. The black acrylic the sub box was covered with was frustrating, its 1/2" and theres a step with 2 levels and the upper layer had a 45 degree bevel in it and I did not want to burn that when I polished it.
I think tbe sheet I bought to do rhat was $400 and that was in the 90s.
 
I agree, I work with lexan quite a bit at our CNC shop. We waterjet it pretty often and Lexan is very tough, and not easy to crack. Acrylic on the other hand is super brittle, and piercing it with our waterjet will make it crack, so we pre-drill every pierce hole. Not very fun.
 
with acrylic you had to be real careful just drilling the stuff, use a special drill bit or it chips as it breaks through.
Or dull a drill bit and run it in a 2500+ rpm drill motor, literally melting your way through.
Starting with a small bit and progressing up doesn’t do well, either. You can drill a 1/16” pilot hole with a sharp bit to center a 3/8 or bigger dull bit but anything closer than 5/16 risks a crack.
 
Or dull a drill bit and run it in a 2500+ rpm drill motor, literally melting your way through.
Starting with a small bit and progressing up doesn’t do well, either. You can drill a 1/16” pilot hole with a sharp bit to center a 3/8 or bigger dull bit but anything closer than 5/16 risks a crack.
Predrill with a small twist drill bit like you described above. Step drill at a slow speed after that. Drilled 1000s of holes and never once have I had an issue.
 
Predrill with a small twist drill bit like you described above. Step drill at a slow speed after that. Drilled 1000s of holes and never once have I had an issue.

I don't either. The larger holes for the terminal access were more or less melted through with a wood-cutting hole saw, then a lot of cleaning up with a file and knife blade.

I've built a number of things with acrylic, from fish aquariums to display cases, and understand the quandary. For simply holding a cover plate in place, you don't need to cinch down on it, just run the screws down enough to snug it up. Trying to mechanically secure acrylic with a screw hole is an effort in futility - they'll always crack.

Lexan/polycarbonate is reported to be three-times stronger than plexyglass/acrylic. They're quite different materials. Lexan is what our auto headlights are made of - the stuff is REALLY tough.

There's zero stress on the top plate here, and just the bms hung on the front one. I did get SS screws for the front plate to replace the cad-plated ones, they're #6x3/4. The top ones are #4 nickel plated, they're not cinched down, they simply hold the plate in place - there is no structural function here - the compression rods - all thread - are what holds the case together.

Starboard holds screws really well - and 'end grain' is the same as 'flat grain' - unlike plywood. ?

 
Or dull a drill bit and run it in a 2500+ rpm drill motor, literally melting your way through.
Starting with a small bit and progressing up doesn’t do well, either. You can drill a 1/16” pilot hole with a sharp bit to center a 3/8 or bigger dull bit but anything closer than 5/16 risks a crack.
I think grinding bevels on the cutting edges of the drill bit at 45 degrees is one way to do it.
 
Or dull a drill bit and run it in a 2500+ rpm drill motor, literally melting your way through.
Starting with a small bit and progressing up doesn’t do well, either. You can drill a 1/16” pilot hole with a sharp bit to center a 3/8 or bigger dull bit but anything closer than 5/16 risks a crack.
I have a strange little makita corded drill i special ordered years ago. I think they called it an aircraft drill. Its tiny, a 1/4" chuck, only 2 amps, but 4500 rpm. I bought it to use with a cloth wheel for polishing, and sanding when an angle grinder was just too much power. The low torque means you really cant hurt yourself with it if you get on the wrong end of rotation if you know what I mean.
 
I don't either. The larger holes for the terminal access were more or less melted through with a wood-cutting hole saw, then a lot of cleaning up with a file and knife blade.

I've built a number of things with acrylic, from fish aquariums to display cases, and understand the quandary. For simply holding a cover plate in place, you don't need to cinch down on it, just run the screws down enough to snug it up. Trying to mechanically secure acrylic with a screw hole is an effort in futility - they'll always crack.

Lexan/polycarbonate is reported to be three-times stronger than plexyglass/acrylic. They're quite different materials. Lexan is what our auto headlights are made of - the stuff is REALLY tough.

There's zero stress on the top plate here, and just the bms hung on the front one. I did get SS screws for the front plate to replace the cad-plated ones, they're #6x3/4. The top ones are #4 nickel plated, they're not cinched down, they simply hold the plate in place - there is no structural function here - the compression rods - all thread - are what holds the case together.

Starboard holds screws really well - and 'end grain' is the same as 'flat grain' - unlike plywood. ?

Did you drill those larger holes with a hole saw by hand, not in a drill press? Thats tough to do even a decent job of. I found that a drill press, a really sharp, new hole saw on a slow speed and very small bites of the material worked wonders. Once the teeth are below the surface they can not clear the material so having an air chuck to clear the kerf and saw as well as cooling the saw when ever it is warm to the touch worked wonders.

I didnt try for long but I never really had success like you did if you did that by hand. (y)

Yes - craftsman drill. I don't have a drill press. I lent my table saw to the neighbor a couple of years ago, and sold my bandsaw many years ago. LOL
Harbor-Freight hole-saw baby. :ROFLMAO:

And yes it was difficult. New hole-saw, but even so, once it got thru it was so hot the plug stuck in the cup bit so I had to disassemble it each time to knock the puck out, and after 3 or 4 it was so hot you couldn't touch it. Then of course all that heat left all the cutting debris melted onto the lip of the hole so I had to file and cut it to get it clean enough to be tolerable. I don't recommend it unless you're patient. But I wanted access holes in the top plate so you could at least put a socket on the terminal nuts to check them, or a DMM probe. I saw that done elsewhere and though it was a slick idea, and it looks cool. Win-win!

I also don't like balance wires run all over haphazard - it screws with my OCD - so mine are gathered and clipped, and tied up like a wiring harness. Each each one also has an additional wire for a cell meter - that's what's on the front. Except where it's mounted I can't see it when the pack is tucked in its space. It is such a hassle to move it and all the wires so I can view it that I will probably just leave there. Haven't decided yet.

 
Last edited:
A mobile battery install needs special attention due to the vibration & shock loads (potholes etc..) not to mention moisture & road grime if its not in-vehicle.
. __>> "I plan to rebuild my other pack with wood interior and metal shield for road debris"
1. Plywood is strong, dampens vibration & insulative for low voltage but is flammable so consider carefully, use Fire Retardent Treated(FRT) if you go this route.
Also use SwitchBoard panel insulation sheet between cells & plywood & in key areas where terminals to metal clearance is difficult to maximize. This sheet is very strong, wear & fire resistant & designed to handle arc flash.
Shield the plywood (reduce height) behind insulation sheet to protect wood from direct arc flash heat.

2. For the mechanical bar holding the top of cells, you might find some thick fiberglass C channel or square tube, put steel tube inside if needed. For other steel bars you could use Fiberglass angle insulated or screw on Insulation Panel.
Put some insulating sheet between the 2 cell banks to widen the space between terminals if required & or use a T-shape as it will always be centered between banks (insulate if metal to protect from loose metal objects).
*** Soft plastic (heatshrink, PVC) over metal bars is not appropriate for heavy mechanical insulation due to wear-thru. ***

3. See if you can find someone (competent & experienced) to asses/check your design/work. In my job we all cross check / review each others design & build.

4. Assess how fire can propagate, ie what can catch fire from what & modify design, use Silicone or Tefzel insulated wire in hazard area.
Consider installing smoke/fire sensor alarm for the power system. Include the charge/load controller in the hazard assessment.

5. Recommend improving enclosure to exclude moisture & dust/road grime. (under vehicle is a very harsh environment).

6. Start a build log on this forum & you will get review & advice as you progress.

7. The battery & associated connections need to be easily inspected periodically, (catch that loose connect before it overheats etc...)

With my sense wires I go direct to the bus bar with a tapped screw & spring washer rather than under the terminal nut.

View attachment 59660
 
Well your right actually, I put short bars on the B+ & B- just for the sense connections. (SBMS100)
Only high current connections are on the main cell bolts. My install is off-grid home so solid Nickle plate CU bars.
You could put a thread in the Lugs, thick copper is a bit sticky to tap so could using tri-lobe screws to form the threads. (I get mine from old electronic products, just make the hole larger than tapping (2.7 for M3 screw) as the thread is rolled & use oil)


View attachment 59813
Thanks for the tip. I will be using that when I redo my two 16 cell packs.
 

diy solar

diy solar
Back
Top