


You are using an out of date browser. It may not display this or other websites correctly.
You should upgrade or use an alternative browser.
You should upgrade or use an alternative browser.
Ground mount recommendations
- Thread starter Austint
- Start date
timselectric
If I can do it, you can do it.
- Joined
- Feb 5, 2022
- Messages
- 20,000
I have pondered the idea of pouring a concrete pad. And building a rack out of treated lumber fastened down to the pad.
I don't want to have to mow grass under the array.
I don't want to have to mow grass under the array.
BentleyJ
Solar Wizard
Based on the pricing I've seen for packaged ground mount kits. I would consider building the columns and backbone out of square tube steel all welded together. IF its designed properly with the appropriate spacing on the cross beams, you should be able to screw the solar panel clamps directly through the square channel or attach "L" brackets to the square channel and go with something like Iron Ridge XR1000 aluminum mounting rails for convenience.
timselectric
If I can do it, you can do it.
- Joined
- Feb 5, 2022
- Messages
- 20,000
1) build it solidly. You don't want a heavy wind gust to damage it.
2) don't let different types of metal contact each other. It will cause galvanic corrosion.
2) don't let different types of metal contact each other. It will cause galvanic corrosion.
BentleyJ
Solar Wizard
There is nothing wrong with lumber, I would use definitely consider using it with the following caution. There are several grades of treated lumber available. Typical treated lumber at the hardware store is generally more for indoor use as a bottom sil plate for framing and is most likely not #1 or better lumber. Just make sure whatever product you choose is graded and that you use the proper structural SPAN, weight loading charts for the particular product you are using.Good information, would you ever use treated lumbar with spanning rails such as the xr1000 as suggested ?
WYtreasure
It's not happy hour, I'm just like this.
This may be worth checking out.Does anyone have recommendations for good ground mount systems ? I would like to do approximately 48 panels in some rocky soil
Thanks

Offgrid Solar Array Mounting Discussion
Tips and tricks for mounting solar panels to different roof materials and environments
 diysolarforum.com
Jack Rabbit Off Grid
Solar Enthusiast
- Joined
- Sep 6, 2021
- Messages
- 478
I have the exact same problem. I borrowed a tractor mounted post auger to make the holes for my 10 panel rack. Well that went horribly wrong. Could only get maybe 10” into the earth before the rocks would stop me.in some rocky soil
Thanks
Better luck to you.
Jack Rabbit Off Grid
Solar Enthusiast
- Joined
- Sep 6, 2021
- Messages
- 478
You are correct there are differences. Non ground contact meant for your sil plates and general outdoor deck construction where posts will stand on pier blocks. Ground contact where it is to come in contact with bare earth. Like 4x4 posts.There is nothing wrong with lumber, I would use definitely consider using it with the following caution. There are several grades of treated lumber available. Typical treated lumber at the hardware store is generally more for indoor use as a bottom sil plate for framing and is most likely not #1 or better lumber. Just make sure whatever product you choose is graded and that you use the proper structural SPAN, weight loading charts for the particular product you are using.
Where I use to work I would build and install what they called valve boxes. They were berried about 6‘ under ground with a lid at the top and steps to the bottom to access underground valves to operate a large irrigation system on a farm. I was told that if made out of ground contact wood they would last 15-20 years before replacement.
They had a guy working for them sometime before me that just bought the cheap non contact lumber. Well I was replacing them before the other ground contact type. maybe 7-10 years.
MarkSolar
Solar Enthusiast
You don't mention what climate you're in. If you have frost depth, you either need piers that extend below the frost line or make one floating slab for the whole array to ride on top of. Piers in really rocky soil means you'll probably have to hire someone with a rock drill who can put in ground screws to the proper depth.
If you don't have frost, you can use either precast concrete ballast, or poured in place ballast. They aren't connected together so they will rise and fall differently if you have frost heave, which will damage your panels and/or mounting system. So you would only be able to use them in warm climates.
There are all kinds of ground mount companies, the biggie is Iron Ridge which is expensive. I used Sunmodo, cheaper and more than adequate for residential applications. In all cases treated lumber could work, but for an array your size the warping and twisting of treated lumber may become a problem because it may damage your panels or the other mounting components. It's also more involved grounding the panels if you use lumber because the entire mounting structure doesn't have electrical continuity. I used ground screws but if I had it to do over I would pour a slab and set the mounting bolts in the concrete when it's poured. We're on glacial till and it was very difficult getting the ground screws in plumb and deep enough.
Hedges
I See Electromagnetic Fields!
- Joined
- Mar 28, 2020
- Messages
- 21,680
I used Unirac ULA. Other people here use Iron Ridge (I think less expensive than Unirac).
Small structure may not need building permit depending on your location.
The vendors can provide structural drawings, designed for wind and earthquake loading.
Obviously, rock you'll have to deal with. What I did was use anchor bolts into existing concrete; big enough rocks and that might work for you. Or core-drill and bond uprights (e.g. 2" pipe) to the rock in an appropriate manner.
I could also imagine removing what soil you could until you hit rock, built footings, and ballast them with rocks.
Good point , yes we have a frost depth of approximately 30”You don't mention what climate you're in. If you have frost depth, you either need piers that extend below the frost line or make one floating slab for the whole array to ride on top of. Piers in really rocky soil means you'll probably have to hire someone with a rock drill who can put in ground screws to the proper depth.
OffGridInTheCity
Solar Wizard
I used 2" galvanized pipe for the base framework and universal strut across for panel mounting and 160bags of 60lb concrete.


I also used the free IronRidge online design tool - you choose sizes, tilt, soil and get drawings/specs which include details such as how big/deep the ballast should be and how wide the span between vertical support posts should be etc. Was a great 'guide' to give me confidence that my design was at least in the relm of recommendations.")
I also used the free IronRidge online design tool - you choose sizes, tilt, soil and get drawings/specs which include details such as how big/deep the ballast should be and how wide the span between vertical support posts should be etc. Was a great 'guide' to give me confidence that my design was at least in the relm of recommendations.
Last edited:
Samsonite801
Solar Wizard
- Joined
- Oct 15, 2020
- Messages
- 2,997
Does anyone have recommendations for good ground mount systems ? I would like to do approximately 48 panels in some rocky soil
Thanks
I went for Power Peak ground mount, I haven't got it installed yet but the parts all look very well built... It cost $2600 though (for a 24 panel mount)...
MurphyGuy
It just needs a bigger hammer
- Joined
- May 20, 2020
- Messages
- 4,129
Just remember that if you're going with some type of surface mounting that we are worried about UPLIFT, not snow loading or foundation area.
Solar panels don't sink into the ground because of a bad foundation, they get ripped out of the ground because the wind wants to make them fly.
One fairly cheap way to make a surface base is to use concrete ballast blocks. Some 2x4's and plywood to make an 8 or 10 foot long block that is 2 feet wide and maybe 16 inches tall. Instead of filling it with solid concrete, you can dump in some busted concrete or large rocks. It doesn't need to be strong, just heavy. Fabricate some mounting studs for the pressure treated lumber or steel and you're all set.
Lumber is pretty expensive right now..
Samsonite801
Solar Wizard
- Joined
- Oct 15, 2020
- Messages
- 2,997
Just remember that if you're going with some type of surface mounting that we are worried about UPLIFT, not snow loading or foundation area.
Solar panels don't sink into the ground because of a bad foundation, they get ripped out of the ground because the wind wants to make them fly.
One fairly cheap way to make a surface base is to use concrete ballast blocks. Some 2x4's and plywood to make an 8 or 10 foot long block that is 2 feet wide and maybe 16 inches tall. Instead of filling it with solid concrete, you can dump in some busted concrete or large rocks. It doesn't need to be strong, just heavy. Fabricate some mounting studs for the pressure treated lumber or steel and you're all set.
Lumber is pretty expensive right now..
Along this same lines, I've heard advice to keep a bit of gap between each of the panels so the wind can bleed through, so you don't wind up having as large of a contiguous sail...
timselectric
If I can do it, you can do it.
- Joined
- Feb 5, 2022
- Messages
- 20,000
To avoid wind issues, I would enclose the mount and create local storage inside. Basically build a sturdy shed with a roof at the perfect solar angle.
Samsonite801
Solar Wizard
- Joined
- Oct 15, 2020
- Messages
- 2,997
To avoid wind issues, I would enclose the mount and create local storage inside. Basically build a sturdy shed with a roof at the perfect solar angle.
That sounds like a great idea, I like it, keeps the pressure from building up underneath the bottomside of the panels...
RV10flyer
Solar Wizard
- Joined
- Mar 8, 2021
- Messages
- 1,198
I just spent two months after work, installing 20,600w or 48 ea QCells at 45° PV array angle on a shale/clay 36° slope, using 48 ea 4x4 post (8’-16’ L), sprayed termite spray, dried them sealed all posts with Black synthetic rubber, dug with post hole diggers/chisel as deep as possible, for shallow holes I poured concrete above ground inside a 12”-14” cylinder, Sealed top of concrete to posts with synthetic rubber, 34 pieces Unistrut, 22 ea 2x4x12’ bracing, 150+ lbs of concrete per post, 112 ea 3/8” x 2.5” ss bolts, 112 ea Belleville washers, 96 ea 3/8” x 4” galv lag bolts. It’s withstood 40 mph winds so far. Going around perimeter with 1x10 oak boards, spaced about 4” apart for a wind block, visual appeal, panel perimeter security and extra weight. Wiring now...Does anyone have recommendations for good ground mount systems ? I would like to do approximately 48 panels in some rocky soil
Thanks
timselectric
If I can do it, you can do it.
- Joined
- Feb 5, 2022
- Messages
- 20,000
Sounds like a work of art.
Very nice.
Very nice.
Jack Rabbit Off Grid
Solar Enthusiast
- Joined
- Sep 6, 2021
- Messages
- 478
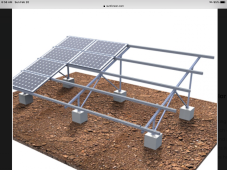
I think since I am unable to dig that deep I’m going to do something like this but out of wood. I’m going to mount my panels landscape so their surface area is going to be 28’w by 7’ tall. How would I calculate how large to make my concrete blocks? I found a calculator for pounds per square foot. I’m thinking of probably 8 legs. 200# ea 300#?
Attachments
Samsonite801
Solar Wizard
- Joined
- Oct 15, 2020
- Messages
- 2,997
I think since I am unable to dig that deep I’m going to do something like this but out of wood. I’m going to mount my panels landscape so their surface area is going to be 28’w by 7’ tall. How would I calculate how large to make my concrete blocks? I found a calculator for pounds per square foot. I’m thinking of probably 8 legs. 200# ea 300#?
Hey if you need more weight, you could also distribute it sideways, by building a frame on the bottom that holds standard cinderblocks (or the solid ones). I remember when I was doing wireless internet, and we would install non-penetrating roof mounts, they had like a frame holder (simple angle iron rectangles), and you could put 10 cinderblocks on the smaller ones, and 20 on bigger ones (and more on even larger ones), to hold a large terrestrial dish antenna mount, without drilling any holes in the roof, but the weight was super heavy, you could even stack them double high on the cinderblocks if you needed more weight.
Last edited:
Zerocool00
New Member
- Joined
- Feb 17, 2020
- Messages
- 16
This sounds exactly like what I was planning. Could you share some photos?I just spent two months after work, installing 20,600w or 48 ea QCells at 45° PV array angle on a shale/clay 36° slope, using 48 ea 4x4 post (8’-16’ L), sprayed termite spray, dried them sealed all posts with Black synthetic rubber, dug with post hole diggers/chisel as deep as possible, for shallow holes I poured concrete above ground inside a 12”-14” cylinder, Sealed top of concrete to posts with synthetic rubber, 34 pieces Unistrut, 22 ea 2x4x12’ bracing, 150+ lbs of concrete per post, 112 ea 3/8” x 2.5” ss bolts, 112 ea Belleville washers, 96 ea 3/8” x 4” galv lag bolts. It’s withstood 40 mph winds so far. Going around perimeter with 1x10 oak boards, spaced about 4” apart for a wind block, visual appeal, panel perimeter security and extra weight. Wiring now...
I used snapnrack.com for my ground mount.
Sandy soil here, boring piers was easy.
Rated for 170mph winds.
We get about 110-120 mph here in hurricanes, hope that the thing stays in place!


However, on page 12 they also show a “beam footing option” that does not require deep holes.
It uses tons of concrete mass to keep the array on the ground in wind.
Sandy soil here, boring piers was easy.
Rated for 170mph winds.
We get about 110-120 mph here in hurricanes, hope that the thing stays in place!
However, on page 12 they also show a “beam footing option” that does not require deep holes.
It uses tons of concrete mass to keep the array on the ground in wind.
Very nice. This looks very similar to what I need. Cost?I used snapnrack.com for my ground mount.
Sandy soil here, boring piers was easy.
Rated for 170mph winds.
We get about 110-120 mph here in hurricanes, hope that the thing stays in place!
View attachment 84827
View attachment 84828
However, on page 12 they also show a “beam footing option” that does not require deep holes.
It uses tons of concrete mass to keep the array on the ground in wind.
Similar threads
- Replies
- 13
- Views
- 373
- Replies
- 2
- Views
- 123
- Replies
- 79
- Views
- 2K