and
Thank you so much for giving some direction
@rio and
@bobbie_ohio . It gave me the encouragement to start testing things. The good news is that I don't seem to have damaged anything. But, I have a strange and interesting battery issue. Here is what I'm seeing happen.
Keep in mind that all I have at the moment is an analog meter, so measurements are approximate.
1. Individually, fully charge all 4 batteries using the Noco Genius 5
2. All batteries testing correctly at around 12v.
3. System tests at about 51v.
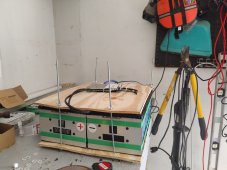
4. Install batteries and reconnect the entire system.
5. Turn key to 'On'
6. Expected "clunk" occurs. System appears to power on for just a fraction of a second.
7. System powers off in a fraction of a second.
8. No power to mower. Will not go.
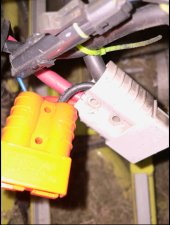
9. Pull main power connector and test voltage.
10. Voltage reads around 28 or, sometimes, around 40
11. Pull out battery bank.
12. Either one, or sometimes two, of the batteries will test at only around 2.5v.
13. Attach Noco Genius 5 to each 2.5v battery for just 5 seconds. Remove charger.
14. Test voltage on battery: about 12v.
15. All batteries now testing at around 12v and system at about 51v.
16. Reinstall battery bank and hook up, and turn key to "On".
17. "Clunk" occurs.
18. If gauge does not light up, you're back to Step 7 above.
19. If gauge lights up, mower will run like a champ. Go mow the lawn, then shut the mower off.
20. But the next time you start the mower, you could be back to Step 5 above.
I recorded a video of this phenomenon that can be viewed here:
https://drive.google.com/file/d/1nv4zu7LXagvquqbaj1GuKbozb-hrs0Sz/view
If the video doesn't play for you in-browser, you can download it using the small down-arrow in the upper-right corner.
What is going on with these batteries? Are they defective? Or, is this some kind of overload protection that happens when the system first starts/clunks? Why would it drop a fully-charged battery to 2.5 volts, only to be restored to 12v at the touch of a charger?
Thank you again for the help. I hope this helps others that might have such a strange issue.


/pagecloud-sites/thinkoggun/images/favicon-7a7796eb-1d17-4ffb-90f1-feb6d575fcb9.png)