diy solar

diy solar

Ryobi Zero-Turn Mower SLA to LiFePo4 Conversion - (Updated - Build Complete With Pics!)

...

12. Either one, or sometimes two, of the batteries will test at only around 2.5v.
13. Attach Noco Genius 5 to each 2.5v battery for just 5 seconds. Remove charger.
...

What is going on with these batteries? Are they defective? Or, is this some kind of overload protection that happens when the system first starts/clunks? Why would it drop a fully-charged battery to 2.5 volts, only to be restored to 12v at the touch of a charger?
It seems that the batteries are not getting fully charged. I suggest that you get a better charger. The "Noco Genius" to me looks too much like a toy. I am using a Mean Well PB-360 to charge my 4S LifePo4 battery. Yes, it may costs a bit more but it charges with 30 amps instead of the measly 5, and it stops when the battery is actually full, not at voltage that is too low.
 
and


Thank you so much for giving some direction @rio and @bobbie_ohio . It gave me the encouragement to start testing things. The good news is that I don't seem to have damaged anything. But, I have a strange and interesting battery issue. Here is what I'm seeing happen. Keep in mind that all I have at the moment is an analog meter, so measurements are approximate.

1. Individually, fully charge all 4 batteries using the Noco Genius 5
2. All batteries testing correctly at around 12v.
3. System tests at about 51v.
4. Install batteries and reconnect the entire system.
5. Turn key to 'On'
6. Expected "clunk" occurs. System appears to power on for just a fraction of a second.
7. System powers off in a fraction of a second.
8. No power to mower. Will not go.
9. Pull main power connector and test voltage.
10. Voltage reads around 28 or, sometimes, around 40
11. Pull out battery bank.
12. Either one, or sometimes two, of the batteries will test at only around 2.5v.
13. Attach Noco Genius 5 to each 2.5v battery for just 5 seconds. Remove charger.
14. Test voltage on battery: about 12v.
15. All batteries now testing at around 12v and system at about 51v.
16. Reinstall battery bank and hook up, and turn key to "On".
17. "Clunk" occurs.
18. If gauge does not light up, you're back to Step 7 above.
19. If gauge lights up, mower will run like a champ. Go mow the lawn, then shut the mower off.
20. But the next time you start the mower, you could be back to Step 5 above.

I recorded a video of this phenomenon that can be viewed here: https://drive.google.com/file/d/1nv4zu7LXagvquqbaj1GuKbozb-hrs0Sz/view

If the video doesn't play for you in-browser, you can download it using the small down-arrow in the upper-right corner.

What is going on with these batteries? Are they defective? Or, is this some kind of overload protection that happens when the system first starts/clunks? Why would it drop a fully-charged battery to 2.5 volts, only to be restored to 12v at the touch of a charger?

Thank you again for the help. I hope this helps others that might have such a strange issue.
I had a similar problem - fully charged battery system that would only fire the contactor then shut down. Battery voltage at 52 etc. In my case it is a dodgy BMS (a Daly unit) that I may have damaged during install. The solution - in my case - is to use the bluetooth app and reset the BMS (sometimes needs 2 or 3 attempts). Once it turns on, it's fine.
 
@ryobilifepo4user, i agree with the others that your batteries are most likely not charged. How long did your charge each battery for? With a 5 amp 12V charger, it would take 20 hours per battery to go from empty to full. Definitely not a good charger for your setup.
 
@ryobilifepo4user Why are you using that tiny little charger? I think the proper procedure with "drop-in" LiFePo4 batteries is to hook them up in parallel for a few days (if supported) to let them balance. After which, just put them back in the mower and use the Ryobi charger. Yes, it may cause the BMS to cutoff (you have 4 BMS units) but you will at least get a full charge. As others have said, it appears your batteries are simply dead. Check with the manufacturer and make sure they support a 4S configuration and then follow the procedures to balance and charge them together.
 
Thank you for all the comments. I have a lot to process and test, then I will get back with what I find. One question: what does this statement mean @AMDPower?
Yes, it may cause the BMS to cutoff...but you will at least get a full charge
If a BMS cuts off, how would a full charge be obtained? I suspect this is a simple concept I am missing.

Nevermind, I think I found it here (I did read this whole thread previously, but it's a lot to retain).

You should be fine. It's a little much for the LiFePo4. Actually charges at 56+ I think. But the BMS will cutoff prior. Only problem is that the Ryobi charger will sometimes go into an error state when the BMS kicks it off. That's what I found anyway.
 
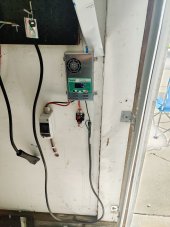
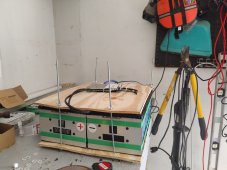
Here is my SCC setup to charge right off the panels. Modified the ezgo connector and it plugs in no problems. Lock out does not work currently, can any body tell me if I take the green wire hanging down and connect it to the positive on the SCC is it will fix the lock out functionality? The green wire is connect to the 3 pin that is on the top by itself. I got my cells from signature solar, however they seem to be a bit wider. Currently it's a little over 14in wide with nothing on the sides on. This is a picture of the rough layout of the box. I am try to use 1/4 in plywood on top and bottom. I will add on front and back for regitity. The signature solar cells are nice, becuase they are already in a balanced 24v configuration, 1 bar to join the 2 packs together and you got a easy blanced 48v battery. They have welded terminals with threaded holes in the bus bars for easy balance leady placement. If anyone has a better idea for a box please share.
IMG_20220515_161452.jpg
 

Attachments

  • IMG_20220515_161437.jpg
    IMG_20220515_161437.jpg
    271.7 KB · Views: 50
Here is my SCC setup to charge right off the panels. Modified the ezgo connector and it plugs in no problems. Lock out does not work currently, can any body tell me if I take the green wire hanging down and connect it to the positive on the SCC is it will fix the lock out functionality? The green wire is connect to the 3 pin that is on the top by itself. I got my cells from signature solar, however they seem to be a bit wider. Currently it's a little over 14in wide with nothing on the sides on. This is a picture of the rough layout of the box. I am try to use 1/4 in plywood on top and bottom. I will add on front and back for regitity. The signature solar cells are nice, becuase they are already in a balanced 24v configuration, 1 bar to join the 2 packs together and you got a easy blanced 48v battery. They have welded terminals with threaded holes in the bus bars for easy balance leady placement. If anyone has a better idea for a box please share.
View attachment 94767
I had a similar problem with my Delta-q charger - which I think is similar to the ezgo. In my plug from the charger there are 3 pins, white (+ve), black (-ve) and green. You won't get output from the charger if there is no connection to green (which I think is from the lockout sensor). I put a 10 kOhm resistor from black to green and that turns on the charger output.
 
So im new to this form and would like to try converting my mower. Not so sure about building a pack but im back and forth between what battery to buy. Most are sold out however im looking for ease of install vs price.
couple questions i think this group could help me with is…
If i run the 4 12v in series will i need a special charger?
blue wire over voltage protection must be overridden?
Stock batteries say they have t11 terminals will that really matter or will most bolt in?
Is there a consensus on best bang for buck on a charger?
i would like it to charge with the stock charger plug so am i limited to 13a due to wire gauge?
Anything else i should get to finish the conversion?
 

Attachments

  • EA276133-31D2-4633-B876-038AA5F66E4A.png
    EA276133-31D2-4633-B876-038AA5F66E4A.png
    2.4 MB · Views: 22
  • 01EFCD85-26DD-44BC-9D54-053C66062209.png
    01EFCD85-26DD-44BC-9D54-053C66062209.png
    1.8 MB · Views: 22
  • F183AB73-6A8F-425B-89D9-6D59AB692AB1.png
    F183AB73-6A8F-425B-89D9-6D59AB692AB1.png
    1.5 MB · Views: 19
  • C9CCDA82-4796-4186-94D0-6E7DF7160831.png
    C9CCDA82-4796-4186-94D0-6E7DF7160831.png
    1.6 MB · Views: 21
  • 1FB331F3-63C8-4909-A6E6-8498ACBCC283.png
    1FB331F3-63C8-4909-A6E6-8498ACBCC283.png
    3.2 MB · Views: 21
Last edited:
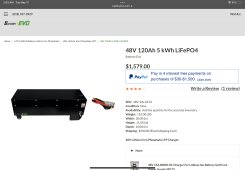
I’m about to try out the “simple way” I have no time to build my own battery. My mower is brand new, it’s actually still at HD, I’m going to pick it up tomorrow. I’m going to order 4 of these battery's, the total with tax is about $1600. https://amperetime.com/products/ampere-time-12v-100ah-lithium-lifepo4-battery
They do free shipping and have a 3% off coupon. The battery has a built in BMS and they say they can run 4 in serial. Also the dimensions are the same as the OEM so it should be a drop in solution unless i’m missing something. The FAQs say it has a max 5120w load power. That would be the only thing i’m not sure of, what the mowers max load is, but I’m guessing it will be enough. I’m going to get a new charger and voltage meter as mentioned I should previously. Hopefully that is all I will need. I’m not sure how to wire up the charger snd meter yet, but I’m guessing it’ll be pretty straightforward. I’ll document the process and post here. I have to get the batteries shipped to a California address then shipped by boat to Hawaii so it may take about 3-4 weeks before I can do the swap.
Hi there, did you end up going with this route and if so, can you please share your experience and any tips or URLs of components you used? I got a RM480E for 800 bucks and 29 hours on it. I've mowed 2 times with it so far, but this morning when I was mowing I noticed that the blades would dis-engage and then start again, repeat. Was wondering if the batteries are starting to fault out. Shows that it's charged.
 
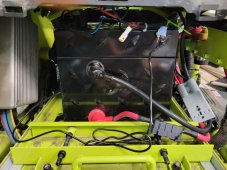
I dropped in a 48v 100AH LiFePo4 battery from ampere time. https://www.amazon.com/gp/aw/d/B09BR4JZTT?psc=1&ref=ppx_pop_mob_b_asin_title
It fits fine in the tray and has it’s own BMS built in. I built some spacers to keep it secure in the tray form leftover plastic siding I had.

Is there any reason I can’t just use the ryobi charger that came with the mower? 48v, 13a.

I did order this charger just in case but would rather not rewire the plug if I don’t need to.


I did buy the new display module but haven’t tackled that yet. https://www.amazon.com/gp/aw/d/B088RG27LS?psc=1&ref=ppx_pop_mob_b_asin_title

Trying to keep it as simple as possible. Anything else I should be aware of so I don’t burn my barn down?
Hi there dochoot, curious to know how your experience has been and if you wouldn't mind sharing some tips?
 
and


Thank you so much for giving some direction @rio and @bobbie_ohio . It gave me the encouragement to start testing things. The good news is that I don't seem to have damaged anything. But, I have a strange and interesting battery issue. Here is what I'm seeing happen. Keep in mind that all I have at the moment is an analog meter, so measurements are approximate.

1. Individually, fully charge all 4 batteries using the Noco Genius 5
2. All batteries testing correctly at around 12v.
3. System tests at about 51v.
4. Install batteries and reconnect the entire system.
5. Turn key to 'On'
6. Expected "clunk" occurs. System appears to power on for just a fraction of a second.
7. System powers off in a fraction of a second.
8. No power to mower. Will not go.
9. Pull main power connector and test voltage.
10. Voltage reads around 28 or, sometimes, around 40
11. Pull out battery bank.
12. Either one, or sometimes two, of the batteries will test at only around 2.5v.
13. Attach Noco Genius 5 to each 2.5v battery for just 5 seconds. Remove charger.
14. Test voltage on battery: about 12v.
15. All batteries now testing at around 12v and system at about 51v.
16. Reinstall battery bank and hook up, and turn key to "On".
17. "Clunk" occurs.
18. If gauge does not light up, you're back to Step 7 above.
19. If gauge lights up, mower will run like a champ. Go mow the lawn, then shut the mower off.
20. But the next time you start the mower, you could be back to Step 5 above.

I recorded a video of this phenomenon that can be viewed here: https://drive.google.com/file/d/1nv4zu7LXagvquqbaj1GuKbozb-hrs0Sz/view

If the video doesn't play for you in-browser, you can download it using the small down-arrow in the upper-right corner.

What is going on with these batteries? Are they defective? Or, is this some kind of overload protection that happens when the system first starts/clunks? Why would it drop a fully-charged battery to 2.5 volts, only to be restored to 12v at the touch of a charger?

Thank you again for the help. I hope this helps others that might have such a strange issue.
Did you top balance your new cells to full?
 
Hi there dochoot, curious to know how your experience has been and if you wouldn't mind sharing some tips?
Wow! That's a great deal! Sounds like you definitely have some weak batteries. Most of the drop-in replacements will work with little effort. Just make sure they are compatible with a 4S configuration (4 batteries in SERIES). However, you can probably build your own for half the amount of buying ready-built. Obviously, this take a lot more time to build and also may take a lot longer to ship. So, it's purely a buyers choice. Good luck!
 
I'd love to make this conversion. Any assistance on how to get started would be greatly appreciated!
 
Hi all,
I did the lifepo4 conversion with an Overkill bms and 105ah EVE cells. After getting everything hooked up, I mowed about half my yard, using 1/3 of the battery and everything was great. Then the next day I drilled out the space for the shunt meter, but now when I turn the key I get nothing, no click, no beeps in reverse, and the mower won't move. I thought it might be the relay like was mentioned in previous posts, but I tried connecting it to the positive terminal and still nothing. It also seems to have 48v at the yellow wire, indicating that its not in a charging state (unless I'm using my multimeter wrong). The only other thing I noticed, is when I first hooked the battery up the cells weren't particularly balanced, the overall pack voltage was around 53-54, but after mowing and sitting on the charger for 2 days the cells had balanced more and the pack voltage was over 56. Any ideas or other places I can test to see why it isn't starting?
 

Attachments

  • Battery.jpeg
    Battery.jpeg
    253.3 KB · Views: 39
  • Shorted.jpeg
    Shorted.jpeg
    108.1 KB · Views: 39
Hi all,
I did the lifepo4 conversion with an Overkill bms and 105ah EVE cells. After getting everything hooked up, I mowed about half my yard, using 1/3 of the battery and everything was great. Then the next day I drilled out the space for the shunt meter, but now when I turn the key I get nothing, no click, no beeps in reverse, and the mower won't move. I thought it might be the relay like was mentioned in previous posts, but I tried connecting it to the positive terminal and still nothing. It also seems to have 48v at the yellow wire, indicating that its not in a charging state (unless I'm using my multimeter wrong). The only other thing I noticed, is when I first hooked the battery up the cells weren't particularly balanced, the overall pack voltage was around 53-54, but after mowing and sitting on the charger for 2 days the cells had balanced more and the pack voltage was over 56. Any ideas or other places I can test to see why it isn't starting?
Initial thoughts:
  • So you're measuring 56v at the battery right now?
  • Did you accidentally disconnect (or incorrectly re-connect) anything on the control panel?
  • Does the BMS app report any errors?
 
Initial thoughts:
  • So you're measuring 56v at the battery right now?
  • Did you accidentally disconnect (or incorrectly re-connect) anything on the control panel?
  • Does the BMS app report any errors?
  • Yep, just checked again and it was 58.8v
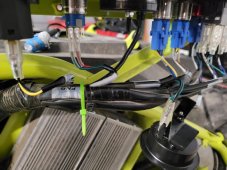
  • I took a picture of the panel before hand to make sure, and I believe I've got everything back correctly. I didn't remove everything, and I drilled the shunt meter hole with the panel still attached to the mower.
  • No errors in the BMS.
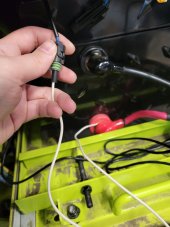
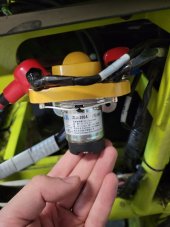
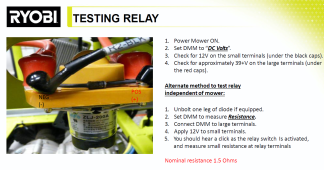
I contacted ryobi support, and they had me test the relay, it had 39V at the large terminals, but 0V at the small terminals which should have been 12V, so they're sending me a new relay. I'm wondering if drilling the shunt display hole could have broken this, but I wouldn't expect that to be any worse than vibrations from mowing a bumpy lawn (which mine is).
 

Attachments

  • relay.jpeg
    relay.jpeg
    98.7 KB · Views: 46
  • testing.png
    testing.png
    595.6 KB · Views: 47
  • panel.jpeg
    panel.jpeg
    227.9 KB · Views: 46
  • Yep, just checked again and it was 58.8v
  • I took a picture of the panel before hand to make sure, and I believe I've got everything back correctly. I didn't remove everything, and I drilled the shunt meter hole with the panel still attached to the mower.
  • No errors in the BMS.
I contacted ryobi support, and they had me test the relay, it had 39V at the large terminals, but 0V at the small terminals which should have been 12V, so they're sending me a new relay. I'm wondering if drilling the shunt display hole could have broken this, but I wouldn't expect that to be any worse than vibrations from mowing a bumpy lawn (which mine is).
I'm surprised and impressed that Ryobi is honoring the warranty with a non-OEM DIY battery mod.
 
58.8 V? That would make the average cell voltage 3.675, which is no good. What are the voltages according to the overkill app? Hopefully this is a typo or you have a very bad multimeter. Can you share a screenshot of the app? Are you confident that you installed all the balance leads correctly?

Before you mentioned the 58.8 V my initial thought was check the main fuse.
 
Back
Top