diy solar

diy solar

RV schematics/diagram specfic to UK code

If taking the idea of an 'additional' 12v battery pack further, whereby it had two power sources, 1/ victron orion TR 48/12-30A from 48v bank & 2/ victron orion TR smart 12/12-30 from the alternator/engine battery.
My question is, would you connect the output from 1/ TR 48/12-30 to the aux 12v battery bank along with the TR 12/12-30 or would you direct the output through the DC blade fuse distribution block?
I presume keeping the more critical/always on loads on the 12v side and luxuries on the 48v/inverter side.

Would i need any battery protects or is that all handled by the victron units themselves?


View attachment 8805
Unfortunately to charge 48v you would need to input a higher voltage, so you would need to step up from the 12v to 48v. For example if I want to charge my 48v battery bank, I'd have to have 60v+ to charge it effectively and so I'd put my solar panels in series until I've achieved the desired voltage needed.
Yes, that would do it perfectly, especially as it supports smart alternators. Thank you for the link.

I'd like to see the efficiency data though but I couldn't find it in the documentation on their website.
 
Unfortunately to charge 48v you would need to input a higher voltage, so you would need to step up from the 12v to 48v. For example if I want to charge my 48v battery bank, I'd have to have 60v+ to charge it effectively and so I'd put my solar panels in series until I've achieved the desired voltage needed.

Yes, that would do it perfectly, especially as it supports smart alternators. Thank you for the link.

I'd like to see the efficiency data though but I couldn't find it in the documentation on their website.
Sorry ella, ive maybe misled you by not drawing things out in full. The 48v battery bank is supplied by an 48v SCC & inverter charger. The link you see, is for the 48v system to connect to/charge the additional 12v battery bank, so power is going the opposite way (ie from the 48v system to the 12v system). I do however think i prefer to keep it simple and go with the 'sterling' solution. When i first looked at those, i didnt come across a 48v version, but it is certainly there now.
 
Unfortunately with a 48v battery it seems to be impossible to charge from the alternator, even victron's buck boost only goes to 24v. I haven't found a way to do it yet. Some people talked about having a second alternator and some how bridging the two but everyone seem a bit unsure.

My main reason for having 48v was to run a powerful inverter more efficiently, so maybe a way around it would be to have a separate 12v battery bank then you could run all your 12v electrics off that only, have the alternator charge the 12v battery bank and also use a 48v DC to 12v DC converter to charge it from solar too?
There is one way to do it. Get a 12v inverter and then use the 230v output to run a battery charger. Need to size the charger so as not to overload inverter. Bonus is you have an extra inverter, albeit linked to your vehicles 12v system. I run this system for 12 - 24v as I can control the AC input current on my multiplus. I have it configured so inverter only on when vehicle running to ensure battery doesn't drain.
 
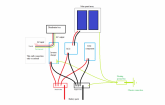
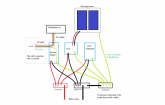
Ella, i know you wrote previously not to use the chassis for ground purposes due to corrosion issues, but looking at the inverter/charger manual suggests an additional earthing wire from the unit to the chassis. On the SCC, it indicates an earth wire from the negative busbar to the chassis. Ive heard folks talk about an earth wire from the frames of the solar panels to the chassis. There are so many opinions out there all conflicting.
I dont know for sure, which of these diagrams would work best?

RV earthing diagram amended..pngRV earthing diagram.png
 
There is one way to do it. Get a 12v inverter and then use the 230v output to run a battery charger. Need to size the charger so as not to overload inverter. Bonus is you have an extra inverter, albeit linked to your vehicles 12v system. I run this system for 12 - 24v as I can control the AC input current on my multiplus. I have it configured so inverter only on when vehicle running to ensure battery doesn't drain.
Yeh, you could do it with a secondary inverter but there would be a loss due to efficiency of inverters. But as @the_tux has found that Sterling Power does a 12v to 48v alternator charger, it would be easier to do that.
 
Ella, i know you wrote previously not to use the chassis for ground purposes due to corrosion issues, but looking at the inverter/charger manual suggests an additional earthing wire from the unit to the chassis. On the SCC, it indicates an earth wire from the negative busbar to the chassis. Ive heard folks talk about an earth wire from the frames of the solar panels to the chassis. There are so many opinions out there all conflicting.
I dont know for sure, which of these diagrams would work best?

View attachment 8925View attachment 8926
If it works for people to use the chassis as a floating ground then that's great, but personally I'd still prefer to have a closed system using pure copper cable. It's safer than if you come into contact with a positive contact point while touching the chassis. On a 48v system you can get a significant shock. On 230v AC you could get a dangerous shock.

I'm guessing people do this to save money on copper cables? It really isn't that much more of an effort to just run a positive and negative.
 
If it works for people to use the chassis as a floating ground then that's great, but personally I'd still prefer to have a closed system using pure copper cable. It's safer if you come into contact with a positive contact point while touching the chassis. On a 48v system you can get a significant shock. On 230v AC you could get a dangerous shock.

I'm guessing people do this to save money on copper cables? It really isn't that much more of an effort to just run a positive and negative.

I think there is confusion here between chassis ground and chassis return.
I don't think jim wants to use the chassis as the return path.
just wants to bond the chassis to the negative terminal.
 
I think there is confusion here between chassis ground and chassis return.
I don't think jim wants to use the chassis as the return path.
just wants to bond the chassis to the negative terminal.
The first diagram shows a floating chassis ground with a return to the negative and the second shows grounding to just the negative.

With the first, using a ground to the chassis and then returning to the negative will become a short if a positive connection comes into contact with the chassis. So if a person happens to be in contact with the chassis and also a positive, depending on the circuit being shorted, this could be dangerous.

The second is a lot safer as it bypasses the chassis and uses cable to return the ground to the a negative bus bar directly.
Thanks ella. What exactly do you make of this below, from an inverter manual?
"This product is a safety class I device (supplied with a ground terminal for safety purposes). Its AC input and/or output terminals must be provided with uninterruptible grounding for safety purposes. An additional grounding point bonded to the chassis is located inside the terminal cover of the product."
Do you think that means vehicle chassis or could they be meaning the chassis of the unit, ie its casing? If it simply meant the casing, i'd imagine it would already be installed?

Plus, there is this info on another inverter...
1583960839676.png
Thanks to DZL for that.
 
Last edited:
The first diagram shows a floating chassis ground with a return to the negative and the second shows grounding to just the negative.

With the first, using a ground to the chassis and then returning to the negative will become a short if a positive connection comes into contact with the chassis. So if a person happens to be in contact with the chassis and also a positive, depending on the circuit being shorted, this could be dangerous.

The second is a lot safer as it bypasses the chassis and uses cable to return the ground to the a negative bus bar directly.

On the other hand the chassis bond means that a short to the chassis will hopefully trip the ocpd and clear the fault condition.
 
Last edited:
Back
Top