wattmatters
Solar Wizard
You'd want swappable batteries or swappable mowers with one or two on the charger at the home/workshop using a large PV array / grid support as needed.


Greetings everyone. I hope everyone had a great holiday season.
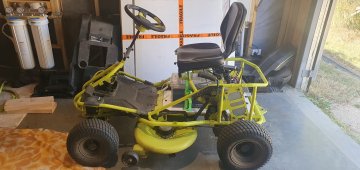
This weekend I decided to start my conversion.
I picked up the following items to treat this as the least invasive drop-in replacement solution:
Batteries:
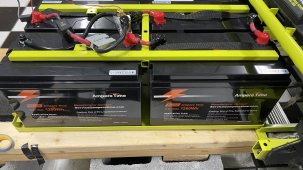
Ampere Time 12V 100Ah LiFePO4 Lithium Battery, 4000+ Deep Cycle Lithium Iron Phosphate Battery, Built-in 100A BMS (https://www.amazon.com/dp/B0BCKHFR26?psc=1&ref=ppx_yo2ov_dt_b_product_details)
Battery Indicator:
CAMWAY Battery Monitor 8-120V 0-500A Voltmeter Ammeter Voltage Current Meter Backlight
(https://www.amazon.com/gp/product/B088RG27LS/ref=ppx_yo_dt_b_search_asin_title?ie=UTF8&psc=1)
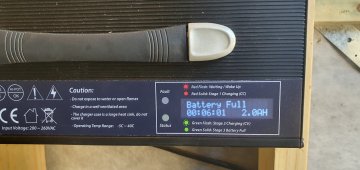
Charger:
ULTRA FAST 48V 15 AMP DAKOTA LITHIUM LIFEPO4 BATTERY CHARGER
(https://dakotalithium.com/product/4...4-battery-charger-for-lithium-iron-batteries/)
Victron Energy Blue Smart IP65 12-Volt 5 amp Battery Charger (Bluetooth)
(https://www.amazon.com/dp/B07TLCT7X7?psc=1&ref=ppx_yo2ov_dt_b_product_details)
Note that I used the Victron for individually charging my new LiFePo batteries since it came so highly recommended. However, the charger automatically installed a new firmware update which I discovered gave me some very wonky results when trying to charge in the Li-ion setting taking far longer than it should have or never entering the proper phases. I would normally have to reset my history and reconnect the plugs to get it to register. It seems like a problem with the firmware when I looked up the issue online. Use this charger with caution.
Cables:
Anderson Power Products SB50 Connector Kit, 50 Amps, Gray Housing, w/ 10 12 AWG, 6319 (1 Pair)
(https://www.amazon.com/dp/B07CHD4JCK?psc=1&ref=ppx_yo2ov_dt_b_product_details)
Drive-up EZGO RXV 48 Volt Charger Receptacle with Wire / 3-Pin Triangle Charger Plug Handle EZGO Charging Port OEM#604321 611219 602529 Golf Cart
(https://www.amazon.com/dp/B082S9BH7R?psc=1&ref=ppx_yo2ov_dt_b_product_details)
Work done:
I was able to remove my old Leoch batteries and drop in the new Ampere Time batteries. I reused all existing cabling. One observation with the four 12V 100Ah batteries is that they seem to be a bit taller than the original Leoch. Using the plastic Ryobi battery terminal cover plates it is just a bit too tall to use the long hold-down screw with the washer and lock washer installed. I was able to install the bolt without the washers. I may need to look into a longer bolt.
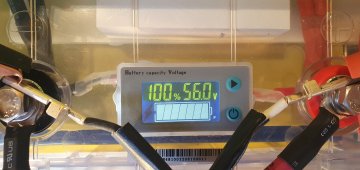
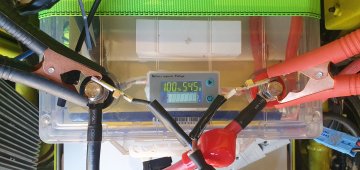
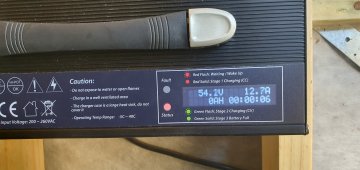
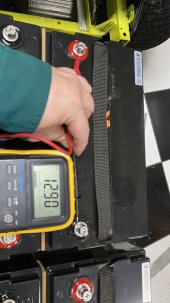
I validated all of my batteries were charged and balanced to about 53.3V before and after the install.
When I went to turn on the mower I heard the relay click but no power showed on the original meter. Measuring the voltage at the original charge port showed low to no voltage. I disconnected the main Anderson plug to the batteries and tested the voltage to the battery which was reading 53.3V. I feared I had somehow nuked my charger port again. I reconnected the main Anderson plug again and remeasured the voltage at the charger port. The charger read the normal 53.3V. Whew!
I then turned the mower on again, heard the relay click…again no power. Disconnecting and reconnecting the battery returned to proper voltage.
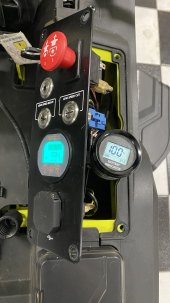
I then decided to leave the multimeter probes for measuring voltage connected to the charge port so that I could observe the voltage change when I turned the key on. When I did this…the mower came on and read 100% on the meter!
I disconnected my multimeter and was able to turn the mower on and off without issue (at least so far). I’m not exactly sure if the mulitmeter being connected was a fluke, or if it provided just enough momentary resistance that it allowed the circuits to properly turn on the electronics. I still haven’t tried mowing or other heavy loads but the lights, blades, beepers, etc…are all functioning. Maybe someone can explain what the connected multimeter in DC voltage testing mode actually did to allow the mower to turn on. Regardless, I’ll take that win!
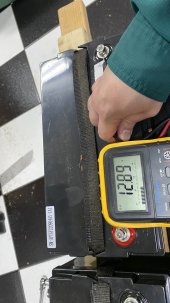
Now I’m onto the next step of installing the new power gauge. I followed the advice of many on this forum that have used the Camway battery monitor off of Amazon. The sampler block on this monitor is enormous.
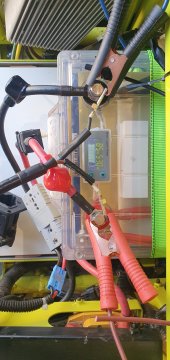
I opened up the control panel and removed the old battery indicator. This indicator has a single plug with three wires (two green and one black). There isn’t a lot of slack in the existing wiring, so I wasn’t trying to cut connectors in case I needed to hook up the original indicator. Also, there are no labels for what the different wires are used for on the original indicator.
Where I’m scratching my head a bit is how people hooked up the new Camway monitor since its instructions show cables going back to the battery. The existing wiring is also using green and black vs red and black. After some multimeter voltage testing it seems like existing wiring has the green wires as the battery pos and the black wire is hooked up to battery negative.
I guess, my first question is if anyone has a photo of how they did the wiring connections to the new camway monitor from the existing Ryboi wiring? See attached pictures.
If not:
Do I need to connect both green wires from the legacy Ryobi indicator to the new Camway or just one? UPDATE: Both green wires need to be connected to both B+ screws on the Camway. 18-22awg wires should be sufficient for connecting into the pins of the existing indicator plug.
Do I just connect a single black wire from legacy Ryobi wiring to the B- connector on the Camway? UPDATE: I can confirm that you only need to have a single 18-22awg wire from the existing plug to the small Camway B- terminal.
No wires will come from the P- connector on the camway? UPDATE: Doesn't seem to be required.
How did folks mount/secure the Camway sensor block to their mower? This is still an open question that would be great to see how people mounted this. In theory it could be wired to hang below the indicator, but I would prefer it to not move around. I'm thinking of drilling some holes through the side of of the plastic housing next to the seat into the area below the indicator and then use bolts to mount the new Camway sensor block to the inside of that cavity just below the indicator. If anyone has a better suggestion, I'm all ears!

You will want to hook the shunt up to the battery. I don't think the wires from the old meter will work. I took the plastic piece off the shunt and bolted B- directly to the negative threaded terminal and P- to the negative load cable. Positive wire for the shunt I hooked up directly to battery. This keeps the meter on all the time but I have mine hooked up to solar so it doesn't matter to me.
The new gauge is bigger than the original one so you will need to make the opening bigger in the metal holder. If you have the right tools it is pretty easy, if you don't it is a pain. Otherwise you could mount it somewhere else.


Thanks for confirming. I've already found several differences between what you need to do to make the RM480 work vs the RY48ZTR. I'm hoping someone else on the forum can chime in on what they did for the ZTR models when installing the Camway (AiLi) monitor to save me from pulling out my hair. Trial and error has gotten me so far, but trying to avoid that "broken clock is right twice a day" situation by thinking I have something right and it blowing up later.Ah, yeah I have an older RM480 38" non-zero turn and leaving the connector unplugged from the old meter works for it. Perhaps they changed the wiring with the new zero-turn ones or they were different to begin with. Hopefully someone with a newer zero-turn has an answer!
 www.deepcyclesystems.com.au
How is your VoltX battery performing? I've just ordered the same one for my Ryobi Zero Turn.Ok, so I think the battery capacity indicator is just inaccurate because using volts to ascertain state of charge is an inexact science...
I’m a little late to this thread but qucc (recommended) and chargery (not recommended) use external relays.another option is to control a disconnect relay and wire the motor directly to the relay. Then you dont have to have a high current BMS to pass 200+ amps to the motor. and instead just monitor battery voltage and trigger the relay when H/L Vco.
This is what http://www.electrodacus.com/ does. However they only support 8s at the moment. Its my understanding that some of the Daly BMS can also be used to trigger the right kinds of relays for this kind of setup.
It's a well built battery at a good price. The indicator on the front is a bit of a gimmick, just don't expect it to give an accurate reading. Apart from that, I think it's a good drop in solution. Having said that, I don't have the equipment to run all the tests.How is your VoltX battery performing? I've just ordered the same one for my Ryobi Zero Turn.
New comer here, I have read through the this thread a few times and I want to start out by saying thanks you for for all the great info and sharing your experiences. I am starting to gather up the parts to convert my RM480e. It sat in the garage all last year since the SLA are totally dead and I'm ready to get it running again with a new setup.I've finished my build and successfully mowed my yard with the new battery. 100 Ah cells, 16s Overkill BMS. Mowed my entire yard 0.8 acre on 22° slope using 30% of the battery capacity (80% → 50% SOC). One nice thing: with the old SLA OEM setup the fuel gauge would swing 20-30% depending on whether the battery was under load ( voltage vs SOC lookup table I presume ). I never knew that the actual percent was with the SLAs. With the shunt it's really nice knowing the exact SOC.
Max current while mowing with the new battery 108 Amps as reported by Overkill app, which did make me a little nervous. It must've been very brief since the 100A OEM battery fuse didn't blow. My old OEM battery was the 70Ah SLA. It might be placebo effect, but the mower seems peppier going up hills (shedding almost 200 pounds of lead and having more max current to work with I presume). I noticed no difference in center of gravity change: the mower doesn't seem any more likely to tip.
Here's a full Tinkercad of my build. I've been keeping SOC max 80% for battery life. AIMS charger set to charge LiFePo4 @ 15 amps. Planning to add a mechanical timer, estimate how long it will take to reach ~80% and have it turn off after that duration.
- The design I used is a modded version of @rio 's brilliant build, here are the changes I made
- added the middle lid notch to accept the steel lid brace (rough cut using a jigsaw)
- used high quality 1/2" birch plywood for the sides and bottom, 3/4" for the lid and middle spacers
- box held together with #6 screws and waterproof wood glue
- middle spacers screwed into side
- outside finished with 3 coats of spar polyurethane
- 5 mm EVA foam (white Cosplay foam from Hobby Lobby) to pad the hold-down braces under the lid
- 3d printed shunt holder, dust cap and stabilizers for middle brace, and the mains dust cap
- used this enormous stepper bit to enlarge the hole for the shunt display, took 10 minutes with hand drill
- I destroyed my OEM charging port by plugging in the AIMS Charger the first time causing a large arc from (we suspect) the inrush current filling the charger capacitors from the battery. I have a complaint filed with AIMS Corp to see if this is normal. Here's how I repaired:
- removed OEM charger receptacle and plug
- replaced with Anderson SB50 plugs
- 3d modeled the receptacle to hold the SB50 onto the mower (see pics)
- connected the blue wire from the lockout circuit to battery positive, permanently disabling the lockout†
- going to build a $20 protection circuit to prevent this moving forward using a diode and resistor in parallel
- for now I have been disabling the battery using iOS app, then connecting AIMS charger, last turning battery on to charge without arcing
† With rio's help we reverse engineered the lockout circuit in case anyone wants to see how it works, and how I decided to connect the lockout circuit to battery positive, see pic.
 www.facebook.com
I would install 4 volt meters one on each battery and look to see exactly what is dropping out when the mower stops.Hopefully now that it is spring and the folks in colder climates are now starting to get their mowers out of the shed for use...and watching this thread a bit more closely to provide feedback.
As an update to my conversion project:
I still haven't figured out the whole jumpstart issue and why it looks like the four AmpereTime 12v 100ah lithium batteries seem to just kill the power to the mower if I try to turn on the mower when it hasn't been receiving a direct charge for more than 30 min even though the batteries are are between 80-100% charge. I suspect there is something with the BMS in one or more of the batteries but I haven't been able to prove it. So my default procedure was to turn on the charger to get some juice flowing..then turn on the mower with the charger on, then turn off the charger and remove the plug. Wonky experience but seemed to do the trick for my first 4 mows without issue.
After my first couple successful mows only using about 30-35ah of charge of the 100ah available I decided it was working with the hassle of this initial "jumpstart" and just recycled my old SLA batteries. However on my 4th mow everything worked fine until my last pass when the power just suddenly dropped out and shut off the mower. I rolled it back to the shed...plugged it into the charger..the battery monitor lit back up and showed I had only used about 27ah charge and was at over 70% charage. I was able to turn it on and drive it around, but within a few min of turning on the blades the power would fully repeat and cut out again. My amp readout never showed me going over 70amp and it would even cut out sitting still and just running the blades consuming only 20-25amp. So it was't a voltage issue, charge issue, or amperage issue.
I hit the same problem again on my 5th mow where the power would just drop out after using about 27ah of charge. So at least it is a little consisent on where the power fails but I don't know why. Even though these four 12v100ah ampereTime batteries are rated for series installs and the runtime use and discharge is well within their limits it just seems like something the bms doesn't like. It seems like under the worst loads the amps will peak around 75amps and under normal conditions I'm between 45-55amp or less. I don't know how much more time and money it is worth to invest further in this from my perspective unless someone has some good advice on how to troubleshoot this issue vs cutting my losses and buying a new mower and trying to sell this one as used that is designed with lithium in mind. It could be the mower, something with the charger, or something with the AmpereTime batteries.
Living in Florida I never stop mowing...I just mowed less between nov-feb. We are in full on spring now with temps back in the mid 80s. So I don't have time to mess around during my next 9 months of heaving growing. If I don't find an answer to salvage this project I'm either back to my backup push mower or investing in something new.
Help is appreciated.
If you give up and decide to sell it all, let me know… I might be up for a trip down there.Hopefully now that it is spring and the folks in colder climates are now starting to get their mowers out of the shed for use...and watching this thread a bit more closely to provide feedback.
As an update to my conversion project:
I still haven't figured out the whole jumpstart issue and why it looks like the four AmpereTime 12v 100ah lithium batteries seem to just kill the power to the mower if I try to turn on the mower when it hasn't been receiving a direct charge for more than 30 min even though the batteries are are between 80-100% charge. I suspect there is something with the BMS in one or more of the batteries but I haven't been able to prove it. So my default procedure was to turn on the charger to get some juice flowing..then turn on the mower with the charger on, then turn off the charger and remove the plug. Wonky experience but seemed to do the trick for my first 4 mows without issue.
After my first couple successful mows only using about 30-35ah of charge of the 100ah available I decided it was working with the hassle of this initial "jumpstart" and just recycled my old SLA batteries. However on my 4th mow everything worked fine until my last pass when the power just suddenly dropped out and shut off the mower. I rolled it back to the shed...plugged it into the charger..the battery monitor lit back up and showed I had only used about 27ah charge and was at over 70% charage. I was able to turn it on and drive it around, but within a few min of turning on the blades the power would fully repeat and cut out again. My amp readout never showed me going over 70amp and it would even cut out sitting still and just running the blades consuming only 20-25amp. So it was't a voltage issue, charge issue, or amperage issue.
I hit the same problem again on my 5th mow where the power would just drop out after using about 27ah of charge. So at least it is a little consisent on where the power fails but I don't know why. Even though these four 12v100ah ampereTime batteries are rated for series installs and the runtime use and discharge is well within their limits it just seems like something the bms doesn't like. It seems like under the worst loads the amps will peak around 75amps and under normal conditions I'm between 45-55amp or less. I don't know how much more time and money it is worth to invest further in this from my perspective unless someone has some good advice on how to troubleshoot this issue vs cutting my losses and buying a new mower and trying to sell this one as used that is designed with lithium in mind. It could be the mower, something with the charger, or something with the AmpereTime batteries.
Living in Florida I never stop mowing...I just mowed less between nov-feb. We are in full on spring now with temps back in the mid 80s. So I don't have time to mess around during my next 9 months of heaving growing. If I don't find an answer to salvage this project I'm either back to my backup push mower or investing in something new.
Help is appreciated.
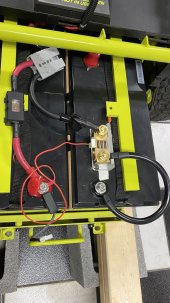
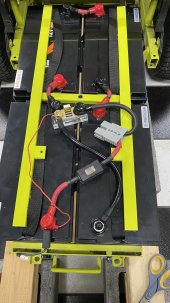
See attached photos of how it is all connected. Reused nearly all the existing wiring except adding an extra length of cable between the shunt and the lead negative terminal. I had seen some people directly bolt the shunt directly to the negative terminal using a longer M8 bolt but I didn't feel as confident with that due to the platic shunt bracket preventing direct contact with the battery terminal unless someone says it isn't an issue.If you give up and decide to sell it all, let me know… I might be up for a trip down there.
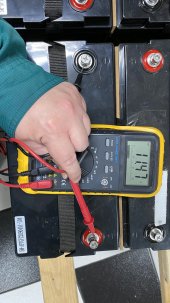
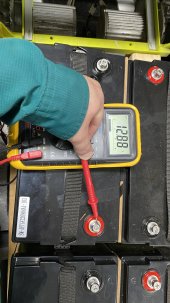
Agreed that the 100Ah batteries shouldn't be having an issue. Well yesterday I mowed again and it only did 20% of my yard. So each time it is mowing less. When I started the mower the AiLi/Camway monitor said the state of charge was at 100% which made sense with the amount of time I let my Dakota Lithium 48v 15ah charger run after each mow. Normally only using about 30-40ah out of the 100Ah batteries. So about 2-3 hours charge is usually sufficient. Dakota doesn't recommend leaving the batteries sit on the charger, so I just installed a mechanical timer to shut the power off after the charge. The Camway monitor seemed to be accurate when reading the voltage, current use, etc...especially for the time I was mowing, so seeing the monitor report 100% charge all seemed to add up.Yes, I would get 4 12V digital volt meters, connect one to each battery, and see if one cuts out when the mower fails to run.
100Ah batteries should have no issue with that mower load.
Appreciate the input. If the one battery is this far out of whack it could certainly explain part of what I'm seeing. Maybe a replacement battery would be in order, but I am really hesitant to invest even more into the system. A 48v 100ah AmpereTime/LiTime battery would run about $1600 and other brands go up from there. Not really feeling like building a pack with what I have already sunk into this conversion. This is turning into a more costly investment than just replacing with SLA batteries for something as silly as "luck of the draw" on an individual battery. At $1600 I'm 25% of the way towards a more up to date lithium mower from Ryobi, Ego, or Greenworks.Batteries wired in series can and do go out of sync. A good battery may charge up faster than a lesser battery and once the good battery stops charging (the BMS stops the charge), the lesser battery can no longer get a charge.
If you want a 48 volt battery, build a 48 volt battery. Putting 12 volt batteries in series can lead to problems like you're seeing. That may not be the root cause of your issue, but it could be.