Watts Happening
I call it like I see it.
- Joined
- May 3, 2022
- Messages
- 819
Original post updated with progress from the last couple of days, we're now up and running with 1/3 of the overall system, it's working great!


So far it’s great, correct, rafters at 2’. Not sure what I’d do different honestly, maybe just a slight dimension change to fit panels perfectly but you’d have to know what panels you were using before starting. Otherwise, it’s going great!So, how are you liking how your plan is working out? The rafters are 2' O.C.? Any thoughts on how you might do it differently if you built the pergola again with solar on the roof?
You should totally do a continuity test. The solar panel frame is not conductive because is anodized aluminum. It has a surface layer of aluminum oxide so resting on the guide rail is very probably not enough.I assume you’re talking about whether or not the panels are bonded to the structure? Your most basic test is a continuity test and I’d be shocked if it didn’t check out perfectly. But maybe over time it fades, mayyyybe.
I’ve installed the grounding plates, I think it’ll be solid across the board. Regardless the structure is bonded to ground so as a whole it should be fine.Years ago I was part of a team that did a natural gas pipe corrosion survey in a remote area (we did find a small leak; kind of scary). I was checking soil conductivity over and over again. Took us something like 3 weeks. I just wonder if there is a way to check ground from some random spot on a panel frame all the way into the ground (we used about 8 electrically connected huge nail spikes spread in a line attached to a box with circuitry and a meter)

Canadian solar 445w bifacial panels from www.solarsteals.comWhat panels are you using ? Love this setup
Good idea with the hose, but I'm not even going to try to fight it. We live in the high desert and have minimal rain, we can just hang out inside during the few rain showers we getHey, thanks for sharing.
My solar panels have an indented area on the side profile of the aluminum. It feels like a perfect place/size for a rubber garden hose to go. Then you just push the panels and the hose acts a bit like a gasket. It wouldn't be perfect for drips I'd argue it doesn't have to be. But you'd also have a free system to cool a part of your panels and heat some water, which humans always find a use for. I think it could be done in a very stealthy way.
Your bifacials look flat on the sides, which I guess could still work in a similar way. If the flexible garden hose has a cross section of 20mm, you essentially mount the panels at like 18mm apart. Maybe super leaky over time and seasons changes, not sure. It still seems 99% better than a 1" gap (which I still think would be fine actually).
It just seems more useful than paying as much for some foam tape.. I assume there are garden hoses or tubing designed to last a while in the sun, but maybe that is a stupid assumption.
Can I also ask, subjectively, how much different does it feel to have partial sun coming through the glass vs when it was all wood? Those bifacials seem so cool and infinitely better to look at than just white plastic.
")


Simply put, it’s been doing ~30kWh per day for the last week. Peaking around 5kwThis is a great idea. Really like how it looks. Curious what kind of real numbers you are getting from the nominal 6.675kw. Are you seeing a lift from the bifacial nature? How many hours a day is it producing reasonable wattage?
Great results! Thanks for the info. I have to consider doing something like this myself.

It sure makes me a happy camperThat's a very pretty picture.
How does that compare with PVWatts estimate given the orientation? Great job on the project.Simply put, it’s been doing ~30kWh per day for the last week. Peaking around 5kw
I’ll have to run the numbers again and eyeball it. I think it’s reasonably closeHow does that compare with PVWatts estimate given the orientation? Great job on the project.

Great job! Congratulations and enjoy every bit of your free energy! ?Update!
Almost exactly a month to the day later, the pergola has generated its first megawatt! She’s chugging along great, beginning to see the effects of the season changing but still powering the house great!
The city also issued our permit yesterday to install (10) 395 watt panels on the house. That’ll effectively double our power generation as they’re pointed in a MUCH more advantageous direction. Looking forward to it all!
Do you have a link to the solar panel mid and end clamps, also the nut that go into the unistrut?Long story short: I built a big steel pergola four years ago and finally realized I should throw solar panels on it. Scroll down for pictures, it's still a work in progress. If you're bored and into solar like I am, read the back story.
Back Story
Years back I built this pergola in our back yard, a neighbor had a terribly kept back yard and this helped us not see it plus provided some much needed summer shade and great place to hang out in the winter with a hot tub, fire pit and Alexa controlled copper mister system I built. At 20x22' it's 440 square feet of roof space, our local jurisdiction requires a permit on anything over 200 square feet, and just by chance, I fought and won that battle. The 4x4's are all 1/8" thick, aka .120 wall, except for the horizontal one with a large cantilever, it being 3/16ths (heavy as hell). Four posts are four feet into the ground with 200+ pounds of concrete, one is bolted to our patio. That cantilever was only done to eliminate a sixth post going straight down into our already existing concrete path. I cut the shape of our state out of 1/4" plate to act as a gusset and shorten the cantilever. I tried to go the route of permitting but the city was being a REAL pain, I asked if they could help me understand their definition of square footage, as the eves of my home don't count as square footage etc, so I was struggling to understand if I needed a permit. They couldn't come up with a solid answer, and I told them if they couldn't point to law that defined it for my structure I was going to build it regardless. If I had built it out of wood they'd have happily stamped and approved it in house, but by going with significantly stronger and more permanent steel, they required stamped engineering drawings and a "certified welder" or to optionally have all welds magnetically inspected.
So, I began building it and was immediately red tagged, I openly told them where I lived and expected it. I was probably 80% done and invited the inspector over, he had already guesstimated it at being 400 square feet, I told him the dimensions and welcomed him in. We went out back and he was like, "yeah, this is going to need a permit". I then explained my interpretation of the law being that if you wrapped a string around the posts, anything inside that would be considered square footage, anything outside was "eves". He agreed, then measured, then said, "I can't believe it, it's 197 square feet, in 30 years of working for the city, this is EASILY the largest legally un-permitted structure I've ever signed off on". We shook hands, he asked for some pictures for his buddies and went on his way, great guy I've dealt with numerous times since.
It's now been maybe 4 years and I'm going through another permitting process of adding a Sol-Ark, SOK batteries and (10) 395w panels on the house, playing the same games as before. The only sticking point this time is them wanting "stamped engineering plans stating the rafters can handle the weight", to which I ask whom in my neighborhood has changed their rafters to accommodate solar panel load, even with the exact same floorpan and more panels. They knowingly answer "nobody", but then say other homes can't be used as an example. Cracks me up, but it'll be worked around soon enough.
The Solar Pergola
During this time I was sitting outside and thought, you know what, screw it, I'll just throw panels on the pergola and they can't do anything about it. Talked to the city and they basically agreed. It's not an ideal roofline at all, facing about 315 degrees (Northwest), at a 13.5 degree tilt. It won't be perfect, but it's got plenty of wasted space and I may as well utilize it, not having to deal with fire code setbacks that just destroy usable roof square footage on the home.
So I ripped off an 8 foot section of the roof and began stitch welding strut channel on top, about 1.5" of weld every 12", staggered by 6" on the opposite side. The panels will be going horizontally across the channel and it's absolutely overkill having them clamped every 2 feet, but I'll never have to worry about anything falling apart. I'll end up with (16) 445w bifacial panels up there as the new roof, which should certainly help our power demands. Panels will be delivered Monday/Tuesday and will start going up in sections so I can still walk across the old roof to place and tighten them. Then another section will come out etc, it'll be three phases.
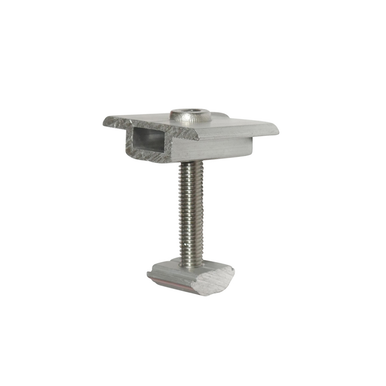
For mounting I opted to use the mini rail end and mid clamps from Signature Solar, then removed the bottom piece that normally slots into the rail and replaced it with seemingly hard to find M8 threaded unistrut spring nuts as shown.
My one current question
Would you consider the panels to be safely bonded to the structure under those clamps without any of the little ground/bonding gizmos that can be bought? I spaced it and didn't realize they didn't come with the clamps, but I'm mentally assuming that (8) clamps per panel should be pretty darn sufficient for ensuring the panels have a decent ground to the structure so I can just connect a single grounding wire to the pergola and call it "grounded". It'll be aluminum on aluminum as the panels aren't anodized black, then on the bottom it'll be the aluminum panel touching the galvanized strut channel. I don't want to make it unsafe, but I also don't want to delay and waste time/effort on something that to me, seems pretty darn solid. Your thoughts?
I'll update as I make progress, any questions are more than welcome.
Before the roof removal
View attachment 164661
Before I extended out wall up, you can see the waterfall that runs in PVC through one of the rafters and dumps into a whiskey barrel that has a pump in it, which then cycles it under the deck (made of recycled hardwood pallets) and back around for another loop. Also Alexa controlled.
View attachment 164662
Removal and project starting
View attachment 164663
View attachment 164664
View attachment 164665
Forgive the overall mess, it's project time. You can see the conduit going from the back side of the pergola to the garage where the Sol-Ark is. Also note how no part of the pergola is attached to the house, the upper board is cut where the rain gutters are and the rest of that "wall" is a "gate" attached to the house. This was again due to a requirement that the structure couldn't be attached to the house, or it would need a permit. You can also see two of our four mini splits on the side yard. I removed our entire exising HVAC system in favor of them, they've been great.
View attachment 164666
Mini rail clamp on the left, original nut removed and replaced with unistrut spring nut on the right, and installed into the railing above, looks like it's going to work out swell. Hoping the ridges of the mount help with ensuring a good bond to the structure.
View attachment 164667
Update 8/31/23
The panels were delivered yesterday and one was unfortunately broken. That said, I was able to get the first (5) installed and connected to the system. The PV wiring from the panels to the outdoor breaker box is very temporary, I won't finalize it until all panels are installed so I can configure the series strings in such a way that they take advantage of shading in the later hours of the day (upper panels on one string, lower on another).
View attachment 165471
We have in-laws coming over this weekend from out of state so I cleaned up the tools and threw some camping chairs back there. It'll come together over the next couple weeks.
View attachment 165472
I also finalized the outdoor PV breaker, pulled another set of 12awg wire for the second string and bonded the pergola to the Sol-Ark/house ground. I suppose my only question here is whether someone could argue this 3" of 10awg ground wire is "subject to physical damage" where it exits the conduit at 8' in the air, below a roofline. If you're unaware, a ground wire subject to physical damage needs to be 6awg or larger. Personally I feel that would be a stretch, but I suppose I could add additional protection if needed. I gave the steel a good brushing with a die grinder then immediately installed the bonding wire, I then applied 4 coats of clear coat to help mitigate any rust over time.
View attachment 165474
Do you have a link to the solar panel mid and end clamps, also the nut that go into the unistrut?
Thanks
Scat
 signaturesolar.com