diy solar

diy solar

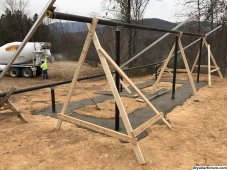
My DIY 60 kW 220 panel setup

I have a pole barn with a metal roof very similar to yours and I'm looking for mounting brackets. Which ones did you use?
I can't speak for the OP of this thread, but on our pole barn, and on my similar pitch metal roof home I used S-5 Versa brackets to attach to the metal roof Then the rail of your choice.

I've used Unistrut (from bigger box stores - I don't recommend due to scarcity of panel clamps etc), low cost Prosolar rails and clamps, and most recently the very low cost Signature Solar Mini Rails.
Thank you for the feedback. I'm going to read up on all of those options to help me make my decision.
 
Thank you for the feedback. I'm going to read up on all of those options to help me make my decision.
S-5 makes a large assortments of metal roof hardware mounts. Their VersaBracket is water tight and the most economical.
 
@crazydane >> If None has told you yet... I built a controller for an old satellite dish.. the motor is 24v, but will work fine with 12v.. just slower, which will be great for the project.. Look at http://www.redrok.com/electron.htm#led3x
they have these in ready built or kit form.. easy and cheap, and connects straight to the motor and uses the existing limit switches.
i built mine into a small landscape light.. metal body with glass jar cover.. then the control box housed a small 7Ah battery and a 10W solar panel with small charge controller. I also used a 4PDT for manual / Automatic control, and another switch so i could move the panels manually E or W.
the control board inches things back to East during the night, so that it's ready for the next day..
check out the site,, pretty interesting..
 
The next day the POCO came out and killed the power to the house, and moved the cables from the pole into the new meter base and energized the new panel and left. It then took me about 3 hours to mount the transfer switch and run new 3/0 Cu to the sub-panels in the house. Bending 3/0 Cu is no fun at all, although it was not nearly as bad as the 300 MCM feeding the solar sub-panel.

View attachment 110474

Next I decided to pour a pad and make a "power room" where the service enters the house.

View attachment 110475

Structure done:

View attachment 110476

The roll of cable is a 24 strand fiber cable that I ran down to the shop building since I had ditch dug anyway.

20 kW Kubota generator installed and wired:

View attachment 110477

Last month I decided to ditch all the micro inverters and go 100% SMA SB string inverters. Doing all the ground mounted arrays was easy since I had easy access to the inverters, but the 56 panels on the roof were a different story.

I hauled a pallet up onto the roof, got it level, and the moved the top row of each array section onto it, and then shifted the remaining panels in each row, up one:

View attachment 110479

Inside the shop, I build a frame to hold all the inverters along with the 225A sub-panel. Here's a shot from when the shop roof arrays were still on micro inverters:

View attachment 110481

All done:

View attachment 110483

Closeup of solar sub-panel:

View attachment 110484

Getting that 300 MCM Cu cable to make the turn into the 225A breaker was a real challenge!

All PV wire going into the inverters are 10 AWG and the A/C output of the inverters going to the sub-panel is 6 AWG. The feeder wire from the solar sub-panel to the converted 400A shop meter base is 300 MCM Cu.

Output when the sun is out:

View attachment 110485

Production for the last 30 days:

View attachment 110486

I want to post genuine constructive feedback but I need your permission to do it.
I can't figure out whether you're still active recently or not.
 
Has the OP heard of ground screws? I think you could have saved yourself a lot of money and time, rather than using concrete foundations for your ground mounts.
 
I've done concrete screws. Is it the same?
I don't think so, I'm talking about metal ground screws, they are $20-$30 each.


1 x Screw Pile Installation Tool SR100 £12
2 x 1.5m Tube for Installation £24
£36 total


You can use a lump hammer with a wooden drift to help the ground screw start to dig into the ground as you both turn it with the short scaffolding tubes - you don't need to insert the thinner tubes at the beginning, you only need them when it's impossible to turn the short tubes by hand.
Once you get most of the screw into the ground, it's extremely hard work pushing the poles around, even with two people, and then you know the ground screw is rock solid.

My installation guide: (Two people are needed)
Use a two feet long masonry drill, to drill a guide hole in the ground - this also helps you find out if there are any stones directly underneath where you intend to put the ground screw. I had to drill in a different place several times while setting up my solar panels, because of stones in the ground.
Then use a drift (piece of wood, placed on top of the ground screw, held by your assistant) which you hit with a lump hammer, then you both turn the ground screw 90 degrees, holding the short tubes of the Screw pile Installation Tool to turn it by hand, then hit the drift again a few times with the lump hammer, then turn the ground screw another 90 degrees, and carry on until you feel the screw is firmly embedded in the ground, and is able to screw itself in as you turn it, with no further need to hit it with a lump hammer! Then you find you can no longer turn the screw with just the short tubes of the Screw Pile Installation Tool, and then you insert the 1.5m tubes, and turn the screw that way, as shown in the video above.
Remember - it's better to leave too much of the screw sticking out and then have to tighten it down a bit, than to screw it in too far, and then have to undo it - I imagine undoing it will make the screw much less reliable, as it will now have a slight 'hole' underneath its end.
 
Last edited:
Last edited:
When I looked into these in the USA at least it is going to depend on how deep you have to go and soil type. Since my frost line is over 6 feet a single ground screw was going to cost well over $100.
 

diy solar

diy solar
Back
Top