diy solar

diy solar

12v 560AH Build For Overland Van

Pulled the pack cover off and did some testing. Cell 4 had a couple nuts which were a bit loose with my torque wrench. Maybe 10 degrees total turn. Running at 300A discharge cell 4 is 12mv below the other cells. At 130A its 6mv. Not perfect, but since tightening those nuts improved it, I must have a bus bar that's out of flat I would guess. I will do a 20% DOD and then charge at 100A to see what happens at the end of the charge. If it stays in balance, I may just leave it. Otherwise I can pull the bus bars and check them for flatness at the contacts.

I also need to think about what I want to do with the nuts. I am not sure if they came loose on their own (lots of washboard rods), or if the bus bars compressed a bit. I may have enough threads for a jam nut, not sure.
 
when I get the 2 banks ready to bolt into my RV I will complete the final assembly with Nylock nuts. this will help with vibration. Proper torque is also essential.
 
when I get the 2 banks ready to bolt into my RV I will complete the final assembly with Nylock nuts. this will help with vibration. Proper torque is also essential.

I did ensure proper torque, however copious dielectric grease does make for easier loosening fasteners.

After a 100A charge I terminated and pulled the bus bars on cell 4. A volt meter showed that one cell was 10mv lower than the other. This indicates that this cell was providing most of the discharge current.

I took a close look at the bus bar and terminals, and there was sign of a chip or grain of sand under the terminal of the other cell. I didn't find the debris itself, but the indent in both sides was evident at about 0.75mm wide. This was the terminal which was 10 degrees from proper torque. I polished the terminals with 1000 grit sandpaper and some mothers aluminum polish.

I then greased everything up and torqued it back down. A load test at 300A showed only a 4-5mv drop at cell 4 to the highest cell. This is a significant improvement, and I think it will work fine.

Moral of the story, with these low torque connections, pay very close attention to cleanliness.
 
Cleanliness-is-next-to-Godliness-Quote-SVG-Cut-by-TheLucky-1-580x386.jpg


At least that's what my dad used to say when telling me to clean my room. I should remind him of that when I walk through his house. It's a good thing he uses a walker now. He'll never catch me. :)

I've used Mother's chrome polish on my vehicles. It left a residue. I think I would use acetone instead.
 
I did clean with solvent after I polished. It shows the high/low areas nicely.

I think in this case my bus bars aren't a perfect fit, so I wiggled them a bit to slide them down. This probably knocked a copper burr out of the hole. At least that's the theory. In a stationary application, I wouldn't put grease on before assembly. That would let me blow out the gap between the terminal and bus bar at the last couple mm. Then when its torqued just give it a spray of contact protectant.
 
Moral of the story, with these low torque connections, pay very close attention to cleanliness.
The more I test my own cell builds, and listen to others on this forum, it seems building and testing cells, getting a quality well built / performing battery is like my every day work in the Semi world... for me at work, cleanliness of parts and robots taught down to 0.1mm is critical. Yes as you said, paying close attention to details.
 
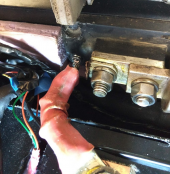
Had a surprise coming down House Rock Valley Road in Utah Today. Stopped a trailhead and had zero electrical power on the home system. Volt meter showed zero volts coming from the battery. My initial guess was loose connection in the pack, or maybe a blown fuse. Dropped into a nice BLM camp down the road, and started unpacking crap to access the battery. I found the main positive feed fatigue cracked where I bent the lug to attach to the fuse block.

1621033318709.png


This is a 2/0 heavy lug. Futher investigation showed one of the pack hold down bolts was loose, so the pack could move back and forth about 3/16". So every turn was bending and work hardening the lug. Now, I don't currently have any 2/0 lugs or wire. Same goes for a heavy crimper. In fact I don't even have my propane torch (which I normally carry). So I dug around in my parts bin to see what I did have.

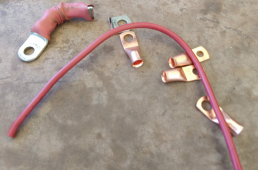
Turns out I had some 8awg wire scraps, and some 2AWG light duty lugs. Now, How to crimp... Turns out my 350W heat gun is just barely enough to solder these lugs. I had to wrap the other end of the cable with insulation to get it hot enough!


1621033755492.png

So I gathered up 2AWG worth of strands and made a pair of cables. Combined they should be good for 300A or so. I used my hammer to do a quick crimp and soldered the lugs. A little heat shrink, and I think this is a permanent repair. At least after I put some locktite on the hold down bolts!


1621033765690.png
 
I have done a few "Bush" repairs over the years, you would be amazed what a few feet of 10awg wire and some zip ties can do.

I can definitely say I never expected to break a 2/0 cable.
 
I had some pretty extreme cell voltage deltas when charging, Two cells ended up being as much as 100mv above the others. This was only when charging over 100A, so didn't affect performance too badly. I pulled the cover off and check nuts, they were all tight. Removed the bus bars, and it looks like my dielectric grease was reacting a bit with the copper. The grease was brown in places, and green in others. Not very consistently though. No sign of moisture or corrosion on the aluminum or elsewhere. I reviewed the datasheet for the grease and there wasn't any metal reactivity listed, I will reach out to tech support though.

I cleaned everything up and did a quick nickel electroplate on the bus bars. I didn't polish them afterwards. I then applied MG Chemicals 847 conductive assembly paste (recommended by upnorthandpersonal). This is a thick (thicker than peanut butter) carbon filled paste with "corrosion inhibitors". It will not run or migrate when heated. Cell deltas when loaded are less than 5mv now. My multimeter showed less than 2mv at 150A. This is better than when the pack was brand new. Very impressive (better be for 30$ an oz!).

 
Wow, excellent data point. It sounds like you would recommend it for any install?
 
The anti-corrosion grease is good stuff. I used it only in places where dissimilar metals were connected. I supposed that it could be used at every connection. It's not like I didn't have plenty. That little jar of No-Ox-ID will probably get handed down to one of my kids.
 
Pack is still rock solid, no balance issues, and the MG paste and nickel plate seems to be doing its job. Might do a capacity test in a bit to see what my degradation has been.
 
Back
Top