


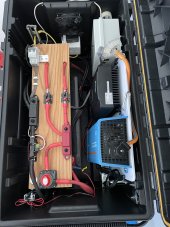
I’ve got this at about 85% complete. This is all installed inside a Dewalt Tough Chest 38 in. 63 Gal. Mobile Tool Box. I’m using a 12v 200ah Ampere Time LifePo4, 1200w Victron Phoenix Inverter, Renogy Rover 60amp MPPT, and a Victron BMV-712 shunt/monitor. There’s 2 low power quiet fans installed, 2 110v outlets with USB and GFCI(since no true ground so to speak),
This is meant to be a mobile job site power source along with a home backup. I didn’t want to rely on a gas based generator. The Rover can handle over 1000watts of solar panels so charging will be fast if sunny. Currently I’m using a small 20amp ac charger until I get the solar wiring part finished to the distribution box.
As tested I’m able to run a 115qt portable refrigerator for about 2 days give or take using the inverter. I’m going to test again running a straight 12v plug to the refrigerator and see if run time is better or worse.
I’m waiting on wire for the solar distribution box, a 12v/usb/rocker switch dist panel, and a top fan panel for better cooling. The fans will be direct off the battery for better efficiency. 2 fans on the side for intake air and the 2 on too for exhaust.
Many challenges along the way as this was the first time doing this type of electrical work. Found that wire sizing and connectors along with having good tools is a challenge and big pain when wrong. Both of the crimping tools I order have incorrectly sized die/jaws and did not fully crimp the copper lugs. The wire you order is also critical as you need to make sure what you order is flexible enough for a box like this and also the right rating. Another thing is the lug position when crimped is important as it has to already be the right orientation and rotation so to speak to align to the post. Otherwise it’s to hard to twist and maneuver the wires after the fact. This was the first time I’ve used so large gauge wire and only had experience with home electrical and Romeo type wire and connectors. Good learning all around with this project.
Attachments
Last edited:


