


WarpedJester
New Member
- Joined
- Jul 10, 2020
- Messages
- 43
And so it begins….
Hello all!
Sooo… this has been a long time coming but I am finally getting around to "breaking ground" on my first solar system. I'm not going to lie, Its both very exciting and freaking me out. It's odd, I have already done a lot of work in the form of planning which has felt like a hill to hike (more on that later). Additionally I have already spent a lot of money getting all the [I hope right] parts and pieces which was another hummock to crest. That said, now it's time to start building and fitting and programing what not. While I was anticipating this being another rise to summit, it's still intimidating.
Before I dive into the details, I want to first set the stage with a little background on me and the environment that this project is being inserted into.
After a "Life event" I transitioned to 1986 26' motor home named Oatmeal and while I loved him to death and had big plans for him, that fact was that he was a project and not one I could do while living in him, which seems funny when I think about all the plans I have for my current motor home (that’s called foreshadowing). Speaking of… after finding a good home for Oatmeal around April, I transitioned into my current home which is a 2014 Sunseeker 3170DS.
This is of minor relevance to the project but I picked the 3170DS because A) as a full time home, I wanted as much floor space as I could get and B) I have 4 kids that visit and being that this model has bunk beds, I have enough bed space for all 4 of them at once. That said. It also gives me a lot of space to play with and modify.
Finally, my living situation is that I do work full time in an office (I am one of not even a handful that needed to stay behind in house to support remote staff) so while I cannot travel [yet], I also cannot afford renting a "parking space" for my RV so I am 100% urban camper/street sleeper/stealth camper (if you can call parking a 31 foot class c motorhome "stealth").
OK, so here I am getting settled into my new digs and new way of life with the intention of spending a good loooooooong time in it, getting to know it, and taking time to really think about what I may want to do in the future…. 2 months later my mind is hatching all manner of plans for mods, updates, changes and more but through all that, what became abundantly clear very quickly was that my power situation was not going to work out. My RV comes with 2 flooded lead acid batteries and a Onan 4000 genny to charge them. The issue is that I am a digital-life kind a guy (hey I work in IT what can I say) so the batteries get drained fast and as a result I have logged a lot of hours on my genny to keep them charged up (over 4000 hours logged in 8 months).
"So a dude you going to get to the build any time soon?"
Yeah, yeah I'm getting there. OK, the stage is set the goal is solar now we just need to figure out where to cram all the solar hardware. Now I'm sure the thought that is going to cross many people's minds is "just shove it in a storage bay" and that’s not a bad plan but I am not one to give up storage space and I have a bad habit of making things hard on myself.
So lets take bets, what is the most effective way to not eat up a bunch of storage AND make this build more complicated than it needs to be?... Well, if you said rip out the refrigerator and cabinet that houses it then 10 points to Gryffindor!

Now lets take a moment to take this in. that is a floor to ceiling cabinet that houses not only the fridge, but also the heater, and the "convenience center" panel. Now if that not enough to make you question my sanity, did I mention that this cabinet also houses 90% of all the wires that run through the RV?

Yeahhhhh… I don’t recall if I was questioning my decisions at this point but I'm pretty sure my friend was (that’s her in the corner of the pic… LOVE YOU DANA!!!
Ok so.. We got everything ripped out lets take a step back and assess the situation… I now have a lot of room… wires coming from 5 different ways including the middle of the ceiling, and a giant hole in my wall where you used to access the back of the fridge. Ok.. Im not panicking… yet. I have a plan which I am sure will work.. Maybe… I hope… DANA!!!!!!!!!!
Where do we go from here? Deep breath.. Ok, so now its time for a game plan which I have at least half though out. I need to put the heater back where it was. I also want to build in more counter space since this model of RV is woefully lacking in that department.. And ya know.. If I make that hole in the wall a bit bigger…. Hang on I need to pull up Sketchup and do some thunk'n…
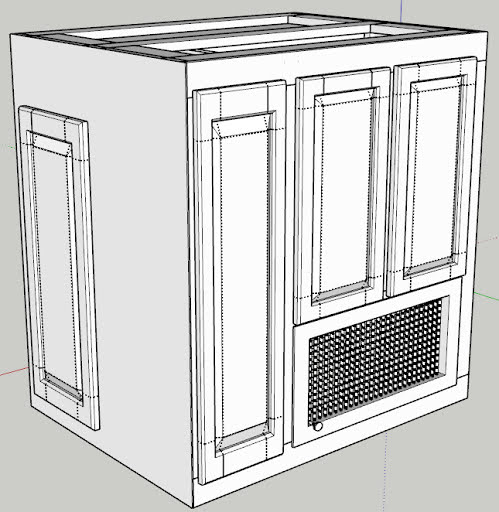
oK, here we go… I did some measuring and counting, I even had to take my shoes off for some of the counting, and I think I got a game plan. If I make a cabinet just a tad deeper then what was there, say 25 inches, I can fit my trash and recycling can under it!

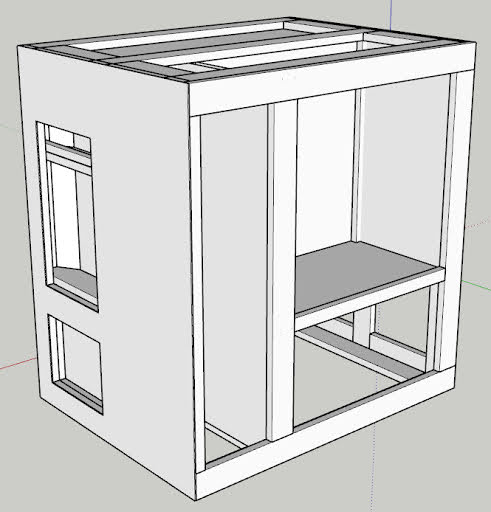
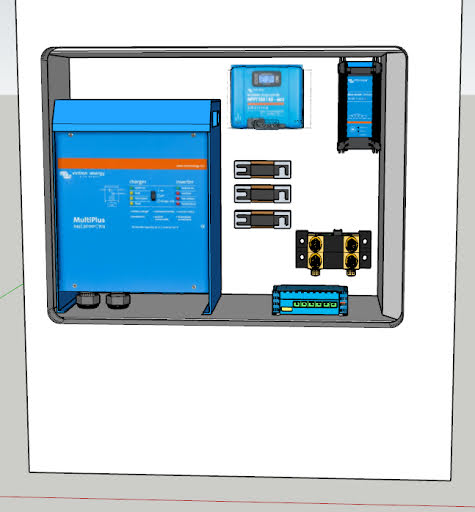
Im liking this so far but wait. I was trying to solve a problem….. OH yeah.. A place for solar stuff!!! Well I got ya covered because if we look at the back side, which will be accessible through that hole in the wall….

BAM! Now that’s what im talking about. And with a mockup of the outside wall with the hatch opening just for effect.

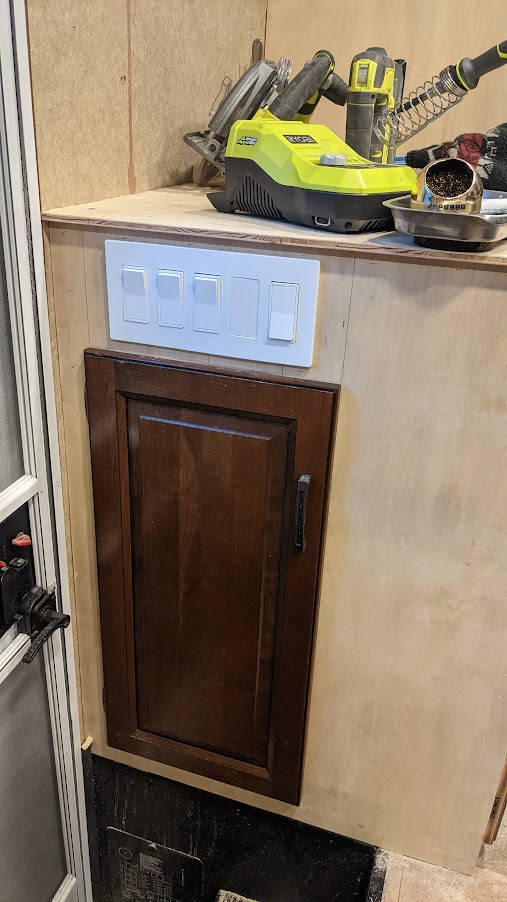
OK ok, I can make this work. Oh, BTW, the side of the cabinet that will face the door will house the breakers, cut off switched and fuse box

Wait, fuse box??? What??, but the fuse box is in the back under the bed.. Why are we dragging that into the mix???? Did I mention I like making my life hard?
Well we got a game plan, we have a sketch up plan.. Its all smooth sailing from here!! And if you believe that then please PM me because I have a killer deal on a bridge for sale.
This will be easy. All we need to do is build the frame, skin it then bring it in and bolt it down.. Yeah.. Umm remember I said 25 inches? Anyone wanna make a guess at how wide the door is? If you guessed 24.5 inches then you get a cookie. To add to that, we had to build this thing around all the wires and gas lines from the heater and fridge.
Ok.. Umm plan B.. We will just build it bit by bit into the space..

Umm.. Ok, im seeing now that we are going to need to do something about all then wires .. Umm. Shoot well, hmm.. OH wait, what if we build a upper cabinet and route all the wires from the ceiling down through the upper cabinet, into the wall and down? Sure but I really don’t want to have to build another cabinet.. Hmm… well what about that one on the other side of the door?..

Umm… sure, I guess.. I mean, its like twice as big as it needs to be and it has a bunch more wires running through it already, and the TV is partially supported by it.. Yeah.. This is clearly the right way to go about this…

At what point do you classify a project as "beyond scope"?

To be continued...
Hello all!
Sooo… this has been a long time coming but I am finally getting around to "breaking ground" on my first solar system. I'm not going to lie, Its both very exciting and freaking me out. It's odd, I have already done a lot of work in the form of planning which has felt like a hill to hike (more on that later). Additionally I have already spent a lot of money getting all the [I hope right] parts and pieces which was another hummock to crest. That said, now it's time to start building and fitting and programing what not. While I was anticipating this being another rise to summit, it's still intimidating.
Before I dive into the details, I want to first set the stage with a little background on me and the environment that this project is being inserted into.
After a "Life event" I transitioned to 1986 26' motor home named Oatmeal and while I loved him to death and had big plans for him, that fact was that he was a project and not one I could do while living in him, which seems funny when I think about all the plans I have for my current motor home (that’s called foreshadowing). Speaking of… after finding a good home for Oatmeal around April, I transitioned into my current home which is a 2014 Sunseeker 3170DS.
This is of minor relevance to the project but I picked the 3170DS because A) as a full time home, I wanted as much floor space as I could get and B) I have 4 kids that visit and being that this model has bunk beds, I have enough bed space for all 4 of them at once. That said. It also gives me a lot of space to play with and modify.
Finally, my living situation is that I do work full time in an office (I am one of not even a handful that needed to stay behind in house to support remote staff) so while I cannot travel [yet], I also cannot afford renting a "parking space" for my RV so I am 100% urban camper/street sleeper/stealth camper (if you can call parking a 31 foot class c motorhome "stealth").
OK, so here I am getting settled into my new digs and new way of life with the intention of spending a good loooooooong time in it, getting to know it, and taking time to really think about what I may want to do in the future…. 2 months later my mind is hatching all manner of plans for mods, updates, changes and more but through all that, what became abundantly clear very quickly was that my power situation was not going to work out. My RV comes with 2 flooded lead acid batteries and a Onan 4000 genny to charge them. The issue is that I am a digital-life kind a guy (hey I work in IT what can I say) so the batteries get drained fast and as a result I have logged a lot of hours on my genny to keep them charged up (over 4000 hours logged in 8 months).
"So a dude you going to get to the build any time soon?"
Yeah, yeah I'm getting there. OK, the stage is set the goal is solar now we just need to figure out where to cram all the solar hardware. Now I'm sure the thought that is going to cross many people's minds is "just shove it in a storage bay" and that’s not a bad plan but I am not one to give up storage space and I have a bad habit of making things hard on myself.
So lets take bets, what is the most effective way to not eat up a bunch of storage AND make this build more complicated than it needs to be?... Well, if you said rip out the refrigerator and cabinet that houses it then 10 points to Gryffindor!
Now lets take a moment to take this in. that is a floor to ceiling cabinet that houses not only the fridge, but also the heater, and the "convenience center" panel. Now if that not enough to make you question my sanity, did I mention that this cabinet also houses 90% of all the wires that run through the RV?
Yeahhhhh… I don’t recall if I was questioning my decisions at this point but I'm pretty sure my friend was (that’s her in the corner of the pic… LOVE YOU DANA!!!
Ok so.. We got everything ripped out lets take a step back and assess the situation… I now have a lot of room… wires coming from 5 different ways including the middle of the ceiling, and a giant hole in my wall where you used to access the back of the fridge. Ok.. Im not panicking… yet. I have a plan which I am sure will work.. Maybe… I hope… DANA!!!!!!!!!!
Where do we go from here? Deep breath.. Ok, so now its time for a game plan which I have at least half though out. I need to put the heater back where it was. I also want to build in more counter space since this model of RV is woefully lacking in that department.. And ya know.. If I make that hole in the wall a bit bigger…. Hang on I need to pull up Sketchup and do some thunk'n…
oK, here we go… I did some measuring and counting, I even had to take my shoes off for some of the counting, and I think I got a game plan. If I make a cabinet just a tad deeper then what was there, say 25 inches, I can fit my trash and recycling can under it!
Im liking this so far but wait. I was trying to solve a problem….. OH yeah.. A place for solar stuff!!! Well I got ya covered because if we look at the back side, which will be accessible through that hole in the wall….
BAM! Now that’s what im talking about. And with a mockup of the outside wall with the hatch opening just for effect.
OK ok, I can make this work. Oh, BTW, the side of the cabinet that will face the door will house the breakers, cut off switched and fuse box
Wait, fuse box??? What??, but the fuse box is in the back under the bed.. Why are we dragging that into the mix???? Did I mention I like making my life hard?
Well we got a game plan, we have a sketch up plan.. Its all smooth sailing from here!! And if you believe that then please PM me because I have a killer deal on a bridge for sale.
This will be easy. All we need to do is build the frame, skin it then bring it in and bolt it down.. Yeah.. Umm remember I said 25 inches? Anyone wanna make a guess at how wide the door is? If you guessed 24.5 inches then you get a cookie. To add to that, we had to build this thing around all the wires and gas lines from the heater and fridge.
Ok.. Umm plan B.. We will just build it bit by bit into the space..
Umm.. Ok, im seeing now that we are going to need to do something about all then wires .. Umm. Shoot well, hmm.. OH wait, what if we build a upper cabinet and route all the wires from the ceiling down through the upper cabinet, into the wall and down? Sure but I really don’t want to have to build another cabinet.. Hmm… well what about that one on the other side of the door?..
Umm… sure, I guess.. I mean, its like twice as big as it needs to be and it has a bunch more wires running through it already, and the TV is partially supported by it.. Yeah.. This is clearly the right way to go about this…
At what point do you classify a project as "beyond scope"?
To be continued...


")


