A special thanks to everyone who responded and helped with my first Power Station project. A special thanks to Rocketman for convincing me to buy a SmartShunt and answering my many questions.
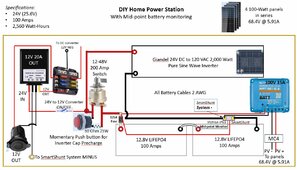
SPECIFICATIONS:
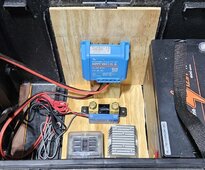
Pictures attached show the box used and components placed below the inverter. The LIFEPO4 batteries are on the far left and far right of the box. A piece of ¼” sanded plywood sits on top of the batteries and supports the inverter. Although it doesn’t look like there’s enough space on the right side of the inverter, there is room enough to plug in two 110VAC plugs. I haven’t screwed the inverter to the plywood yet since I’d like to see if I can’t get better positioning of the 2AWG battery cables. Connecting the battery cables were the most challenging part of this build.
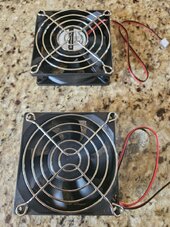
*NOTE: When I ordered the 24V to 12V converter, I fully expected the 12V output to read 13.6V...but it read exactly 12.0V. I then did some additional research and found that I could have ordered a 24V to 13.6V converter. That is what I would recommend since all the car cigarette lighter plugs provide about 13.4-13.6V. I didn't bother changing my system since the only item I use the 12V output for is to power 4 USB outputs (two USB 2.4A outputs and 2 USB fast charge outputs for phones/tablets). I'll also add 2 box fans for cooling, but I realize now that the box fans will operate on 24V so I'll only use that 24V to 12V converter for the USB outputs.
SPECIFICATIONS:
- 24V LIFEPO4 System
- 2,560 Watt-Hour capacity (each battery 12.8V 100Amps; 2 in series)
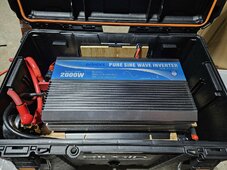
- 24V 2,000-Watt Pure Sine Wave Inverter
- Bluetooth SmartShunt Mid-Point monitor for batteries in series
- Bluetooth 100V 15A solar charge controller (communicates with SmartShunt) provides ~400 watts solar
- DC 24V to 12V 20Amp converter for 12V cigarette receptacle, box fans, fast charge USB ports *See Note below
- Built into a RIGID 2.0 toolbox with attachable wheels/handle
- Solar charged by 4 Ecoflow Monocrystalline 100-watt solar panels in series
Pictures attached show the box used and components placed below the inverter. The LIFEPO4 batteries are on the far left and far right of the box. A piece of ¼” sanded plywood sits on top of the batteries and supports the inverter. Although it doesn’t look like there’s enough space on the right side of the inverter, there is room enough to plug in two 110VAC plugs. I haven’t screwed the inverter to the plywood yet since I’d like to see if I can’t get better positioning of the 2AWG battery cables. Connecting the battery cables were the most challenging part of this build.
*NOTE: When I ordered the 24V to 12V converter, I fully expected the 12V output to read 13.6V...but it read exactly 12.0V. I then did some additional research and found that I could have ordered a 24V to 13.6V converter. That is what I would recommend since all the car cigarette lighter plugs provide about 13.4-13.6V. I didn't bother changing my system since the only item I use the 12V output for is to power 4 USB outputs (two USB 2.4A outputs and 2 USB fast charge outputs for phones/tablets). I'll also add 2 box fans for cooling, but I realize now that the box fans will operate on 24V so I'll only use that 24V to 12V converter for the USB outputs.
Attachments

Last edited: