diy solar

diy solar

Goal Zero Yeti 1250 – Great platform for drop-in LiFePO4 upgrade

Upgrading my Yeti 1250 soon with 2x 100ah Renogy LiFePO4 batteries. Any concerns about the Yeti 1250's built-in MPPT charger having an AGM charge profile instead of a LiFePO4 profile?

I just received my batteries and was going to charge them up to full before putting them into the Yeti, but I only have an AGM charger here and am reading mixed advice on whether it's OK to charge the LiFePO4's up with an AGM charger. Anyone have thoughts?
check the voltage that the AGM charger will charge to. double check what voltage it uses for equalization charge if it does that.

3.65 volts per cell is max safe with LiFePO4 chemistry, so four cell "12V" max safe voltage is 3.65 V * 4 cells = 14.6 volts.

if the AGM charger will go over 14.6 volts, then its use is discouraged and could damage the 4cell LiFePO4 battery

if it does have a higher charge voltage than 14.6 volts and you are feeling adventurous and vigilant, it should be ok to monitor the voltage with a multimeter at the battery terminals and then terminate charge once it gets to like 14 volts. that translates to 3.5 volts per cell which is basically full. that would give a basic amount of safety margin for being slow to disconnect it.

hope this helps, good luck with the conversion.
 
Upgrading my Yeti 1250 soon with 2x 100ah Renogy LiFePO4 batteries. Any concerns about the Yeti 1250's built-in MPPT charger having an AGM charge profile instead of a LiFePO4 profile?

I just received my batteries and was going to charge them up to full before putting them into the Yeti, but I only have an AGM charger here and am reading mixed advice on whether it's OK to charge the LiFePO4's up with an AGM charger. Anyone have thoughts?
I've been using the Yeti's built-in MPPT charger to charge the Ampere Time LFP I dropped in over a year ago with no issues. The built in charger seems to stop around the 14.6v mark but even then the built in BMS in the LFP battery the has kept them from overcharging when I connected them to a 15V power supply and left them for longer than I should have.
 
I've been using the Yeti's built-in MPPT charger to charge the Ampere Time LFP I dropped in over a year ago with no issues. The built in charger seems to stop around the 14.6v mark but even then the built in BMS in the LFP battery the has kept them from overcharging when I connected them to a 15V power supply and left them for longer than I should have.
Thank you both. This puts my mind at ease. I’ve got the system functioning and as we all knew from the original post, the battery display isn’t correct. So far, so good on Day 1.
 
One thing I am seeing now.... after the batteries have discharged to ~80% or so (via the battery's bluetooth app), the Yeti doesn't indicate charging more than 3 watts even though I have a the Yeti's wall charger brick plugged in and ~420 watts of panels connected (it is a cloudy day, admittedly, but I should be getting more than 3 watts from both sources combined). The battery display on the Yeti remains showing 100% completely full.

If the Yeti's internal charger doesn't know that the LFP batteries are low, will it stay at a float charge instead of pushing through a full charge? My refrigerator is drawing almost 80 watts right now and yet the charge wattage indicator still says only 3 watts of incoming power.
 
What’s This Post About?
I got the portable, LiFePO4-based solar generator I wanted by combining an old-school Goal Zero Yeti 1250 with a Lion Energy Safari UT battery.

This is not the best system for everyone, but it fits my requirements almost perfectly. It’s also straightforward to achieve:
  • Buy a used Goal Zero Yeti 1250.
  • Buy a Lion Energy Safari UT LiFePO4 battery.
  • Replace the lead-acid battery with the LiFePO4 battery.
  • Enjoy your full featured, high capacity, portable LiFePO4 solar generator.
For those who want more of the story, read on.


Background

I wanted a portable, relatively large capacity, lithium-based solar generator that had room for expansion. In looking at the full-sized offerings on the market I found I didn’t really love the big Li-NMC systems. My concerns were fewer max capacity cycles, lack of easy expansion, and battery chemistry safety compared to LiFePO4. I looked to see if any vendors offered a LiFePO4-based system but didn’t find anything I liked. I figured I’d have to go the route of others and build my own portable system (I’m amazed at how cool the systems in Show and Tell are). Then I remembered a solar generator I had first looked at way back in 2012 but always dismissed as not truly portable: the lead-acid Goal Zero Yeti 1250.

Go here for Goal Zero Yeti 1250 info


The Conversion to LiFePO4
The Yeti 1250 is a monstrously heavy 103 lbs (46.7 kg) unit with a group 27 100Ah AGM lead-acid battery at its core. The good news is that Goal Zero designed this system to have a user-replaceable battery. The battery accounts for over 60 lbs of the Yeti 1250’s weight, so I thought if I found a LiFePO4 drop-in replacement that was light weight and could fit in the battery compartment I might have something to work with. (The original battery measures 12.9" x 6.8" x 8.7".)

Enter the Lion Energy Safari UT 1200. Coming in at 21 lbs and offering more effective capacity than the lead-acid it would replace, I figured it would make the Yeti 1250 light enough to lift and make it actually portable (where my definition of portable is that I can lift it myself and put it into a vehicle for remote use). The Safari UT physical dimensions of 10.2” x 6.6” x 8.8” seemed workable in theory. In practice, it fits and has worked great so far.

Replacing the battery was straightforward, and Goal Zero even provides a seven-step procedure in the user manual. Here’s a YouTube video of how to replace the battery.

After replacing the battery, the whole system weighs about 60 lbs.


Charging
  • The old Yeti 1250 has a 20A MPPT charge controller built in! And unlike the MPPT module Goal Zero sells now for their Li-NMC models, you can put 12V panels in series because the input is rated at 16-48V (the Yeti Lithium 25A MPPT module input is rated at 15-22V which means you will be putting your 12V panels in parallel).

    There are two types of charging ports, (2) 10A 8mm and a 20A Anderson power pole port for a combined input power rating of 240W.

    [The website (320W) and manual (240W) have conflicting information, so I contacted Goal Zero customer support to confirm what the actual max input wattage is. The answer is max input of 240W, regardless of whether that all comes in through the Anderson power pole input or split between that and the 10mm input ports.]

  • You can also use the chaining port (described below) to jack in whatever charge controller/charger you want. I use this to connect a Samlex 30A grid-power charger. I may also use it for a higher rated MPPT charge controller down the road.

State of Charge Monitoring
Note: I haven’t yet decided what I’m going to do long-term for state of charge monitoring since I assume the built-in monitor is calibrated for lead-acid. Stay tuned.

(Edit: Dec 21, 2019) First attempt at SoC monitoring is to use this Drok meter with hall effect sensor. (More details below.)

(Edit: June 9, 2020) The Drok is a bust as it does not provide accurate SoC. I'll work on a shunt-based solution.

Output Ports
  • 1200W continuous/1500W surge AC inverter (pure sine wave) with three outlets
  • 3 – USB (2.1A)
  • 2 – 6mm 12V DC (6A)
  • 1 – Cigarette lighter style 12V DC (10A)
  • 1 – Anderson power pole 12V DC (33A)

Expandability
The Yeti 1250 has a built-in chaining port (Anderson SB175 connector) on the back that allows users to add additional batteries in parallel. Perfect! I can attach more Safari UTs if I need to get more run-time, and since they only weigh 21 lbs a piece I can still load the whole setup into my SUV in pieces and reconnect at my destination. With the Anderson connector, adding or subtracting the additional batteries is a snap.

(Edit Mar 6, 2020) Example of chaining extra batteries can be seen in this post below.

Availability
  • Yeti 1250 – Find a used one on eBay. Goal Zero customer support told me that they have discontinued the Yeti 1250 (shortly after I bought a refurbished one from them).

  • LiFePO4 Battery – Buy a Lion Energy UT 1300 (or any LiFePO4 battery that fits the dimensions stated above. Or go the DIY LiFePO4 route).

    Note: Lion Energy discontinued the UT 1200 shortly after I bought a couple. Hmm, a pattern. The universe seems to be trying to tell me something. However, they are replacing it with a UT 1300 that is the same physical size, only 23 lbs, and reportedly will be 105 Ah (vs. 90 Ah for the 1200)

The Cost
Your mileage will likely vary from mine, but here it is for reference:

  • Yeti 1250 - $700 for an “open box” Yeti 1250 from Goal Zero. I was able to sell both the lead-acid battery, and the Yeti roll cart (you may want to keep this depending on your situation) which brought my cost down to $550.

    I’ve seen used Yeti 1250s sell on eBay for between $475-$650 recently.

  • Safari UT 1200/1300 – $650 for a UT 1200 from Costco’s recent clearance sale. This is an atypically low price, so you will likely spend closer to $800-900 for a battery that fits into the compartment.

  • Drok meter for SoC monitoring - $29 (Edit: June 9, 2020) Don't buy the Drok.

  • Chaining cable for extra battery capacity - $25 on eBay for a 2’ long 4 AWG cable: eBay chaining cable

Total cost for my base system: $1,200 $1229 (Edit: Dec 21, 2019)

For reference, that is virtually identical to a Goal Zero Lithium (NMC) Yeti 1000 w/MPPT module.
Note: Costco offering the UT 1300 @ 2 for $1400: https://www.costco.com/lion-energy-safari-ut1300-2-pack.product.100663833.html
 
One thing I am seeing now.... after the batteries have discharged to ~80% or so (via the battery's bluetooth app), the Yeti doesn't indicate charging more than 3 watts even though I have a the Yeti's wall charger brick plugged in and ~420 watts of panels connected (it is a cloudy day, admittedly, but I should be getting more than 3 watts from both sources combined). The battery display on the Yeti remains showing 100% completely full.

If the Yeti's internal charger doesn't know that the LFP batteries are low, will it stay at a float charge instead of pushing through a full charge? My refrigerator is drawing almost 80 watts right now and yet the charge wattage indicator still says only 3 watts of incoming power.
Haha. Ok, found the issue and it was a wiring fault, not the fault of the Yeti.

Happy 4th to all the US folks!
 
Not a bad price, if it will fit in the unit.
I checked the dimensions and it looks like it will. I think it's actually made to replace this size and capacity battery. Thanks!

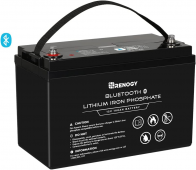
Renogy 12v 100Ah Bluetooth Smart Lithium Iron Phosphate Battery specs:
  • Rated Capacity: 100Ah
  • Nominal Voltage: 12.8V
  • Cycle Life(0.5C,25℃): 80%DOD 2000 Cycles
  • Maximum Continuous Charging Current: 50A
  • Maximum Continuous Discharging Current: 100A
  • Connection Method: Parallel
  • Storage Temperature: -13~149℉
  • Dimensions: 12.99 x6.77 x 8.43 inch
  • Weight: 28.7 lbs
 
Last edited:
I checked the dimensions and it looks like it will. I think it's actually made to replace this size and capacity battery. Thanks!

Renogy 12v 100Ah Bluetooth Smart Lithium Iron Phosphate Battery specs:
  • Rated Capacity: 100Ah
  • Nominal Voltage: 12.8V
  • Cycle Life(0.5C,25℃): 80%DOD 2000 Cycles
  • Maximum Continuous Charging Current: 50A
  • Maximum Continuous Discharging Current: 100A
  • Connection Method: Parallel
  • Storage Temperature: -13~149℉
  • Dimensions: 12.99 x6.77 x 8.43 inch
  • Weight: 28.7 lbs
That looks like an amazing battery for the price! Wish I hadn't purchased my second Ampere Time battery cause I'd way rather have that with bluetooth monitoring!
 
That looks like an amazing battery for the price! Wish I hadn't purchased my second Ampere Time battery cause I'd way rather have that with bluetooth monitoring!
I think so too. I just put in my order last night. It should arrive in about a week. I'll try to post when I get pics and updates on the upgrade.
 
I bought the Renogy LiFePO4 batteries and I like them. You can get the “Smart” version which is more expensive but it connects to Renogy One for cloud monitoring, or you can save some money and get the “non-Smart” version which still has Bluetooth support for a phone app for monitoring. I went with the latter and the app is pretty simple to use. Can’t do cloud monitoring from where my batteries are anyway.
 
I bought the Renogy LiFePO4 batteries and I like them. You can get the “Smart” version which is more expensive but it connects to Renogy One for cloud monitoring, or you can save some money and get the “non-Smart” version which still has Bluetooth support for a phone app for monitoring. I went with the latter and the app is pretty simple to use. Can’t do cloud monitoring from where my batteries are anyway.
I got the BT only version. I was thinking along the same lines as you were; I'd just use the built-in BT monitor because I'll be off grid when I'm using it anyway. The battery arrived today and I plan on doing the conversion this weekend if I have time.
 
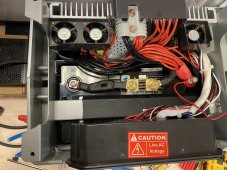
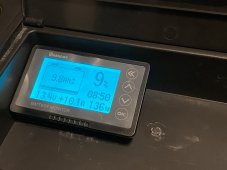
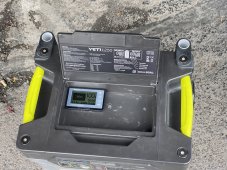
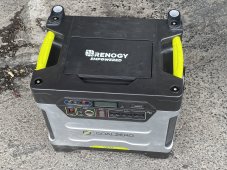
I finished my GZ Yeti 1250 conversion from AGM to LiFePO4. It went smoothly and I found that there was plenty of room in the housing for the shunt and extra wire. I put in a 500A shunt mainly because it was what was available on Amazon when I ordered it. I added an extra length of cable to connect the shunt to the negative pole of the battery. Everything fit well. Now I have BT monitoring of the battery and an accurate meter on the GZ itself.
Shunt in place with new wire between shunt and negative pole:
IMG_0480.JPG

Meter and the hole I made for the cable. The meter is held in place using low-profile velcro tape.
IMG_0483.JPGIMG_0488.JPGIMG_0494.JPG


Fully converted unit:
IMG_0492.JPG

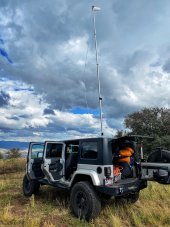
I made a trip into the backcountry to test some overlanding equipment . Here is a picture of the unit powering a WeBoost cell phone booster (only 20W). However, I also have a small microwave which powered just fine as well.
IMG_0496.JPGIMG_0497.JPG


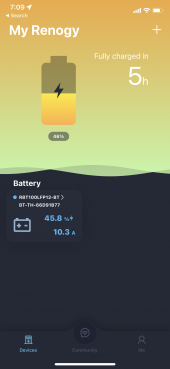
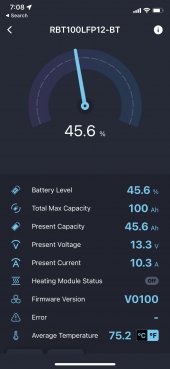
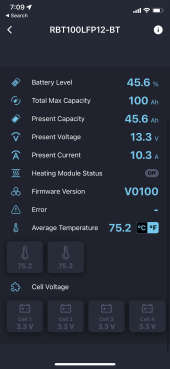
Remote BT monitoring software running on my iPhone. This was just after installation and before it had been fully charged.


IMG_0487.PNGIMG_0485.jpgIMG_0486.PNG
 
I finished my GZ Yeti 1250 conversion from AGM to LiFePO4. It went smoothly and I found that there was plenty of room in the housing for the shunt and extra wire. I put in a 500A shunt mainly because it was what was available on Amazon when I ordered it. I added an extra length of cable to connect the shunt to the negative pole of the battery. Everything fit well. Now I have BT monitoring of the battery and an accurate meter on the GZ itself.
Shunt in place with new wire between shunt and negative pole:
View attachment 105963

Meter and the hole I made for the cable. The meter is held in place using low-profile velcro tape.
View attachment 105964View attachment 105967View attachment 105968


Fully converted unit:
View attachment 105969

I made a trip into the backcountry to test some overlanding equipment . Here is a picture of the unit powering a WeBoost cell phone booster (only 20W). However, I also have a small microwave which powered just fine as well.
View attachment 105970View attachment 105971


Remote BT monitoring software running on my iPhone. This was just after installation and before it had been fully charged.


View attachment 105972View attachment 105973View attachment 105974
Awesome job! Thanks for sharing the conversion pics and the action shots. I hope you get many years of great use.
 
Awesome job! Thanks for sharing the conversion pics and the action shots. I hope you get many years of great use.
For the BT monitoring, which unit did you go for? I'm looking at adding to my Yeti 400.

did you ever look at MPPT for your 1250? i know were probably getting to the point where we are creating theseus's ship, where only GZ bits left are logic panel and faceplate.

Has anyone also added Qi charging to the USB circuit so it turns on when USB enabled? i know Yetis arent known for flat surfaces which lend themselves to being suitable for mobiles to lay on.
 
For the BT monitoring, which unit did you go for? I'm looking at adding to my Yeti 400.

did you ever look at MPPT for your 1250? i know were probably getting to the point where we are creating theseus's ship, where only GZ bits left are logic panel and faceplate.

Has anyone also added Qi charging to the USB circuit so it turns on when USB enabled? i know Yetis aren't known for flat surfaces which lend themselves to being suitable for mobiles to lay on.
The GZ1250 charger is an MPPT. For BT monitoring, the Renogy battery has it built in so you just pair your app to the battery when its setup. The more expensive Smart versions require a separate BT monitoring dongle and data cable that chains all batteries together. The only thing I added was the shunt and physical monitor which is required if you want accurate readings at the GZ without the app - the one that is built into the GZ no longer shows correct readings as it's calibrated to AGM. I think Qi charging would be awesome and easy to add as there is plenty of space inside the 1250.
 
The GZ1250 charger is an MPPT. For BT monitoring, the Renogy battery has it built in so you just pair your app to the battery when its setup. The more expensive Smart versions require a separate BT monitoring dongle and data cable that chains all batteries together. The only thing I added was the shunt and physical monitor which is required if you want accurate readings at the GZ without the app - the one that is built into the GZ no longer shows correct readings as it's calibrated to AGM. I think Qi charging would be awesome and easy to add as there is plenty of space inside the 1250.
ah apologies forgot the 1250 sported a MPPT, i have the smaller 150 and 400 which are AGM and are onboard PWM. My error. i was looking at options to utilise a side chain port (as they are not diode limited can input from extra cell or output to auxilary inverters etc) to allow me to squeeze a MPPT circuit inside somewhere as im aware of limitations on efficiency of the PWM.

I had seen the little BT modules on amazon that sit across the battery to "smart" the dumb AGM cells and report via ios / android apps.

im not quite yet ready for primetime LiFePo upgrade of the 400. but it would be good as the larger yetis are a pain to lug around with old lead tech inside.
I found on my 150 even the guess-o-meter went worse when i put a 15ah instead of a 14ah factory cell so the extra monitor sounds a good move on your upgrade.
 
Glad I found this forum. I have a spare Eco-Worthy 150a LifePo4 battery and was thinking of building a portable unit. Found a 1250 on the FM for $250, says new but needs a battery. I'm thinking of offering $200 and drop in the extra LiFePO4 battery with a 500a shunt and call it good.
 
I would personally use that safari battery with an all in one unit and call it a day. Mppt, pure sine wave inverter, ats, charger etc, for much cheaper. But I love the idea of hacking a goal zero. If you have one laying around collecting dust because the AGM failed, and you can get a LiFePO4 for cheap, you can toss it in there.
Thou this is an old post, glad I discovered it! I have an old 1250 with dying AGM battery that I was hoping to replace with one of this cheap chinese LFP ones. Wasn’t sure if the wall charger would be compatible to bring it up to a level where top-balancing by the BMS could occur. Is the wall charger going thru the regulator on PCB or directly wired to the terminals only restricted by a fuse? Why not use the Anderson input pole to plug a lithium specific wall charger? Glad to hear the MPPT charger allows higher voltage input from series configured solar panels, but is the charge profile compatible with LFP? What are pros and cons? I was also thinking to put a victron smartshunt right on top of the LFP battery for BT monitoring of SOC, instead of the built in display, but wasn’t sure if it would fit or if I was gonna have to drill holes in the case cover on the NEG terminal side for the wires. Any thoughts? Thanks in advance.
 
Glad I found this forum. I have a spare Eco-Worthy 150a LifePo4 battery and was thinking of building a portable unit. Found a 1250 on the FM for $250, says new but needs a battery. I'm thinking of offering $200 and drop in the extra LiFePO4 battery with a 500a shunt and call it good.
How did this work out for ya? Which shunt did ya end up using? Any issues with the wall charger?
 
What’s This Post About?
I got the portable, LiFePO4-based solar generator I wanted by combining an old-school Goal Zero Yeti 1250 with a Lion Energy Safari UT battery.

This is not the best system for everyone, but it fits my requirements almost perfectly. It’s also straightforward to achieve:
  • Buy a used Goal Zero Yeti 1250.
  • Buy a Lion Energy Safari UT LiFePO4 battery.
  • Replace the lead-acid battery with the LiFePO4 battery.
  • Enjoy your full featured, high capacity, portable LiFePO4 solar generator.
For those who want more of the story, read on.


Background

I wanted a portable, relatively large capacity, lithium-based solar generator that had room for expansion. In looking at the full-sized offerings on the market I found I didn’t really love the big Li-NMC systems. My concerns were fewer max capacity cycles, lack of easy expansion, and battery chemistry safety compared to LiFePO4. I looked to see if any vendors offered a LiFePO4-based system but didn’t find anything I liked. I figured I’d have to go the route of others and build my own portable system (I’m amazed at how cool the systems in Show and Tell are). Then I remembered a solar generator I had first looked at way back in 2012 but always dismissed as not truly portable: the lead-acid Goal Zero Yeti 1250.

Go here for Goal Zero Yeti 1250 info


The Conversion to LiFePO4
The Yeti 1250 is a monstrously heavy 103 lbs (46.7 kg) unit with a group 27 100Ah AGM lead-acid battery at its core. The good news is that Goal Zero designed this system to have a user-replaceable battery. The battery accounts for over 60 lbs of the Yeti 1250’s weight, so I thought if I found a LiFePO4 drop-in replacement that was light weight and could fit in the battery compartment I might have something to work with. (The original battery measures 12.9" x 6.8" x 8.7".)

Enter the Lion Energy Safari UT 1200. Coming in at 21 lbs and offering more effective capacity than the lead-acid it would replace, I figured it would make the Yeti 1250 light enough to lift and make it actually portable (where my definition of portable is that I can lift it myself and put it into a vehicle for remote use). The Safari UT physical dimensions of 10.2” x 6.6” x 8.8” seemed workable in theory. In practice, it fits and has worked great so far.

Replacing the battery was straightforward, and Goal Zero even provides a seven-step procedure in the user manual. Here’s a YouTube video of how to replace the battery.

After replacing the battery, the whole system weighs about 60 lbs.


Charging
  • The old Yeti 1250 has a 20A MPPT charge controller built in! And unlike the MPPT module Goal Zero sells now for their Li-NMC models, you can put 12V panels in series because the input is rated at 16-48V (the Yeti Lithium 25A MPPT module input is rated at 15-22V which means you will be putting your 12V panels in parallel).

    There are two types of charging ports, (2) 10A 8mm and a 20A Anderson power pole port for a combined input power rating of 240W.

    [The website (320W) and manual (240W) have conflicting information, so I contacted Goal Zero customer support to confirm what the actual max input wattage is. The answer is max input of 240W, regardless of whether that all comes in through the Anderson power pole input or split between that and the 10mm input ports.]

  • You can also use the chaining port (described below) to jack in whatever charge controller/charger you want. I use this to connect a Samlex 30A grid-power charger. I may also use it for a higher rated MPPT charge controller down the road.

State of Charge Monitoring
Note: I haven’t yet decided what I’m going to do long-term for state of charge monitoring since I assume the built-in monitor is calibrated for lead-acid. Stay tuned.

(Edit: Dec 21, 2019) First attempt at SoC monitoring is to use this Drok meter with hall effect sensor. (More details below.)

(Edit: June 9, 2020) The Drok is a bust as it does not provide accurate SoC. I'll work on a shunt-based solution.

Output Ports
  • 1200W continuous/1500W surge AC inverter (pure sine wave) with three outlets
  • 3 – USB (2.1A)
  • 2 – 6mm 12V DC (6A)
  • 1 – Cigarette lighter style 12V DC (10A)
  • 1 – Anderson power pole 12V DC (33A)

Expandability
The Yeti 1250 has a built-in chaining port (Anderson SB175 connector) on the back that allows users to add additional batteries in parallel. Perfect! I can attach more Safari UTs if I need to get more run-time, and since they only weigh 21 lbs a piece I can still load the whole setup into my SUV in pieces and reconnect at my destination. With the Anderson connector, adding or subtracting the additional batteries is a snap.

(Edit Mar 6, 2020) Example of chaining extra batteries can be seen in this post below.

Availability
  • Yeti 1250 – Find a used one on eBay. Goal Zero customer support told me that they have discontinued the Yeti 1250 (shortly after I bought a refurbished one from them).

  • LiFePO4 Battery – Buy a Lion Energy UT 1300 (or any LiFePO4 battery that fits the dimensions stated above. Or go the DIY LiFePO4 route).

    Note: Lion Energy discontinued the UT 1200 shortly after I bought a couple. Hmm, a pattern. The universe seems to be trying to tell me something. However, they are replacing it with a UT 1300 that is the same physical size, only 23 lbs, and reportedly will be 105 Ah (vs. 90 Ah for the 1200)

The Cost
Your mileage will likely vary from mine, but here it is for reference:

  • Yeti 1250 - $700 for an “open box” Yeti 1250 from Goal Zero. I was able to sell both the lead-acid battery, and the Yeti roll cart (you may want to keep this depending on your situation) which brought my cost down to $550.

    I’ve seen used Yeti 1250s sell on eBay for between $475-$650 recently.

  • Safari UT 1200/1300 – $650 for a UT 1200 from Costco’s recent clearance sale. This is an atypically low price, so you will likely spend closer to $800-900 for a battery that fits into the compartment.

  • Drok meter for SoC monitoring - $29 (Edit: June 9, 2020) Don't buy the Drok.

  • Chaining cable for extra battery capacity - $25 on eBay for a 2’ long 4 AWG cable: eBay chaining cable

Total cost for my base system: $1,200 $1229 (Edit: Dec 21, 2019)

For reference, that is virtually identical to a Goal Zero Lithium (NMC) Yeti 1000 w/MPPT module.
I’ve been driving around the US for a year with this setup and didn’t realize that apparently Im smarter than I look. ;)
 
Thou this is an old post, glad I discovered it! I have an old 1250 with dying AGM battery that I was hoping to replace with one of this cheap chinese LFP ones. Wasn’t sure if the wall charger would be compatible to bring it up to a level where top-balancing by the BMS could occur. Is the wall charger going thru the regulator on PCB or directly wired to the terminals only restricted by a fuse? Why not use the Anderson input pole to plug a lithium specific wall charger? Glad to hear the MPPT charger allows higher voltage input from series configured solar panels, but is the charge profile compatible with LFP? What are pros and cons? I was also thinking to put a victron smartshunt right on top of the LFP battery for BT monitoring of SOC, instead of the built in display, but wasn’t sure if it would fit or if I was gonna have to drill holes in the case cover on the NEG terminal side for the wires. Any thoughts? Thanks in advance.
I believe all your questions are answered between this thread and my other Yeti 1250 mod thread:

https://diysolarforum.com/threads/n...0ah-lfp-cells-in-a-goal-zero-yeti-1250.13600/
 
I believe all your questions are answered between this thread and my other Yeti 1250 mod thread:

https://diysolarforum.com/threads/n...0ah-lfp-cells-in-a-goal-zero-yeti-1250.13600/
Thank you! Didn’t see the other thread. Just bought me a PowerQueen 12V LFP 100Ah for just under $250 (before tax+free shipping) - that is just under $0.2/Wh, and even cheaper than like-for-like AGM replacement! And am gonna drop it in my 1250 with an inline Victron Smartshunt and consider the upgrade done! Just hoping the MPPT and wall chargers will be able to keep it topped off to at least 90% capacity, but I’ll use a borrowed 20A LFP wall charger as soon as I get the battery to fully charge it for the top-balancing before I drop it in the case. If this ends up working after a few months of testing, then I will buy more PowerQueen 100Ah batteries next summer (up to 4 in parallel) and have me a whopping 5KWh power bank to outfit my van for less than a grand! The 1250W inverter is more than enough to run maximum use case scenario for all appliances running all at once, including the fridge, diesel heater, device chargers and everything else at maximum load! I never understood why anyone would get a 3000W inverter that self-consumes lotsa background power where they’d never use anywhere near its full capacity! I have everything in continuous use wired to DC fuse box. Only my device chargers requiring 120V power is what I’d ever use the inverter for, so it is only turned on when we need to charge devices!
 
Last edited:

diy solar

diy solar
Back
Top