RoadTurtle
Solar Enthusiast
- Joined
- Mar 30, 2022
- Messages
- 367
Thank you to everyone who put up and answered my seemingly endless questions. This was an extremely steep learning curve, as I knew nothing about solar, and enough about electrical to make sparks happen. I was able to keep the 5th wheel operational with the two existing 100ah batteries and onboard charger, giving me flexibility to completely wire up the system, leaving my down time to a couple of hours.
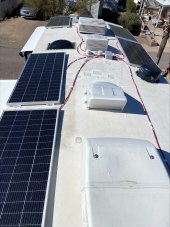
RV Roof and panels
Pretty easy to add two additional batteries, I'll see how this goes before I adding any more. As I mentioned above, can add two more panels, but not without compromise.
RV Roof and panels
- Three 24v 200w 1S3P panels on drivers side, with room for one more, but it will cover the bath sky light
- Three 24v 200w 1S3P panels on pass side, with room for one more, but it will cover fridge vent.
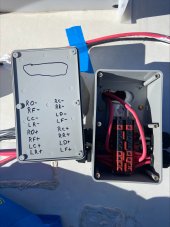
- Project box with combiner block to collect the two panels energy to send to SCC
- This is one of the aspects of the install I'm not 100% happy with. Box walls are too thick for the glands I installed and not as secure as I'd like
- I couldn't run the wire down as I had intended, leading to a few struggles.
- Panels pushed all the way to the outer edge to avoid shadows.
- Two SCC 100/50 each rated for 700w, so I'm slightly under amps, and adding another panel will put me slightly over
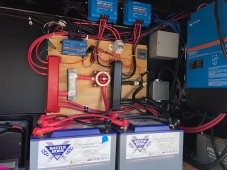
- Cerbo GX
- Having a slight issue with display flashing. Dragonfly Energy is strongly suspecting I have too much of a voltage drop with my USB extension cord. I'll work on either putting a power source closer to the display or a power only plug up front on the board
- Added 50a power inlet on the front of the trailer. Negative side to this, my hardwired EMS is bypassed as it's wired to the back power inlet.
- Front power inlet is power to Multiplus x2
- Multiplus output feeds the prewired ATS generator circuit
- This was done to avoid running two sets of wires to the front and then to the back of the 5th wheel.
- Smart Shunt
- 712 Display
- In retrospect, I didn't need to buy this, but had gotten when I originally installed the smart shunt
- Four 100ah 12v heated battleborn batteries.
- 600a Buss Bar.
- I would have loved to have a smaller buss bar, but every one I found was lower amp. These are actually pretty sweet with small connectors on the top and bottom too.
- 350a Shut off switch
- Solar disconnect
- 400a T Class fuse
- Marine grade wires from Battery Cable USA
- In general, wires are extremely well mfg, however I had two orders where they got the ends wrong
 I reluctantly gave them 3 star review, partially because they were so quick to send me correct wires.
- In general, wires are extremely well mfg, however I had two orders where they got the ends wrong
Pretty easy to add two additional batteries, I'll see how this goes before I adding any more. As I mentioned above, can add two more panels, but not without compromise.