Ok its a miracle - the battery arrived 2 nights ago and while the electrician flaked today, I decided to figure the last parts out on my own and got everything working properly and sealed. The mower works great again and I don't expect any future battery issues.
I removed the 4 x 12v 100ah Redodo LiFePo4 batteries I'd used for the past 6 months as the BMS eventually kept getting triggered despite not having any initial start-up surge issues when I first installed them. I paid $1000 for the 4 batteries about 6 months ago and now have them offered for $400 obo online locally to hopefully recoup some of the cost of swapping to the 48v Chins.
I got the 48v Chins with 500ah BMS surge from Amazon for $1100 delivered on Friday and hooked it up immediately upon arrival by using the simply twisting the end blue wire from the Charger Lockout box that had sheared off to another random wire hooked up to a positive battery terminal. The unit turned on and seemed to work perfectly. As as result, I knew the key would be to make that loose "charger lockout box" connection a solid one. As I have no experience with soldering and sleeving, even though it sounds simple, I asked an electrician to come do it right and he was slated to arrive today.
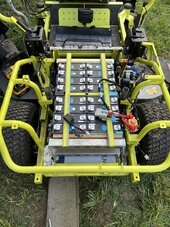
In the mean time, I bought some scrap wood to secure the battery to the tray. I'm not skilled so I wasn't able to build a fancy sealed box out of plywood and foam like some others on this forum - instead I just got some 1.25" square rods and some random scraps and materials from Home Depot. The Chins battery is rather tall so I couldn't put any foam underneath it but I also didn't want it sitting directly on the metal tray so I used a rubber spike welcome mat as my base layer, then secured the scrap wood on the sides of the battery with star screws and finally ran a strap the long way - its not pretty but it works and the battery is very stable on the tray:
View attachment 219279
My main issue was the blue wire from the charger lockout box as I had broken the Delphi bullet connector and cut off both ends. I discovered from this thread that I did not need to connect the Gray thermister wire from the charge port OR the blue one, I just needed to send a positive charge to the end of the blue wire coming from the little black plastic box. As the electrician did not show up, but I had purchased spare Delphi weatherproof bullet connectors from Amazon, I decided that I would try my luck at creating my own bullet connector from scratch. I had the 2 wires, the loose blue wire end from the box (which is 18 gauge) and the loose end from a red 18-gauge scrap wire that had a ring terminal on the other end. I followed a youtube video that instructed me to strip off 1/4" from each end, insert it into the silver metal pins, crimp the ends in 2 places, attach the black plastic housing and by my 3rd attempt, I got it done right and OEM-looking with a very solid connection:
View attachment 219281
From there, the rest was easy as it just required hooking up the main Anderson connector, the other part of the charger lockout box (red/yellow/black tri-wire with white plastic connector) and the chargeport blue connector and slid the tray back in fully:
View attachment 219282
I fired it up and it worked perfectly so I did a test mow and it performed flawlessly so I finally was able to seal everything back up. From the top, this is how far the Chins battery goes when pushed in all the way - the extra room allows the connectors to sit on the side of the unit instead of the top:
View attachment 219283
I sealed it all up and tested it again and everything works fine. In retrospect, the work needed was very simple however I had zero expertise with anything electrical and did not want to guess and make things worse which is a specialty of mine. Ultimately, this forum thread was invaluable and I believe I eliminated all future BMS issues by swapping the 12v lithium batteries for the single 48v Chins. And if for some reason it fails again, at least next time I I won't feel so helpless and lost as I became quite familiar with both the unit and processes involved and no longer feel like its complicated at all. Anyway fingers crossed and this is how she looks now, all put together and happy again - thanks to everyone here for their help and contributions!
View attachment 219285